
[ I have an entire video tutorial on how to compress video for the web. To learn more, click here. ]
Compressor scares a lot of people because video compression can be very complex. However, if all you want to do is compress a video for YouTube, Compressor makes the process very easy; especially if you plan to post more than one movie.
Let me show you how.
THE SECRET
The trick to compressing for YouTube, and many other social media sites, is to remember that they ALWAYS recompress your video into their own format. This means that you need to send YouTube a compressed file which is designed to be compressed again.
We do this by creating an intermediate movie with a high data rate. While you could build your own compression setting file, it is faster and easier to just work with the YouTube settings built into Compressor. That way, we don’t need to understand anything about data rates or compression to make our movies look great.
THE OUTLINE
Start Compressor.
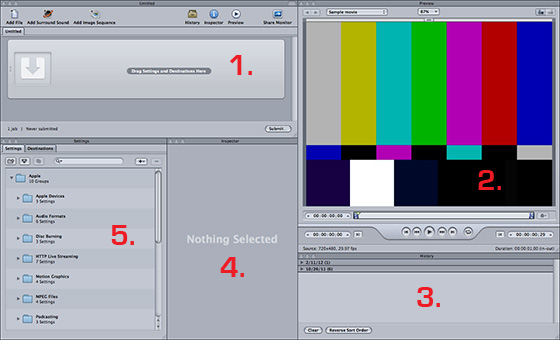
There are five windows in Compressor:
1. Task. Where movies go to be compressed.
2. Preview. Where you can preview your movie.
3. History. Where you monitor compression, or locate past jobs.
4. Inspector. Where you make changes to settings.
5. Settings. Where setting and destination files are stored.
The workflow is simple:
1. Create a new batch using a template
2. Import the movie you want to compress
3. Apply a destination setting
4. Enter your Youtube account and movie information
5. Compress
At which point, Compressor will compress your file and automatically transfer it to YouTube – marking it private, if you want, so you can review the results before making it public. Plus, it stores the compressed movie in a folder on your hard drive so you review it, file it, or share it to another site.
TAKING IT STEP-BY-STEP
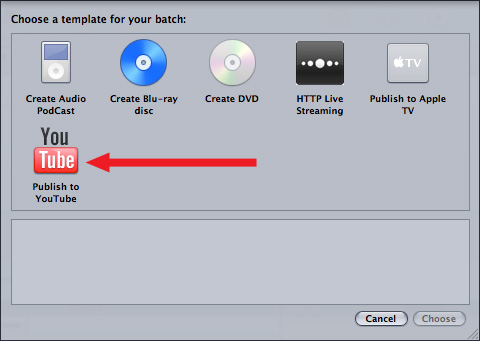
Select File > New Batch from Template. The template window opens. Click Publish to YouTube, then click Choose.
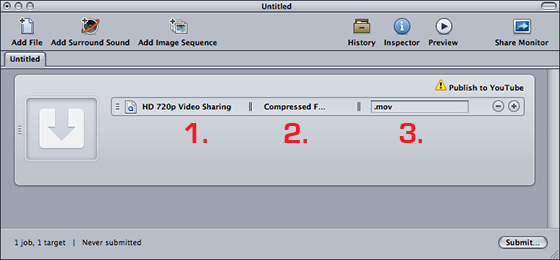
This loads a new Task into the Task window, and automatically configures it to compress your file for YouTube. There are three settings applied to each file you want to compress:
1. Compression setting
2. Destination
3. File name
Also, notice up in the top right corner it says Publish to YouTube. This is a Job Action, which is something that is performed when compression is complete.
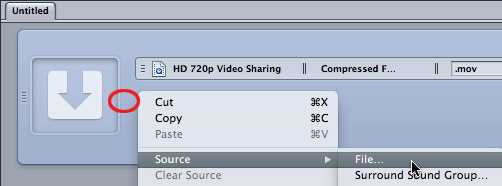
Select the Task that contains the settings and do one of the following:
* Type Shift+Command+I
* Select Job > Source > File
* Right-mouse-click and select Source > File
Select the movie you want to compress and click OK.
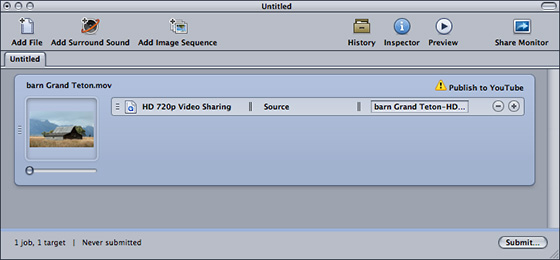
You movie is now added to the task. The compression setting is correct for YouTube and the file name of the compressed file defaults to the file name of the source file.
However, by default, the compressed file is stored locally on your system in the same location as the original movie. While this isn’t a bad thing, I prefer having all my compressed files stored in the same place. So, I created a custom destination for all my compressed files. Changing destinations also prevents conflicts where the compressed file has the same name as the source file.
CREATE A CUSTOM DESTINATION
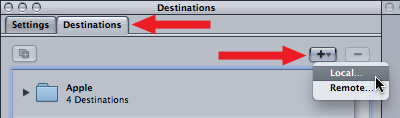
To create a new destination, click the Destinations tab in the Settings window.
Then, click the Plus button to create a new Destination. There are two types:
* Local
* Remote
Local is a folder on one of the hard drives attached to your computer.
Remote is either an FTP or iDisk server.
For maximum speed, I always save my compressed files locally, then transfer them to a remote server later. So, select Local.
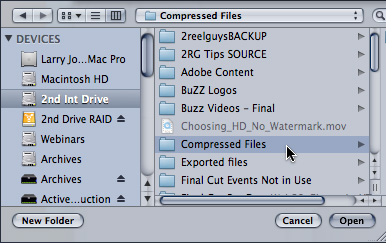
On my second drive, prior to starting Compressor, I created a folder called Compressed Files. We’ll use this for our example, but you can make any folder on any hard disk a custom destination.
Select the folder you want to set as a custom destination, then click Open.
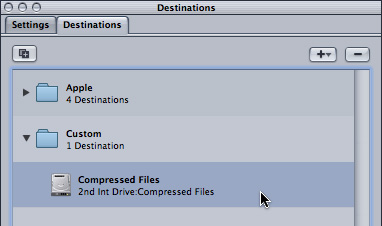
The new custom destination is now available in the Destinations tab. If you don’t see it, twirl down the Custom folder to display its contents.
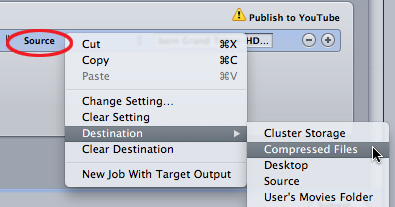
Right-mouse-click on the middle setting (Source) and change it to the new destination; in my example, Compressed Files.
Although this sounds like we are taking a lot of time and steps to get this file compressed, you only need to create a custom destination once.
CHANGE A PREFERENCE
In fact, if you change a preference setting, Compressor will automatically apply this custom destination to all your compressed files so you never have to think about this again.
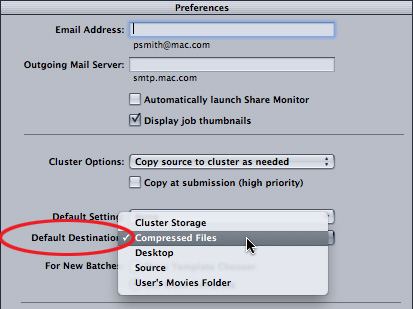
Select Compressor > Preferences and change the Default Destination to Compressed Files, or whatever you called your local folder. Now, whenever you import a file, Compressor will automatically set the destination to this folder.
PUBLISH TO YOUTUBE
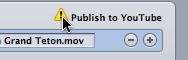
See that yellow warning in the top right of the Task Window? It means that Compressor needs a bit more information before it can publish your file to YouTube.
This, too, only needs to be entered once.
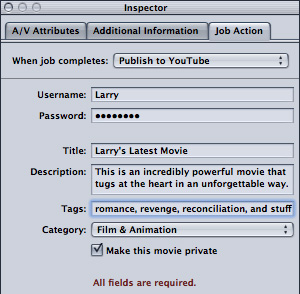
Click the yellow warning in the Task window, then, down in the Inspector, click the Job Action tab.
Enter your YouTube User Name, password, and information about your movie. Compressor will remember your user name and password whenever you compress another movie for YouTube.
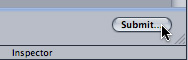
You’re now ready to compress. Click Submit, in the low-right corner of the Task Window.
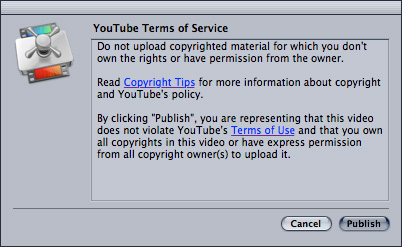
Accept the YouTube Terms of Service by clicking Publish.
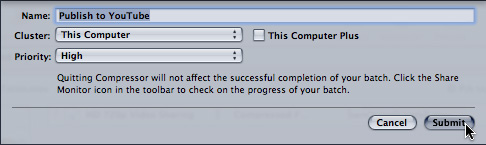
And click Submit once more to start the compression process. (If you are wondering why you click Submit twice, this second option allows you to send the file to a compression cluster or compress on your local system. Compressing locally is the default.)
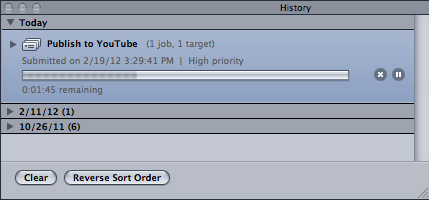
A thermometer appears in the History window that shows the status of your job. To continue monitoring your job, leave Compressor open until compression and file transfer are complete.
SUMMARY
Once you’ve set a custom destination as a preference and entered your YouTube account information, the process of compressing files for YouTube is amazingly quick — less than a minute from import to start of compression.
Plus, by starting simply with templates and learning more about the power of Compressor, you will be able to quickly graduate to more complex projects like adding watermarks, timecode, cropping, scaling, and audio effects to your projects.

2,000 Video Training Titles
Edit smarter with Larry Jordan. Available in our store.
Access over 2,000 on-demand video editing courses. Become a member of our Video Training Library today!
Subscribe to Larry's FREE weekly newsletter and
save 10%
on your first purchase.
32 Responses to Compressor 4: Compress Video for YouTube
Newer Comments →-
 Kent Jakusz says:
February 21, 2012 at 9:23 am
-
 Larry Jordan says:
February 21, 2012 at 9:36 am
-
 Kai says:
December 31, 2012 at 4:54 pm
-
 Larry Jordan says:
January 1, 2013 at 6:02 pm
-
 Jane Duncan says:
January 2, 2013 at 9:15 am
-
 Larry Jordan says:
January 2, 2013 at 9:17 am
-
 Will the Thrill says:
April 22, 2013 at 3:15 pm
-
 Will the Thrill says:
April 22, 2013 at 3:19 pm
-
 Larry says:
April 22, 2013 at 9:02 pm
-
 Will the Thrill says:
April 23, 2013 at 7:42 pm
-
 Sofia says:
May 30, 2013 at 10:55 am
-
 Larry Jordan says:
May 30, 2013 at 11:01 am
-
 Sofia says:
May 30, 2013 at 11:21 am
-
 Larry Jordan says:
May 30, 2013 at 11:35 am
-
 Sofia says:
May 30, 2013 at 12:42 pm
-
 Chris says:
June 1, 2013 at 5:42 pm
-
 Larry Jordan says:
June 1, 2013 at 5:53 pm
-
 Roger says:
June 20, 2013 at 3:19 pm
-
 Larry Jordan says:
June 20, 2013 at 3:45 pm
-
 Roger says:
June 20, 2013 at 4:56 pm
-
 Larry Jordan says:
June 20, 2013 at 5:00 pm
-
 Roger says:
June 20, 2013 at 5:12 pm
-
 Larry Jordan says:
June 20, 2013 at 5:38 pm
-
 Roger says:
June 20, 2013 at 5:23 pm
-
 Larry Jordan says:
June 20, 2013 at 5:37 pm
-
 Roger says:
June 20, 2013 at 10:52 pm
-
 jesse says:
September 21, 2013 at 7:05 pm
Newer Comments →Hi Larry great article.
What is the difference in the published video as seen on YouTube if you use FCPX to publish directly or Compressor 4?
Thanks
Kent
In terms of the image, publishing thru FCP X or Compressor should be the same.
However, Compressor allows you to modify the final version – watermarks, burned in timecode – using filters that aren’t easily available through FCP X.
Larry
Yes in terms of quality does compressor improve the quality of the video? WIll compressor fix the fuzzyness in the backround of my videos?
Compression – the process of making a file smaller – will not fix quality. Unless you are careful, it always makes the quality worse.
Our goal, in compression, is to make the file as small as possible, while doing as little damage to the image quality as possible.
Larry
Is there any way to use the YouTube preset in Compressor without automatically publishing to YouTube? In my workplace I do
not have access to our YouTube password. The workflow necessitates sending the file to my supervisor first.
Jane:
Absolutely yes.
Use the Compression preset and set a custom Destination to a local hard drive or your server. This is what we do here all the time.
Larry
hi Larry, I thought I followed the instructions on the webinar to compress to youtube a HD video from FCPX using compressor 4. But the job just gets slower and slower. I’ve tried it a few times. Currently after 18 hours its 39% complete with another 28 hours to go! The vid is 28 minutes long consisting of two talking heads on a hark background. We do display a dozen pnf files with Ken Burns effect. I have an iMac with 8GB of Ram. Here’s my Compressor setting:
Name: Web compress with filters no TC
Description: 1280 x 720p mono audio
File Extension: mp4
Estimated size: 2.37 GB/hour of source
Audio Encoder
Sample Rate: 32.000kHz
Channels: 1
Bits Per Sample: 16
AAC encoder quality: high
Data rate: 64 Kbps
Video Encoder
Width: 1280
Height: 720
Pixel aspect ratio: Square
Crop: None
Padding: None
Frame rate: 29.97
Frame Controls: Automatically selected: Off
Codec Type: H.264
Multi-pass: On, frame reorder: Off
Pixel depth: 32
Spatial quality: 75
Min. Spatial quality: 75
Key frame interval: 30
Temporal quality: 75
Min. temporal quality: 75
Average data rate: 5.2 (Mbps)
Video: H.264 baseline profile
Hinted for streaming server with
packet size: 1450 bytes
and packet duration: 100 milliseconds
Enhanced Podcast: Off
Color Correct Midtones
Red: 3.000
Green: 3.000
Blue: 3.000
Gamma Correction
Gamma: 1.050
Compatible with Mac and PC
sorry for the typos: ‘dark’ background, and its a dozen png files with Ken Burns.
I used Mpeg Streamclip to get it up and this is the vid: http://youtu.be/BIlUhVBslgc
Will:
There’s nothing here that jumps out at me – and I looked at the movie, it should compress in a couple of hours or less.
Turn OFF Multi-pass. Set it to Single pass. See if that makes a difference.
Larry
Yes, overnight it finished in 4 hours. It does look better than what Mpeg Streamclip produced. I’m on an iMac 2.66Ghz Intel Core i5 with 8GB of Ram. It appears with Multi-pass turned ON, clips under 9 minutes will complete, otherwise it will loop ad-infinitum. The same is true of Mpeg if you check-off Multi-pass for HD video, that is, don’t use Multi-pass for HD.
Hello!
Your website is amazing. Why have not here in Brazil!
I having problem when i try to share to youtube or any destination direct of FCP X 10.6, they always crash. (only works when i export a m4a file, only audio)
And now when i try to compress using compressor the process never start.
Can you help me plase?
Sofia:
Don’t export direct to YouTube from FCP X. Create a master file from FCP X, compress for YouTube in Compressor, then use a web browser to send to YouTube. I’ve found this much more reliable.
Also, read this article: http://www.larryjordan.biz/fcpx-5-export-tips/
Larry
Ok, but even when i try export a master file, the process sudeenly stop. The same happend with video.
Hmmm… in which case, you have something more seriously wrong.
Read this article: http://www.larryjordan.biz/five-step-trouble-shoot/
Larry
I restart my imac in safe mode and appears working! Im waiting export 600MB…
Uhuuuu finally!!
Thaks Larry!!
Hi Larry,
i would be very grateful for some help on saving videos and blue ray dvds to my external hard drive for playback through my ps3.
…given those conditions..what conversion software would you use?
Thank you
Chris
Chris:
Playing Blu-ray DVDs on a Mac is a problem. You’ll need third party software and a Blu-ray player. Bruce Nazarian has recommended Blu-Stor drives to me in the past, but I’ve never used a Blu-ray device, so I don’t have a personal opinion.
As for Videos, saving it as an MPEG-4 file, using H.264 as the compression codec should work. As always, create a test file before the audience shows up.
Larry
Hi Larry,
This is excellent stuff thank you!
Question: I manage multiple youtube accounts for different clients. Is there a way to create multiple youtube profiles/templates with their different logins to speed up uploading to the various accounts?
Roger:
Yes. All you need to do is create a separate compression setting for each YouTube account, then change the log-in information in each setting. In other words, one setting for each YouTube account.
Larry
Awesome stuff Larry, thanks for the quick reply.
Second Question: Can I export to Youtube at 1080p? I only see option for 720 currently.
Roger:
I wouldn’t bother. Most monitors don’t display a full 1080p image, and the bandwidth requirements are such that playback quality is compromised. Stay with 720p for the web, at least for now.
Larry
Appreciated on the practicality but is it technically possible in Compressor?
Totally possible. Leave Geometry > Dimensions set to 100% of source.
Larry
When I manually update a file after compressing it with the Youtube Compression Template setting Youtube displays this warning during the upload:
“For better results, adjust your Quicktime settings to prepare videos for internet streaming. For more information, visit our Help Center.”
On that page they give this recommendation:
“Video settings
Compression Type: H.264
Frame Rate: 30 is preferred. 23.98, 24, 25, 29.97 are also acceptable.
Data Rate: Automatic
Key Frames: Automatic
Frame Reordering: Unchecked
Audio/Sound settings
Format: AAC
Click Show advanced settings and choose Constant Bit Rate as encoding strategy
Other settings
Size: Choose the original size of the video
“Prepare for Internet Streaming”: Fast Start”
Should we be updating the Compressor template settings?
These settings seem fine. You’ll find most of them in the Encoding tab, with the Geometry tab controlling size in the Dimensions setting.
Larry
I am having the same problem with Compressor that I had with FCPX when trying to upload to Youtube, the connection keeps timing out. I have instead moved to using compressor to make the compressed file and then manually uploading to Youtube. This seems to be best for setting up the youtube post settings as well.
Larry I use you a lot to solve my FCPX problems and such but this time you were crazy clutch!! step by step instructions that were easy to follow and the screen shots were a must! Thanks Larry