
[ To see how Compressor works, check out this step-by-step video training. ]
Recently, I received a variety of emails from folks having grayscale or color problems when compressing files using Compressor 4 and H.264. Their images were looking dark, or washed out.
If you are looking for ways to improve your images when they get compressed, this article can help. However, this is an intermediate article. If you are new to Compressor, or compression, this will seem a bit daunting; however, the results should be worth the work. (With video compression, every compression project is different and there is no one perfect compression setting. That would be too easy!)
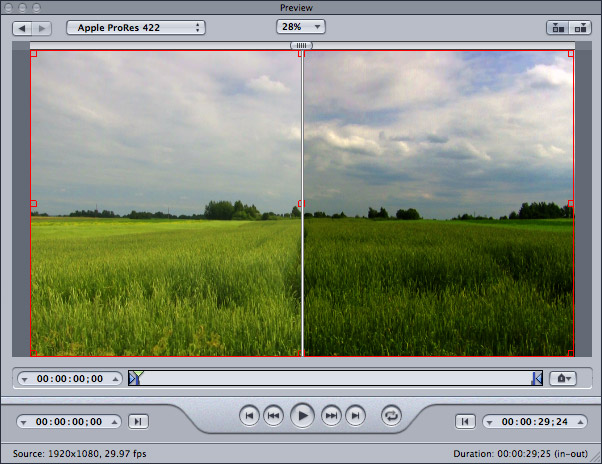
This image is a mock-up, but it illustrates the problem. The Before image, on the left, is lighter than the After image, on the right.
THE PROBLEM
The problem, in some cases, is caused by the H.264 codec that Apple ships with Compressor. I have found, in my own work, that this codec tends to wash out colors and modify the gamma (gray scale) values of an image.
I’ve noticed this problem in both Compressor 3.x and 4.x. Sometimes, these changes are not visible enough to care about. Other times they are.
OPTIONAL SOLUTIONS
There are several options to fix this. First, is to use other software for video compression. Alternatives are:
In addition to these, there are many others to choose from. However, if you are working with Final Cut, the benefits of using Compressor often outweigh the image problems. In which case, we need to find a fix.
CHANGE FILTER SETTINGS
If I know I need to use the H.264 codec for compression, I will always add two filters to compensate for the image changes.
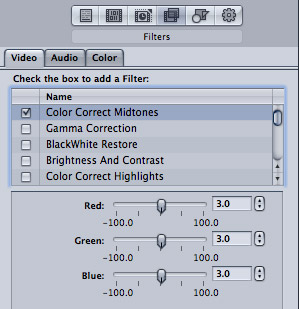
In the Filters section of the Inspector, I will add the Color Correct Midtones filter, then boost the Red, Green, and Blue channels by 3.0. What this does is increase color saturation without adding any color casts.
While we can also alter color settings for highlights and shadows, the “sweet spot” for color correction is the midtones. For this reason, I only add this one filter to adjust for color.
NOTE: While there is a long technical explanation behind this, think about a grapefruit. The shape of the grapefruit represents your color space. White is at the north pole, black is at the south pole. Saturation is determined by the amount of horizontal distance from the center of the grapefruit to the edge. Clearly, you have more room to move in the middle (Midtones) than you do at the poles (highlights and shadows).
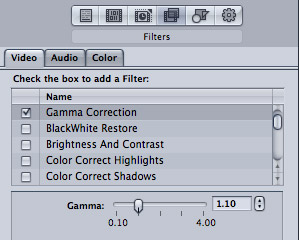
Next, I add Gamma Correction. This adjusts the gray-scale value of the midtones. Here, I’ll add a setting between 1.05 and 1.10. To me, this adds a bit of richness to the image during compression.
These settings generally work fine and I use them in many of my projects.
PLAN B
However, another way to solve this issue is to change the codec from H.264 to X.264. X.264 is the open source version of H.264. They are fully compatible and interchangeable.
I’ve found that the X.264 codec delivers great looking images, at equal or greater compression speed, to H.264, without needing to add compensating filters. In some cases, you may see slightly improved file size.
Best of all, it’s free.
INSTALL THE CODEC
To get started, you need to download and install the X.264 codec. Be sure to download version 1.2.27 or later. There are many earlier X.264 versions which won’t work with later versions of the Mac OS. You can find this in a variety of places, here’s one: http://www.macupdate.com/app/mac/24173/x264encoder
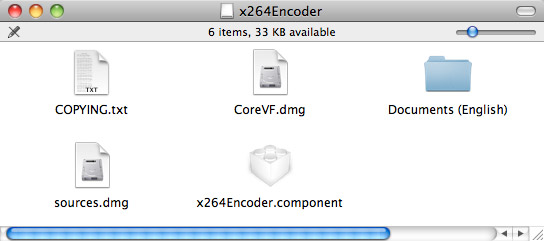
Once the DMG file downloads, double-click it to uncompress the components. The x264Encoder.component is what we need to install, but, before you do, open the Documents (English) folder.
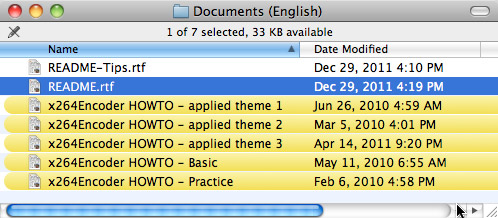
This files – especially the README.rtf – will tell you a lot about how to really optimize this filter. (Don’t panic if this starts to get really complicated. You don’t need to know all of this to get started.)
To install, open your boot drive (generally called Macintosh HD) then open the Library folder.
NOTE: This is NOT the Library folder in your Home directory.
Open the Library folder, then scroll down until you find the QuickTime folder.
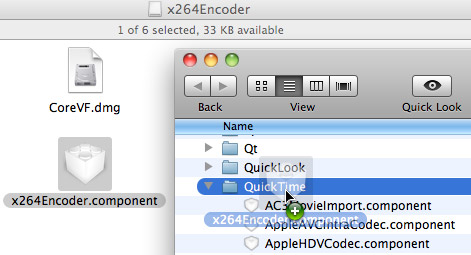
Then, drag the x264Encoder.component file into the QuickTime folder.
NOTE: Be careful to put this into the QuickTime folder. Dropping it by accident into either the Qt or QuickLook folders is gonna cause problems.
Once the component is installed, close the folders. You don’t need to restart your system for this to work.
NOTE: You must install this Encoder before starting Compressor.
USING THE CODEC
Installation is a one-time effort. After that, we can turn our attention to Compressor. Start by opening Compressor. (These instructions work for either Compressor 3.x or 4.x.)
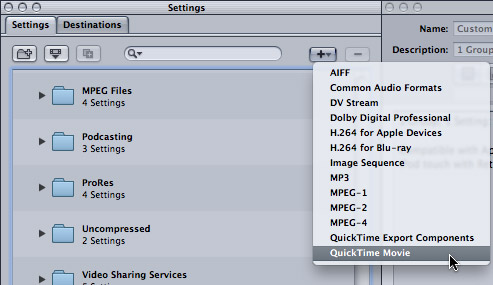
Next, create a new QuickTime compression setting by clicking the Plus key. I won’t go through all the settings, as I’ve written dozens of articles about Compressor – you can find them here: Click here
Select QuickTime Movie, because this allows us to change the codec.
NOTE: Once you’ve created a QuickTime movie, you can use QuickTime Player 7 to export it into an MP4 movie, without recompressing the file. I use this technique for many of my training movies.
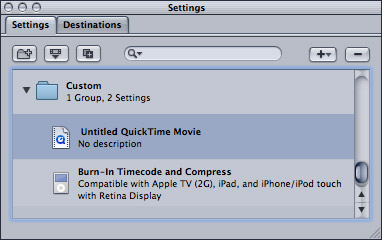
Select the new Setting in the Settings tab – it will be called Untitled QuickTime Movie – to open it into the Inspector. Click the Encoder icon (second from left, just below the Description field).
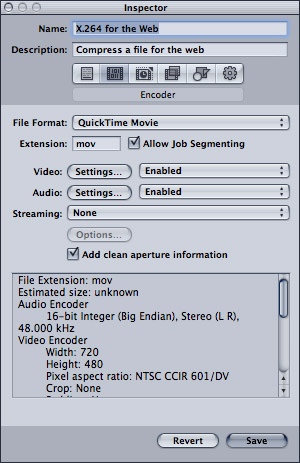
Give the file a name and description.
NOTE: X.264 and H.264 should only be used when creating files for the web. If you plan to edit the resulting file, convert it to ProRes instead. AVCHD files compressed into H.264 for editing will look just awful.
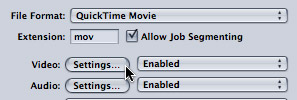
Click the Settings button next to Video to open the Compression Settings window.
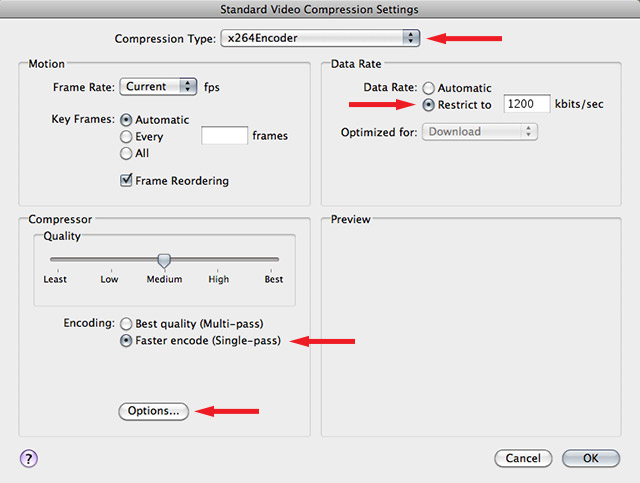
At the top, set the Compression Type to x264Encoder.
If you set Data Rate to Automatic, the Quality slider can be used. If you set the Data Rate to Restrict to, you need to then enter a number for the data rate and ignore the Quality slider. I always set a data rate, and here, I’m using 1200 kbps.
The developer of this codec provides the following compression suggestions:
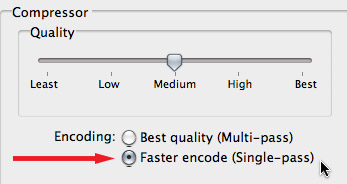
Click the Encoding radio buttons to switch between Multi-pass and Single-pass.
Click the Options button, below the Compressor Quality setting, to display a HOST of other options. Frankly, this whole screen scares me. Don’t touch nothing here!

Except, to turn on CRF, click the Flags tab and check the CRF checkbox. Look around if you like, but don’t change anything else. Click OK when you are sufficiently impressed.
Then, in the encoding window, click OK.
NOTE: I compressed the same video with CRF on and off and didn’t notice any difference. In both cases, I compressed 720p HD video using a 1200 kbps rate.
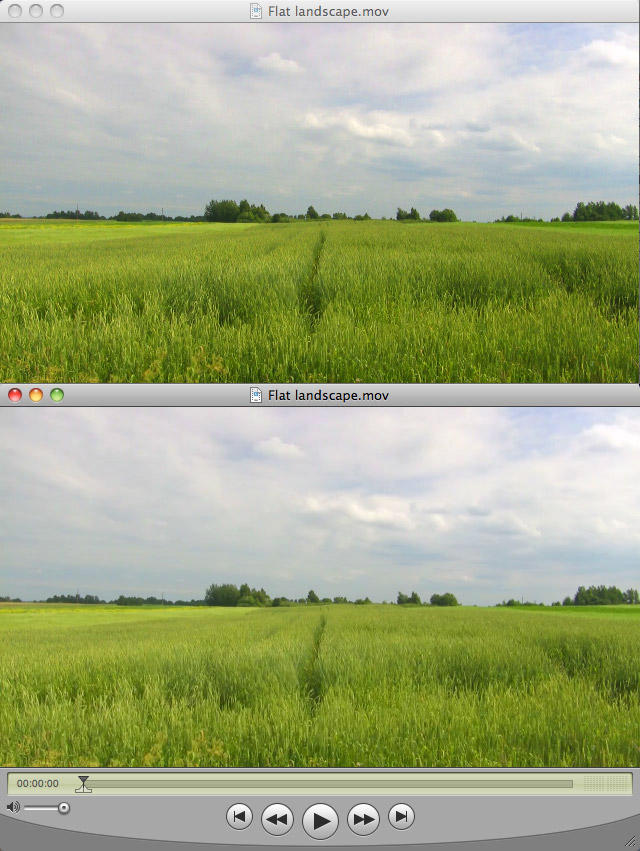
Here’s the final result. The Source is on top and the Compressed version is on the bottom. (I encoded it as single-pass, CRF turned on.) In this screen shot, both images are reduced to about 25% of normal size.
Try this yourself. Start by not changing the CRF. See if you like the results. Then, turn CRF on and see if anything improves. Great compression is a matter of making small changes and watching the results. Now, you have another tool you can use to improve your work.
2,000 Video Training Titles
Edit smarter with Larry Jordan. Available in our store.
Access over 2,000 on-demand video editing courses. Become a member of our Video Training Library today!
Subscribe to Larry's FREE weekly newsletter and
save 10%
on your first purchase.
42 Responses to Compressor: X.264 to Improve Video
Newer Comments →-
 William Hohauser says:
December 31, 2012 at 9:15 am
-
 Larry Jordan says:
December 31, 2012 at 10:19 am
-
 John says:
December 31, 2012 at 11:56 am
-
 William Hohauser says:
January 3, 2013 at 8:51 am
-
 Josiah says:
January 3, 2013 at 5:27 am
-
 Larry Jordan says:
January 3, 2013 at 7:39 am
-
 Josiah says:
January 8, 2013 at 12:50 am
-
 William Hohauser says:
January 3, 2013 at 9:05 am
-
 Alessandro Di Nardo says:
February 8, 2013 at 10:29 am
-
 Mike Janowski says:
March 21, 2013 at 8:54 am
-
 Chris S. says:
December 13, 2013 at 9:00 am
-
 Larry says:
December 13, 2013 at 9:49 am
-
 Gerry Fraiberg says:
April 21, 2013 at 2:50 pm
-
 stu aull says:
April 23, 2013 at 8:36 pm
-
 Larry Jordan says:
April 23, 2013 at 10:49 pm
-
 stu aull says:
April 23, 2013 at 8:45 pm
-
Forget about WebM | WELLINGTON ROAD Pictures Blog says:
June 17, 2013 at 6:59 am
-
 James Wages says:
June 30, 2013 at 10:20 pm
-
 Laura Harvey says:
January 16, 2014 at 3:17 pm
-
 Larry Jordan says:
January 16, 2014 at 5:00 pm
Newer Comments →Certainly some interesting information here and it’s prompting me to try x264. There are a couple of questions I have which you might be able to answer. What is CRF? And why is frame reordering good for computer playback but not mobile devices and is this only really applicable to interlaced source material?
William:
Good questions – and I don’t know the answer to either of them. Perhaps another reader does.
Larry
This is from the x264Encoder HOWTO document in the included documentation folder:
-crf (–crf)
Rate-Preserving method VBR mode (Constant Rate Factor). Different from quality-preserving method VBR mode (constant quality), QP value will vary in each frame. crf will prevent large bit rate fluctuations caused by complex images. One pass only, easy use, and best solution for Mac/PC playback.
Wow, and in English? I take it that this function reduces large bit rate fluctuations or is it just CBR in another terminology?
Hi!
This looks pretty cool, I’ll be producing videos for the web pretty soon so will have to give it a try!
One question though, would anyone here know if sites such as Vimeo, YouTube, etc. would accept a video with this codec? I know it’s just a variation of the H.264 codec which those sites accept, but pays to make sure…
Yes. And you can always submit a test file, just to be sure.
Larry
Thanks Larry, will do! 😉
I am in the process of submitting a large number of files to a VOD supplier and I found that their video server is very sensitive to the embedded audio not the video. I have yet figured out why but making a custom h264 file in Compressor, even with what I think are identical audio settings to Apple’s supplied presets, causes the downloads to not have any sound. When I use one of the presets for YouTube or Vimeo in Compressor, it works fine. Files made with the Turbo h264 encoder hardware USB stick work OK as well. The VOD company can’t figure it out since the files play OK in their offices but not over the internet. Regardless, I had to re-upload about 8 hours of material but I now have the process down for the next 100 hours of material.
Great, I will try this.
Have you a similar article to encode for DVD AVCHD and or Blu Ray.
Thanks for your great work Larry
So Larry, in this article, you state; ” X.264 is the open source version of H.264. They are fully compatible and interchangeable.”
And, since Apple’s implementation of h264 has some obvious flaws…why would you ever use it, and not just convert completely to X264?
Hi Mike!
Good question. To give the simple answer: Once you’re aware that there’s an alternative, there ISN’T any reason to use h264.
Without getting overly technical this is somewhat analogous to the LAME method of encoding for mp3 files. Many people don’t realize that not all mp3 encoders are created equal and that the mp3 encode you get from, say, ripping a music track to mp3 @ 192kbps from within iTunes will not be of the same quality as an mp3 encode you get from, say, ripping that same music track to mp3 @ 192kbps in a GUI using LAME (i.e. foobar2000, XLD, etc.).
As far as why Compressor (or in the above analogy, iTunes) would employ an inferior encoder my guess would be that it has something to do with licensing (http://x264licensing.com/faq) (or maybe to have greater control over the ecosystem of updates?), but if anyone has keener insight into this I’m very curious myself.
Um… anyway, hopefully that helps a little? I was hoping not to get too technical, but it looks like I did get wordier than I thought I would.
Chris & Mike:
I am a fan of X.264 – but would not go as far as Chris recommends. In my experience, I’ve found that H.264 and X.264 yield slightly different results. Sometimes H.264 looks better, sometimes X.264 looks better. I would not describe either of them as “inferior” or “superior”.
Keep in mind that Apple supports using both codecs in Compressor – so you can use one, the other, or both.
Larry
Good article with very helpful information.
I’ve been using DV Kitchen for a few years with excellent results for my YouTube and Vimeo uploads. One nice thing is it lets you test just a few seconds before compressing the whole video. I’ve never had a problem compressing to x264 with DV Kitchen.
But you’ve shown us a great way to improve on Compressor by adding the free x264 codec.
Thanks for sharing.
hmmm.
Installed per directions.
in Compressor 3, selected the newly-minted codec for _several_
30 sec video clips (one at a time to experiment).
Each time, the conversion fails.
Compressor says:
“Failed: codec not installed”
Quite/restart Compressor (not CPU, per instructions). no help
x264 Codec is present in Library/Quicktime folder.
Inspector window in Compressor:
“codec Type: x264 encoder”
Codec is listed in choices under Video Settings/Options/Compressor Type
???
Stu:
Try restarting the computer. Codecs are fairly deep code and restarting may be helpful. ALSO, make sure the version of the codec you are using is compatible both with your OS and Compressor versions.
larry
Follow up-
Did the same as above IN QTPro (where I do most of my h264 conversions, etc anyway)
x264 Codec shows up and encodes just fine!
huh.
[…] 1) I used x264 in Compressor by adding the x264 component to the Quicktime components in Library. Larry Jordan has a nice explanation of how to do this. 2) For most of the HD videos, I created half-size videos […]
Since YouTube will encode our videos again after upload, should we use “Single pass + CRF” or “Multipass + Data rate”, or does it matter at all? (Obviously, I am asking this to determine what the exact settings are BEFORE UPLOADING to get the absolute best result after YouTube re-encodes the video.)
Furthermore, it’s important to note that YouTube wants “Frame Reordering” to be turned OFF on videos you upload:
http://tinyurl.com/m6rt7to
Someone told me that i need to follow the specs.
1920×1080 or 1280 x 720 30 fps orginial
mp4/h.264
variable bit rate
no audio
files should not exceed 16.02 kb/sec
10 sec video – 160 kb
Files should not exceed 200 kb per 10 sec
160 kbps bit rate
final out put 400×226
i follow its specs. but for 25 sec has 492 kb seems little over…
Where can i change to be under size.
Laura:
Because you selected variable bit rate, the bit rate can exceed the spec for periods of time. As long as the person you are sending the file to doesn’t have a problem with this, it isn’t an issue.
If it IS an issue, you would need to adjust the bit rate setting lower.
Larry