
 [NOTE: I’m just finishing a complete training series on Compressor 4.1. Currently, this is available to subscribers only. After the first of the year, it will be in our store.]
One of the most common compression questions I get is how to compress files for a DVD. I’ve covered this a lot in my video training, but haven’t written about this for several years. This article explains what you need to know using both Compressor 4.1 and Compressor 4.0.
NOTE: DVDs are always and only standard-definition video. Compressing HD media for a DVD always converts it to standard-def. If you need to burn HD media onto an optical disc, you need to create a Blu-ray, or AVCHD Disc. (The HD-DVD format listed in DVD Studio Pro is a dead format that can only be played on a Macintosh, and nothing else.)
WHEN SHOULD YOU COMPRESS FILES FOR A DVD?
COMPRESSOR 4.1 SETTINGS
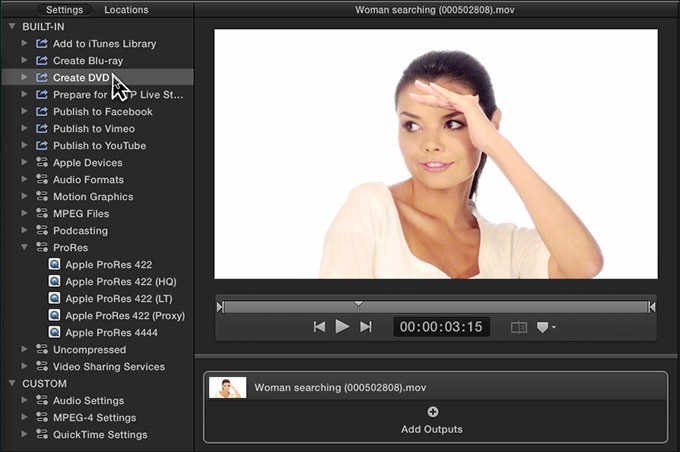
A new feature in Compressor 4.1 is Destinations. A Destination combines both a compression setting and a job action that does something with the file once compression is complete. In this screen shot, the Create DVD destination is highlighted.
The benefit of Destinations is that they compress and burn a single movie to a disc with one setting.
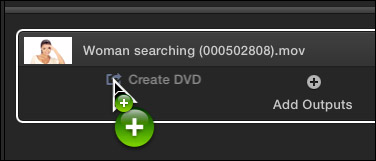
To apply a Destination, drag the “Create DVD” destination on top of the job.
CHANGE AUDIO SETTINGS
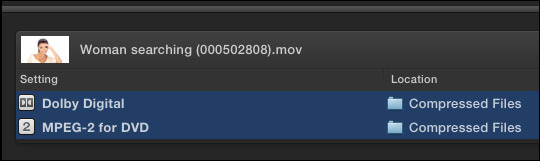
This applies two compression settings and a job action to burn the actual disc itself:
Authored DVDs use MPEG Elemental files, which means that the audio and video are separated into different files during compression, then combined during the final building process of the DVD; a process called “mixing.”
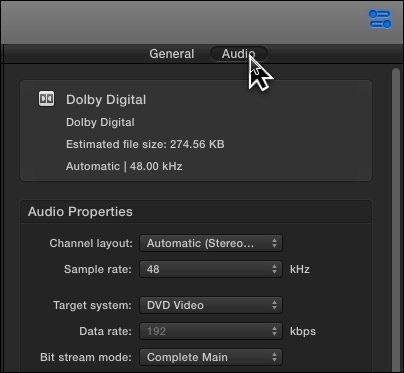
Open the Inspector by clicking the icon (blue in this example) in the top right corner of Compressor, or type Command+4, then click the Audio text button at the top.
All the audio compression default settings are fine, except for three (unless you mixed the audio in a Dolby-certified environment, in which case, leave these on):
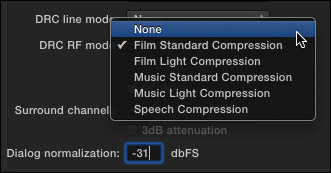
This turns all three of these settings off.
CHANGE VIDEO BIT RATE
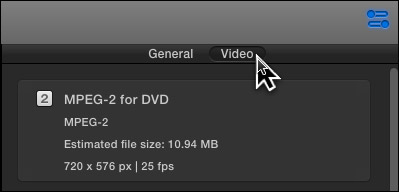
Select the MPEG-2 for DVD setting applied to the job, then click the Video text button at the top.
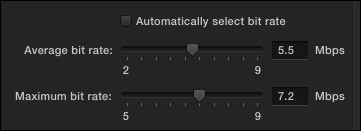
A new feature in the 4.1 update is Automatically select bit rate. This setting is on by default. What this does is automatically set the bit rate for the video file to get the highest quality based on the available space on the disc. However, this setting assumes you are only burning one movie to a DVD. This is the best choice when you are burning a single movie, but not a good choice when authoring several movies to a disc.
NOTE: Keep in mind that if you want to burn multiple movies to a disc, you need to use an authoring program like Adobe Encore or DVD Studio Pro; you can’t use Compressor.
My recommendation, when you need to compress multiple movies to burn to a disc, is to change the compression settings to:
NOTE: These settings apply to both PAL and NTSC media.
The rest of the video settings are fine. This allows up to 90 minutes of media on a single-layer, single-sided disc, or up to 3 hours on a dual-layer, single-sided DVD.
COMPRESSOR 4 SETTINGS
In Compressor 4, the changes are similar, but the interface is different.
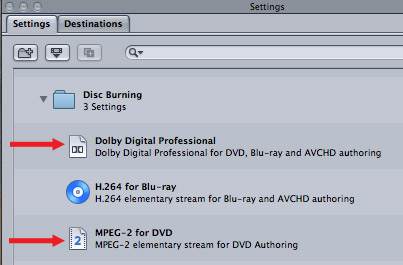
In the Settings window, inside the Apple folder is Disc Burning. Drag the Dolby Digital Professional and MPEG-2 for DVD settings on top of your clip in the Batch window. (The H.264 setting is only used for Blu-ray Discs.)
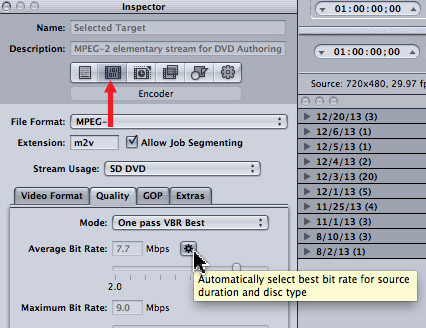
In the Batch window, select the MPEG-2 for DVD setting that is applied to the clip, then click the Encoder tab in the Inspector. Click the dark Auto-Sensor just to the right of the Average Bit Rate entry box. (This is only useful when burning one movie onto the DVD.) When this sensor is dark, it is on. When it is light gray, it is off. In this screen shot, it is turned on (dark).
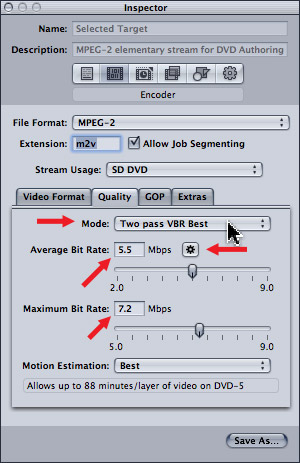
Then, make the following changes:
NOTE: These settings apply to both PAL and NTSC media.
As with Compressor 4.1, this allows about 90 minutes of material on a single-layer, and 3 hours of material on a dual-layer DVD.
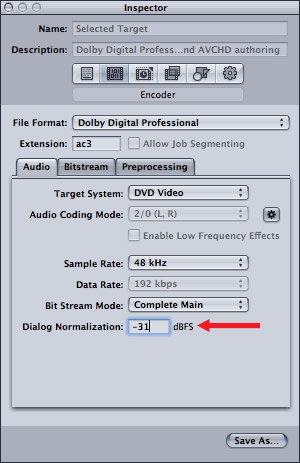
Next, go back to the Batch window and select the Dolby Digital setting applied to the clip. Then, in the Inspector > Encoder > Audio tab, set Dialog Normalization to -31.
NOTE: Yes, I know. This is weird number. But the explanation of how this works would require another article.
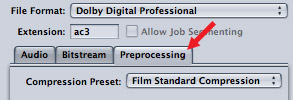
Click the Preprocessing tab…
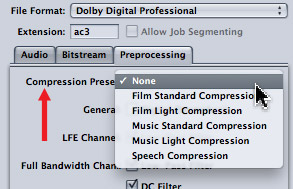
And change the Compression preset to None. This disables light audio levels compression that is being applied by this encoder.
And that’s it.
To learn more about Compressor 4, I invite you to become a subscriber, or check out the Compressor 4 training in our store.

2,000 Video Training Titles
Edit smarter with Larry Jordan. Available in our store.
Access over 2,000 on-demand video editing courses. Become a member of our Video Training Library today!
Subscribe to Larry's FREE weekly newsletter and
save 10%
on your first purchase.

55 Responses to Compressor: DVD Compression Settings
← Older Comments Newer Comments →-
 horatiu says:
December 7, 2015 at 12:36 pm
-
 Larry says:
December 7, 2015 at 1:00 pm
-
 horatiu says:
December 7, 2015 at 4:01 pm
-
 Marlene says:
December 16, 2015 at 2:51 pm
-
 Wade Wofford says:
January 13, 2016 at 12:52 pm
-
 Larry says:
January 13, 2016 at 1:28 pm
-
 Patrick Donegan says:
January 22, 2016 at 3:10 pm
-
 Larry says:
January 22, 2016 at 3:27 pm
-
 Stuart Baker says:
January 31, 2016 at 10:23 am
-
 Larry says:
January 31, 2016 at 11:06 am
← Older Comments Newer Comments →Is it possible to make a DL DVD using compressor 4.2? Can I use Create DVD directly? Do I make my own preset?
Thank you Larry
Horatiu:
Hmmm… I’m not sure. Theoretically, yes. Compressor should be smart enough to create a dual-layer DVD when you are burning your movie.
However, I’ve never used Compressor to do this. My suggestion is to try it and see what happens – the worst that happens is that the DVD won’t play in a TV.
Larry
Thank you Larry,
I tried a few times but I keep getting an error. I will divide it and burn 2 DVDs instead
Hi Larry, People had questions about Burning the files to a DVD disk.
I just wanted to add that when using Compressor 4.1.3, I set up the “Create DVD” settings as you suggested and when I clicked “Start Batch” it asked for a DVD.
I popped one in and it burned it right from Compressor, and it appears to work on a DVD player.
I’m trying to burn a 2-hour film to a *single*-layer DVD. These settings, as you know/state, will only get me 88 minutes… What settings would I use to get 2 hours onto a single-layer? Am I looking at *massive* quality loss to do this?
Wade:
You’d probably need a data rate around 4 mbps and, while it won’t look awful, it also won’t look great. Dual-layer discs are a much better option with a data rate around 7.5 mbps.
Larry
How do I save this Create DVD as a preset so I dont’ have to make this changes each time?
Patrick:
Look up on my website how to create a custom compression setting.
Larry
To my ear, and admittedly on just one TV system, the setting “film compression” seemed to help with the audio. “No compression” has a shrill echo sound to it. What is it that “film compression” is applying to the audio?
Stuart:
Film compression changes the audio levels – not data compression – in a mix. It is similar to the hard limiter or multiband compressor. When applying it, you should hear a change in level and a somewhat “louder” feeling. The echoes you mention in “No compression” puzzle me. No compression means that your audio is not being processed at all.
Larry