
 [NOTE: I’m just finishing a complete training series on Compressor 4.1. Currently, this is available to subscribers only. After the first of the year, it will be in our store.]
One of the most common compression questions I get is how to compress files for a DVD. I’ve covered this a lot in my video training, but haven’t written about this for several years. This article explains what you need to know using both Compressor 4.1 and Compressor 4.0.
NOTE: DVDs are always and only standard-definition video. Compressing HD media for a DVD always converts it to standard-def. If you need to burn HD media onto an optical disc, you need to create a Blu-ray, or AVCHD Disc. (The HD-DVD format listed in DVD Studio Pro is a dead format that can only be played on a Macintosh, and nothing else.)
WHEN SHOULD YOU COMPRESS FILES FOR A DVD?
COMPRESSOR 4.1 SETTINGS
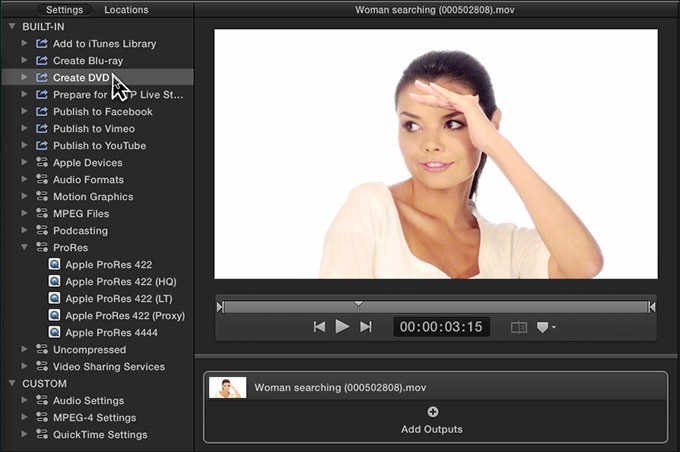
A new feature in Compressor 4.1 is Destinations. A Destination combines both a compression setting and a job action that does something with the file once compression is complete. In this screen shot, the Create DVD destination is highlighted.
The benefit of Destinations is that they compress and burn a single movie to a disc with one setting.
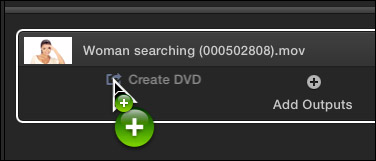
To apply a Destination, drag the “Create DVD” destination on top of the job.
CHANGE AUDIO SETTINGS
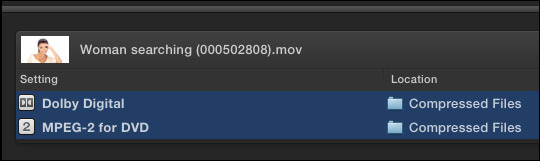
This applies two compression settings and a job action to burn the actual disc itself:
Authored DVDs use MPEG Elemental files, which means that the audio and video are separated into different files during compression, then combined during the final building process of the DVD; a process called “mixing.”
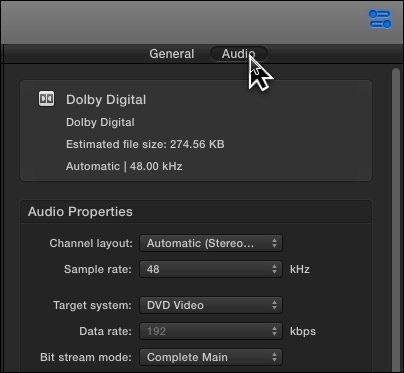
Open the Inspector by clicking the icon (blue in this example) in the top right corner of Compressor, or type Command+4, then click the Audio text button at the top.
All the audio compression default settings are fine, except for three (unless you mixed the audio in a Dolby-certified environment, in which case, leave these on):
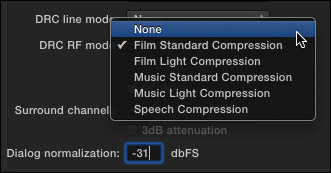
This turns all three of these settings off.
CHANGE VIDEO BIT RATE
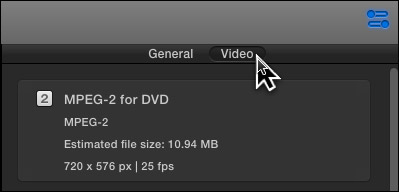
Select the MPEG-2 for DVD setting applied to the job, then click the Video text button at the top.
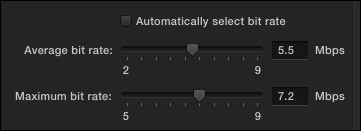
A new feature in the 4.1 update is Automatically select bit rate. This setting is on by default. What this does is automatically set the bit rate for the video file to get the highest quality based on the available space on the disc. However, this setting assumes you are only burning one movie to a DVD. This is the best choice when you are burning a single movie, but not a good choice when authoring several movies to a disc.
NOTE: Keep in mind that if you want to burn multiple movies to a disc, you need to use an authoring program like Adobe Encore or DVD Studio Pro; you can’t use Compressor.
My recommendation, when you need to compress multiple movies to burn to a disc, is to change the compression settings to:
NOTE: These settings apply to both PAL and NTSC media.
The rest of the video settings are fine. This allows up to 90 minutes of media on a single-layer, single-sided disc, or up to 3 hours on a dual-layer, single-sided DVD.
COMPRESSOR 4 SETTINGS
In Compressor 4, the changes are similar, but the interface is different.
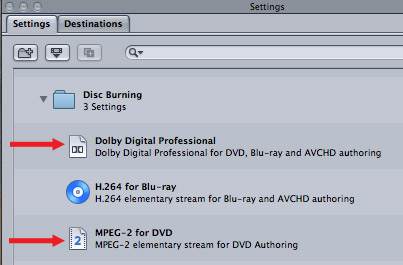
In the Settings window, inside the Apple folder is Disc Burning. Drag the Dolby Digital Professional and MPEG-2 for DVD settings on top of your clip in the Batch window. (The H.264 setting is only used for Blu-ray Discs.)
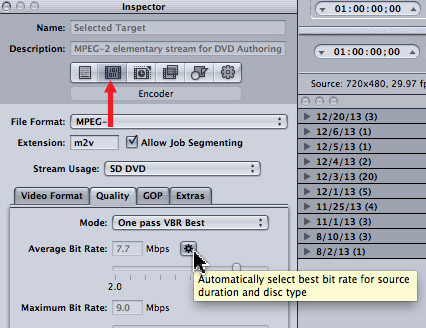
In the Batch window, select the MPEG-2 for DVD setting that is applied to the clip, then click the Encoder tab in the Inspector. Click the dark Auto-Sensor just to the right of the Average Bit Rate entry box. (This is only useful when burning one movie onto the DVD.) When this sensor is dark, it is on. When it is light gray, it is off. In this screen shot, it is turned on (dark).
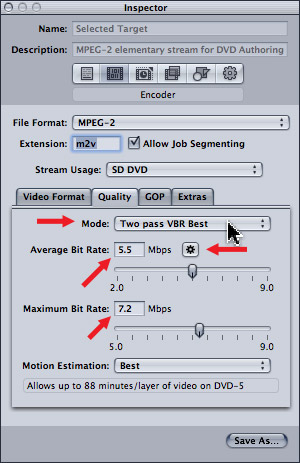
Then, make the following changes:
NOTE: These settings apply to both PAL and NTSC media.
As with Compressor 4.1, this allows about 90 minutes of material on a single-layer, and 3 hours of material on a dual-layer DVD.
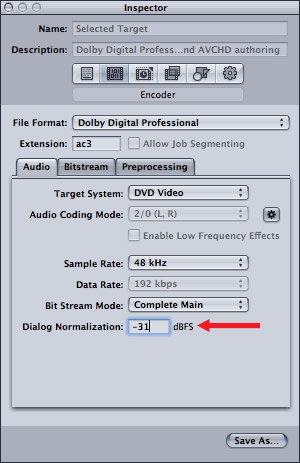
Next, go back to the Batch window and select the Dolby Digital setting applied to the clip. Then, in the Inspector > Encoder > Audio tab, set Dialog Normalization to -31.
NOTE: Yes, I know. This is weird number. But the explanation of how this works would require another article.
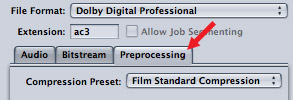
Click the Preprocessing tab…
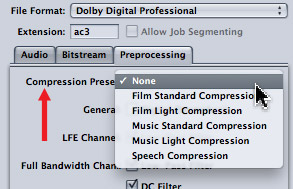
And change the Compression preset to None. This disables light audio levels compression that is being applied by this encoder.
And that’s it.
To learn more about Compressor 4, I invite you to become a subscriber, or check out the Compressor 4 training in our store.

2,000 Video Training Titles
Edit smarter with Larry Jordan. Available in our store.
Access over 2,000 on-demand video editing courses. Become a member of our Video Training Library today!
Subscribe to Larry's FREE weekly newsletter and
save 10%
on your first purchase.

55 Responses to Compressor: DVD Compression Settings
Newer Comments →-
 Dick Walters says:
December 23, 2013 at 6:26 am
-
 Eric says:
December 26, 2013 at 8:48 pm
-
 Larry Jordan says:
December 26, 2013 at 11:34 pm
-
 Edgar Perez says:
January 12, 2014 at 12:49 pm
-
 Ed says:
February 6, 2014 at 10:24 pm
-
 Larry says:
February 6, 2014 at 10:30 pm
-
 Tom says:
March 9, 2014 at 10:27 am
-
 Larry Jordan says:
March 9, 2014 at 10:55 am
-
 Larry says:
March 9, 2014 at 2:30 pm
-
 Paul says:
April 4, 2014 at 10:27 am
Newer Comments →Larry, Very helpful. The program is stable and works well ONLY after all Matrox drivers for Compressor 4 are removed. Otherwise, the UI simply will not run reliably, if at all. Matrox is working on an update for 4.1, timing unknown.
Larry – I know Compressor 3.5.3 also has the Auto – Sensor, but I’ve always avoided this because I thought some DVD players choke at data rates above 8.0. Do you know if this is still true or relevant? Or is auto-sensor the way to go for single movies?
As always, thanks so much.
Eric:
Yeah, that’s what I’ve always been told – avoid data rates above 8.0. For one-off discs that you are burning, the sensor is probably OK, because the disc is not going into general distribution.
For discs that are going to be replicated, I think keeping the data rates down is a good idea – because you have no idea what system will play the disc back.
Larry
I followed this procedure in 4.1 and the results were similar to previous versions where there is a double line and somewhat jagged edges in the image. Is there a way to achieve a compression similar to what you get in IDVD?
Larry I don’t understand why you say:
Set Mode to: Two-pass VBR Best
Set the Average bit rate to: 5.5 mbps
Set the Maximum bit rate to: 7.2 mbps
I don’t believe most people are trying to burn a 3 hr epic and need to compress it into 4.7GB.
If you are burning a 10 – 20 minute short film wouldn’t it be better to set it to automatic (7.7) one pass VBR?
Most people have a blu-ray player so even one pass CBR @ 9.0 Mbps will surely be better quality than 5.5 Mbps.
I know you have years of experience so I just wonder why you suggest such a low bit rate when Compressor can’t even burn multiple movies onto the DVD so why not use as much of the 4.7GB as you can?
Ed:
Good points. However, my settings won’t burn a 3 hour epic, they will only burn 88 minutes to a single-layer DVD.
If you are only burning a short movie, the automatic settings are fine. However, as you start to add more than one movie, or need to burn something longer, Automatic won’t work. So, I provide my settings for films longer than about 30 minutes, which is about what the automatic settings will fit on a single-layer DVD.
Larry
Hi Larry
Another great tutorial! I am using Compressor 4.1.1 and am I trying to create a .mov file with generic ac-3 audio (Dolby Digital Professional). As I understand from your tutorial, it is only possible to have 5.1 sound if you choose destination DVD or Blu Ray. But I want to have the file on my Mac (to integrate in itunes) with the 5.1 audio. So I have to choose e.g. 1080p HD (.mov) and add a second option for the Dolby Digital Professional. The problem is that I have 2 files afterwards : a .mov file and a .ac-3 file. I am not able to integrate the files so I have my 5.1 movie. Please give me some advice.
Thanks.
Tom:
You are correct – QuickTime supports AAC surround sound, but not AC3 surround.
However, you should be able to merge the two clips into one QuickTime movie. I thought I’d written an article about this, but discovered that I haven’t. It is now on the list for tomorrow’s newsletter.
Larry
Tom:
Here’s the article that explains how to do this:
http://www.larryjordan.biz/quicktime-player-7-pro-merge-files/
Larry
Hi Larry,
Great info! My question is: Let’s say I’ve made/burned a DVD in Compressor 4.1. Compressor has saved the m2v and ac3 files to my hard drive and burned a disk or two. Then, at some point in the future, can I burn another DVD of the same material without re-transcoding, i.e., can I tell Compressor just to do the “Job Action” without the transcoding since the transcoding has already been done?