
![]() One of the problems I’ve seen with previous versions of Apple Compressor are variations in color saturation (chroma) and gray scale (gamma) when compressing files using the H.264 codec. These differences were easy to see when comparing the master file to the compressed image and I’ve written about them in the past.
One of the problems I’ve seen with previous versions of Apple Compressor are variations in color saturation (chroma) and gray scale (gamma) when compressing files using the H.264 codec. These differences were easy to see when comparing the master file to the compressed image and I’ve written about them in the past.
To fix this, I would increase color saturation and modify the gamma setting during compression. However, as a general rule, you don’t want to make color or gray scale changes during compression.
With the release of Compressor 4.2, and filled with an abundance of curiosity, I decided to test the default compression settings for H.264 compression to see if anything had changed.
NOTE: I’ve written other articles looking at Apple Compressor 4.2 in more detail:
EXECUTIVE SUMMARY
The H.264 codec, as implemented by Apple in the Compressor 4.2 release, generates color and gray scale results that are indistinguishable from the master file.
When the compressed frame size matched the source frame size, no differences were detected between master and compressed files. When the compressed frame size was scaled smaller than the source frame size, small differences in edge detail were noted; however, these differences, in my opinion, are not significant, nor visible to the eye.
TEST SYSTEM
All files were compressed on a new Mac Pro using Compressor 4.2. Three compression settings were created and compared to the source file using the video scopes in Final Cut Pro X:
I tried to modify the default settings as little as possible, except for frame size, bit rate and keyframe distance (set to 90). Click the links above to see the compression settings I used. All three used the H.264 codec as supplied by Apple.
Three test signals were created:
All files were loaded into Final Cut Pro X 10.2 and measured using its video scopes. As a precaution, I also loaded the files into FCP X 10.1.4, where the scopes showed the same results.
NOTE: All video scope images are stored as PNGs, which is how I captured them from the screen. While I’ve reduced their size for this report, click any image to see it at its full, unretouched size.
UNSCALED RESULTS

Here’s the color bar movie that I used for the first part of this test. Color targets are set to Rec. 709 (HD).


When the compressed results were compared to the source image using the video scopes in Final Cut Pro X, the images were identical. (The top image is the source, the middle image is the YouTube version and the bottom image is the QuickTime version.)
In fact, when I apply a Difference matte to compare these in Photoshop and really crank up the gain this is the result: virtually identical patterns except for very minor variations in the trace route.
SCALING A 1080p IMAGE TO 720p
Reducing the size of an image can create a wide variety of problems, the biggest of which is how to accurately describe the edge of an object.
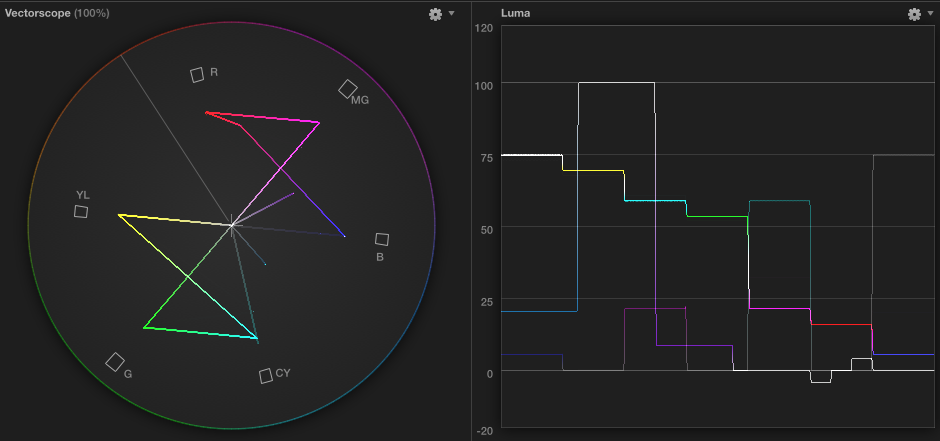
Here’s our 1080p source image, scaled to 720p in Final Cut Pro X. Notice the small artifacts during the trace? These are caused by modifications to the edges of objects in the frame as they are resized.
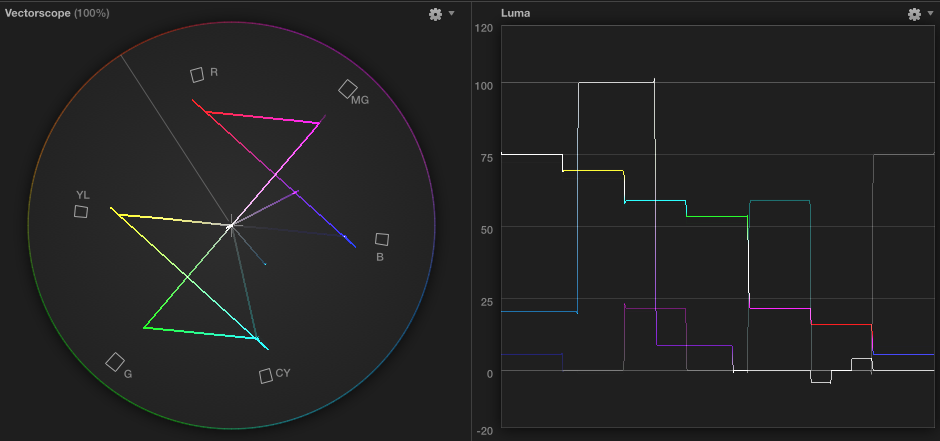
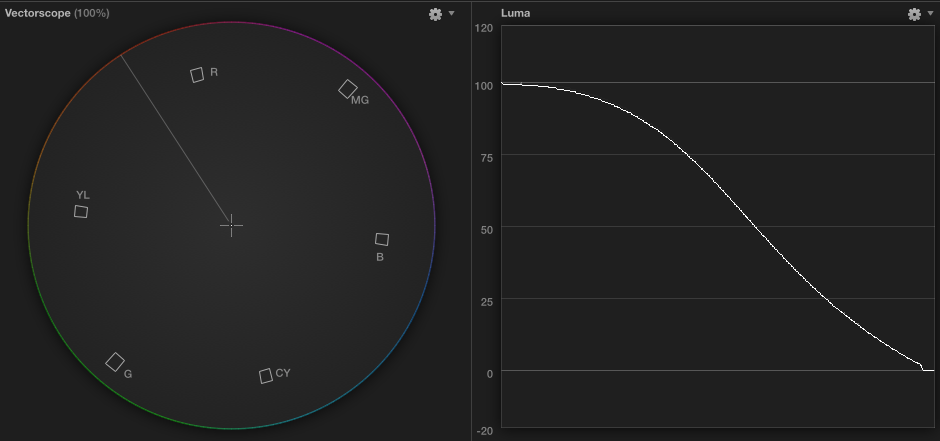
All three compressed versions showed exactly the same results, as illustrated here in the MPEG-4 version of the clip. While clearly noticeable in the Vectorscope as increased saturation, look at the Waveform Monitor and you see a small bit of “waviness” in the vertical lines representing the edges of the color bars. As I looked at the image in the Viewer, I could not see these artifacts at all.
COMPRESSING GRADIENTS

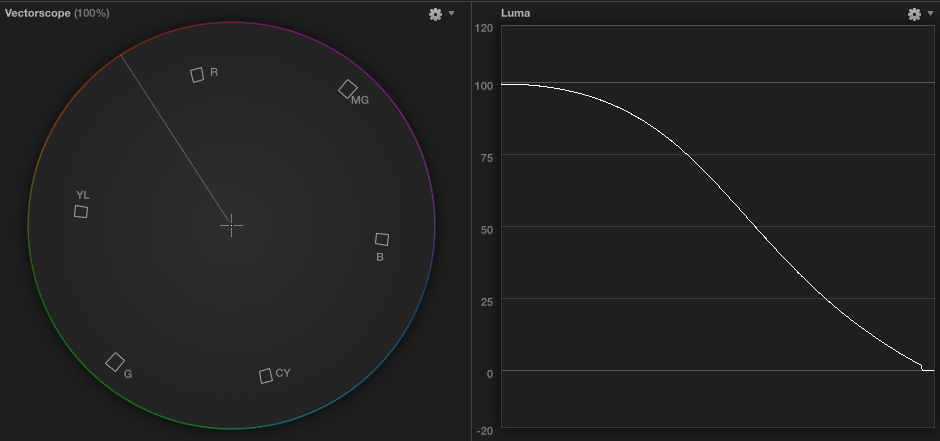
The next test was compressing a gradient, created in Final Cut Pro X representing every shade of black, white and gray that a video image can contain.

All three compressed versions were identical to the source, as you can see here from the QuickTime compressed version.

When the image was reduced in size, there was no difference in how gradients were compressed. This image is the source file set in a 720p Timeline.
This is the YouTube compressed file, reduced to 720p and displayed in the same Timeline.
COMPRESSING MOVING GRADIENTS

The last test, which is impossible to reproduce in print, was animating a gradient so that the grayscale of every pixel changed from one frame to the next. Basically, what I did was create a gradient, then moved the white from the left to the right edge, while moving the black from the right to the left.

All three compressed versions displayed no significant differences when compared to the master file using Final Cut’s video scopes.
SUMMARY
Frankly, I’m very impressed!
I’ve always been a bit wary of the image quality when compressing files using the H.264 codec in Compressor. But, the results of these tests show that Apple has made major improvements in its implementation of H.264. So much so, that if you don’t change the frame size of your source image during compression, and assuming you don’t materially modify Apple’s compression settings aside from data rate, your compressed images should virtually match the source.
Nice job, Apple.

2,000 Video Training Titles
Edit smarter with Larry Jordan. Available in our store.
Access over 2,000 on-demand video editing courses. Become a member of our Video Training Library today!
Subscribe to Larry's FREE weekly newsletter and
save 10%
on your first purchase.
4 Responses to Compressor 4.2: Testing Image Quality
NICE! Always thankful for the incredible time, detail and bargain price (FREE!!) of your hard works. Many, many thanks
Up until now I have always (happily!!) used QTPro for my conversions (I have Compressor 3, so…). 4.2.1 looks fab.
Stu Aull
Alaska
Hi Larry,
Thanks for (yet another) great article. Always a great way to start Monday morning. Apple’s latest implementation of the H.264 compressor is, as you say, very good. But with all due respect I’m not sure the method you used to test it is the most rigorous. In terms of still image quality simply comparing images on the scopes won’t give you enough data. What you really want to do is compare the original to the H.264 version by subtracting one from the other. Anything left will show the errors in the codec. Not likely to result in a perfect black frame.
But even more important is measuring the inter frame performance. This is where H.264, like all inter frame compression schemes, can really fall apart. Anything that has a lot of motion between every frame, e.g., animation or images with lots of lovely film grain can get clobbered by H.264. I recently ran across this trying to use compressor to create H.264 versions of video art containing very (!) high inter frame motion. (Created at 29.97 progressive frames per second — they were never interlaced.) Comparing the ProRes masters to the H.264 versions was night and day. The solution was to force the H.264 compressor to make “all” frames a “keyframe” but that yielded very little reduction in file size vs. the ProRes 4:4:4:4 master. And they still did not match. You can view an example of the type of material I’m talking about here: https://vimeo.com/119865255 (Created in FCP-X, btw.)
For most projects will this mater? Probably not. And H.264 is certainly an excellent general distribution codec. But I don’t think it’s fair to say that even at identical frame sizes the “compressed images should virtually match the source.”
Best Regards,
Dean Winkler
Dean:
You are correct. The four determiners of image quality are: frame size, frame rate, bit rate and the amount of movement between frames. And you are also correct that the bit rate needs to grow as the amount of movement between frames increases. However, testing for that varies on a movie-by-movie basis.
The problems I saw in the past were even more severe with significant losses in chroma and gray scale, which seem to be much improved with this version.
Still, given enough movement, it will be impossible to compress some movies into a file size small enough to either stream or download.
Larry
Hello Larry,
In the history of MPEG video compression, the CCIR SMPTE Test Tape described here was the benchmark from which all high-end encoding solutions were judged:
http://www.itl.nist.gov/iad/894.05/docs/fenimore_mastering_and_Archiving.pdf
(Figure 17-N was especially difficult).
We at Pacific Video Resources (PVR) saw this tape many times and were fortunate to win numerous encoding contracts during the 1990s based on our real-time video encoding solutions which we developed in partnership with Eidesign Technologies. In our time, we encoded over 2000 feature films and television programs, primarily for those companies launching VOD systems.
Please note that it is the differences between frames that makes video encoding most difficult, not the similarities. The capabilities found in Apple Compressor today far exceed those available to us in the 90s — even within our multi-million facility in which we pioneered Scene-by-Scene compression and mastered the art of converting film transfers containing 3:2 pulldown. Video compression has come a long way but the SMPTE Test Tape is still quite a viable test.