

Last week, I wrote about recording audio in Adobe Audition – [ click to read ]. This week, I want to cover multitrack editing, in preparation for a mix.
Adobe Audition, like Apple Soundtrack, provides two different ways to edit audio: a multitrack mix and a waveform edit. Multitrack mixes are non-destructive, while waveform edits are destructive. (Destructive means that it makes permanent changes to your audio files.)
Audition is a highly-capable audio editor which has been used in broadcast for years, however, it has some quirks which make it operate differently from Soundtrack Pro.
This article covers audio imported into Audition for editing – or audio that was recorded in Audition. In a separate article, I’ll cover how to send files from Final Cut Pro 7 (or earlier) to Audition for a mix. I’ve also recorded a detailed video tutorial that illustrates Audition’s very powerful audio repair capability, which you can review here.
GETTING STARTED
Open Audition
Select File > New > Multitrack session (or type Command+N)
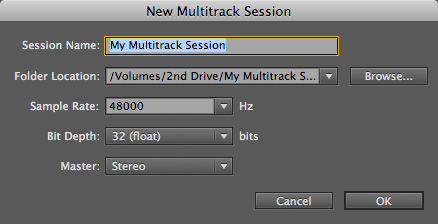
Unlike Soundtrack Pro, where you simply drop clips into the Timeline for editing, with Audition you need to specify the project properties before you start.
IMPORTANT NOTE: Once you set project properties, you can’t change them. If the sample rate of your audio clips doesn’t match the project property settings, your clips will be resampled, which generally reduces audio quality.
In this case, I titled this session “My Multitrack Session.” (You can, of course, title your session any way you like.)

Then, I clicked the Browse button, navigated to my 2nd Drive and created a new folder to serve as the session folder. This is where Audition will store all the elements related to this project. While not required, I STRONGLY recommend you store all media on a separate drive and not in the Home directory of your boot drive.
The project Sample Rate needs to match the sample rate of your clips (see the Sidebar below).
Leave the Bit Depth set to 32 (float). This provides higher quality for mixing, even though you will probably output your finished file at 16-bit depth.
Master refers to how you want to output your file: Mono, Stereo, or 5.1 (Surround). In most cases, today, we will probably use Stereo, which is the default.
Once you have these settings configured, click OK.
SIDEBAR: HOW TO DISCOVER THE AUDIO SAMPLE RATE
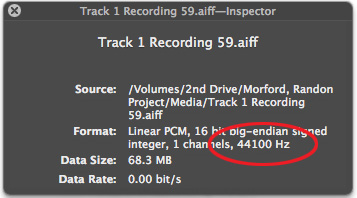
QuickTime Player is a fast way to see the sample rate of an audio clip.
Open the audio clip in either QuickTime X or QuickTime 7.
Type Command+I (QT X: Window > Show Movie Inspector -or- QT 7: Window > Get Info)
The floating HUD displays the sample rate of the clip in the Format section of the HUD. In this case, the sample rate is 44,100 Hz.
GETTING ORIENTED
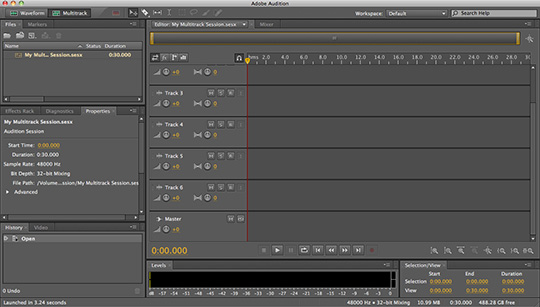
By default, Audition creates a multitrack project containing six tracks. While there is lots of control over the appearance of your clips and the interface, here’s a fast way to get started.
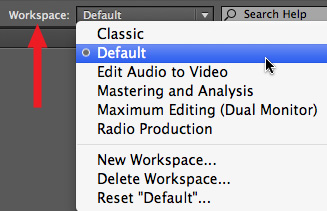
Go to the Workspace popup menu and select Default. (A workspace is how you organize tabs and panes. There are several variations shipped with Audition and you can easily create your own.) This provides a standard way to work with the application, and it also means that your screens will match mine. (When editing audio to picture, I change the workspace to Edit Audio to Video.
IMPORTING MEDIA
In this example, we will edit two tracks of audio that were recorded in Soundtrack Pro. (I’ll save working with audio and video files for another article.)
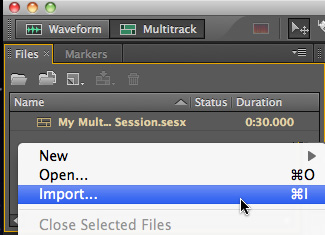
To import a media file (audio or video) do one of the following:
* Select File > Import > File
* Type Command+I
* Right-mouse-click inside the Files pane and select File > Import.
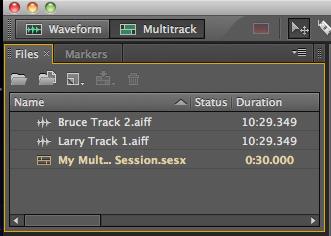
Imported media files are displayed using white text, while session (project) files are displayed in yellow.
NOTE: See the gold border around the Files pane? This indicates which pane is selected; Adobe calls the pane “in focus.” If you ever wonder why something isn’t doing what it’s supposed to do, be sure you have the correct pane selected.
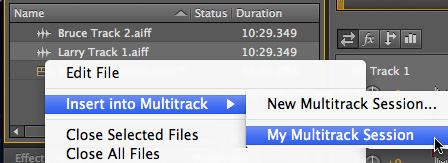
To add an audio file to a track in the Multitrack project, do one of the following:
* Drag and drop it on a track
* Right-mouse-click the clip and choose Insert Into Multitrack > [ Project name ]
Dragging allows you to position the clip anywhere in the Timeline. While mouse-clicking the clip puts it at the position of the playhead (CTI) on whichever track is selected. (You select a track by clicking anywhere inside it. The track will turn a lighter shade of dark gray.)
If you need to sync multiple clips on multiple tracks, right-mouse-clicking is better than dragging, as all clips will align with the Playhead.
EDITING AND TRIMMING
Editing and trimming are very similar to Final Cut Pro or Soundtrack Pro. Trimming tools are located in the Toolbar at the top of the window. We are interested in the first four icons on the left in the screen shot below.

The Move tool (keyboard shortcut: V) allows you to select and move clips.
The Razor Blade tool (keyboard shortcut: R or RR) allows you to slice a single clip, or multiple clips. This works just like the Razor blade tool in Final Cut Pro.
The Slip tool (keyboard shortcut: Y) allows you to slip the contents of a clip, without moving the clip.
The Time Selection tool (keyboard shortcut: T) allows you to select a range on the Timeline that can span from one to many clips. (More on this in a minute.)
To trim the In or Out of a clip, move the mouse to the edge of a clip and watch for the red trim indicator. Drag the selected edge with wild abandon. This is the same as doing a Ripple trim.
To slip the contents of a clip, you need handles on at least one end. If you have edited the entire clip to the Timeline, you won’t be able to slip it. Select the Slip tool (Y), then click and drag anywhere inside the waveform of a clip.
To select a range within a clip, or across multiple clips or multiple tracks, select the Time Selection tool (T). Drag to select a range. Then, do one of the following:
* To delete the range and leave a gap, press the big Delete key
* To delete the range and remove the gap, press Option+Delete
* To delete the range and remove the gap across all tracks, press Shift+Command+Delete

You can also access all these commands from the Edit > Ripple Delete menu or by right-mouse-clicking in the selected region.
To move clips between tracks, drag them. To prevent them from moving from side to side, hold the Shift key down while dragging.
To delete a clip, select the clip and press the Delete key. (This only removes it from the Timeline, it does not remove it from the Files pane, or your hard disk.)
INTERFACE GOODIES
Double-clicking a clip opens it in the waveform editor. Be careful here, because all your changes are permanently recorded in the file.
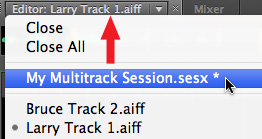
To move between projects, click the name of the project tab at the top of the Timeline and select the project you want to move to. There’s no limit to the number of projects, or audio files, that you can have open at one time.
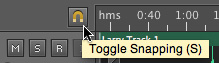
To turn snapping on or off, either click the snapping logo (see screen shot above) or select Edit > Snapping and pick the options you want to snap to. (You could also type S)
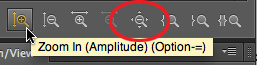
Audition has a number of neat interface tricks up its sleeve. For instance, the zoom in/out controls are all located on the right side, near the bottom. Click one of these magnifying glass icons and watch what happens. (You can also type – or = )
To fit everything in the window, click the fifth icon in from the left or type Command+
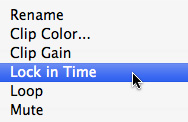
Using the Clip menu, or right-mouse-clicking a clip, you can:
* Rename a clip
* Change the color of a clip
* Lock a clip in Time.
This last option is very sweet. Locking a clip allows you to move it up or down tracks, but prevents it from shifting from side to side. This allows you to move a clip without losing sync. Cool!
Oh! The spacebar starts and stops playback … but you probably figured that out by now.
ADDING FADES
When it comes to adding fades, Audition is far more flexible than either FCP or Soundtrack Pro.
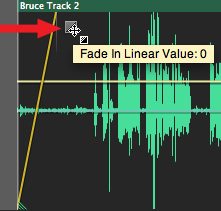
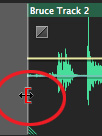
To add a fade, click the small box in the top left (In) or right (Out) corners of a clip and drag sideways.
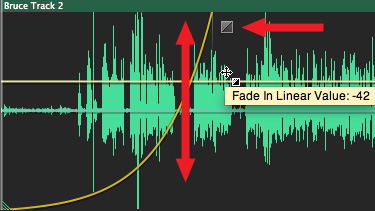
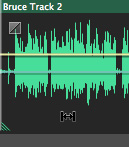
However the VERY cool part is that when you drag the fade handle up or down, you can change the shape of the fade! This is far more flexible – and easier – than adding fades in FCP or STP. In this screen shot, I’ve add a fade that starts slowly, then speeds up at the end. This is a good way to cover a cough or sharp sound at the beginning of a clip.
MIXING
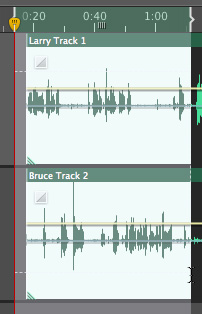
I’m saving mixing for another article, however, just to cover the basics, you change clip volume by dragging the yellow horizontal line running through the middle of each clip up (to make the clip louder) or down (to make the clip softer).
Remember to be SURE your audio levels never exceed 0 dB!
SAVE YOUR WORK
Unlike Soundtrack Pro, Audition has an autosave built into it. It will save your work every ten minutes, unless you change this time to something different in the Preferences.
However, it is a good policy to never trust autosaves completely. As you are working, save your work by typing Command+S.
WRAP-UP
If you have it installed on your system, and haven’t played with it yet, now is a good time to get acquainted with Audition. This is a very capable audio editing and mixing program. I’ve had fun learning it and I’m looking forward to sharing more of it with you in the future.

2,000 Video Training Titles
Edit smarter with Larry Jordan. Available in our store.
Access over 2,000 on-demand video editing courses. Become a member of our Video Training Library today!
Subscribe to Larry's FREE weekly newsletter and
save 10%
on your first purchase.
24 Responses to Audition: Multitrack Editing
Newer Comments →-
 Kelvin says:
October 23, 2013 at 6:07 pm
-
 Larry Jordan says:
October 24, 2013 at 2:29 pm
-
 Kelvin says:
October 24, 2013 at 10:07 pm
-
 Larry Jordan says:
October 24, 2013 at 10:39 pm
-
 Kelvin says:
October 26, 2013 at 6:27 am
-
 Geoff says:
March 21, 2014 at 7:29 am
-
 Larry Jordan says:
March 21, 2014 at 8:33 am
-
 Geoff says:
March 21, 2014 at 9:17 am
-
 Eric says:
January 20, 2016 at 11:35 am
-
 Larry says:
January 20, 2016 at 11:44 am
-
 Praise Emmanuel Likwanya says:
April 17, 2016 at 10:48 pm
-
 Larry says:
April 17, 2016 at 11:11 pm
-
 Kyler Penland says:
May 6, 2016 at 10:54 am
-
 Larry says:
May 6, 2016 at 10:58 am
-
 Lon Goldstein says:
September 23, 2016 at 3:36 pm
-
 Lon says:
September 23, 2016 at 3:59 pm
-
 Larry says:
September 23, 2016 at 4:47 pm
-
 Lon says:
September 26, 2016 at 3:13 pm
-
 Simon says:
December 4, 2016 at 5:21 pm
-
 Larry says:
December 4, 2016 at 6:00 pm
-
 Ruben says:
January 23, 2017 at 6:35 am
-
 Larry says:
January 23, 2017 at 8:33 am
Newer Comments →Dear Larry, I can see that you are very experience in Adobe Audition. I am currently trying out this software and the version is CS6. I am facing some difficulties during mixdown to MP3. May I seek some advise from you please?
Sure, what’s the question?
Larry
Larry, I am trying this Adobe Audition CS6 and I quite like it. I am trying the software now and is facing some difficulties. Larry, I hope you can share your expertise and help me with this. I am going to prepare a mega mix which include more than 30 songs. I used track 1 and track 2 on the timeline to prepare my mega mix. The sound quality is good on my headphone. When I went to multitrack mixdown, and create a MP3 file, and then playback from my car audio, the volume decreases.
Let’s say now i use 2 songs. These original 2 songs when playback from my car audio, I use volume say 10. I can already get good quality sound. Now after mixdown, I need to turn my car audio volume to about 18 in order to get e same sound level with the original 2 songs.
I have selected the sample rate as 44100 and bit rate as 320. I even tried Navigate to Edit > Preferences > Multitrack (tab) and change your ‘Stereo Panning Mode’ to ‘Left/Right cut logarithmic’.
The sound quality is there Larry, when I turn on to volume say 18, the sound quality is there and is good. I just don’t understand why when I playback the mixdown MP3 from my car audio, I will have to use volume 18 in order to get the same sound quality with the original song. I should be using the same volume level of 10 even after the mixdown to MP3. If the volume is insignificant perhaps I may not be able to notice. But it decreases significantly Larry. Something is not very right Larry. Can you please enlighten me Larry? I must have did something wrong. Let me know if you need a screen shot of the steps I did for the software right from the beginning. And let me know how I attach file here?
Kelvin:
This sounds like a classic case of phase cancellation – at least to a partial degree. One of the audio tracks is out of phase with the other.
Look up in the Help files how to change the phase of a clip or track and see if that helps.
Larry
Larry, thank you very much for sharing. I found the problem. Really appreciate your guidance.
Hey Larry,
When editing multiple tracks of audio in multitrack view, using the razor tool (R), all my cuts get applied to all the tracks along the playhead, regardless of soloing or muting. Is there a way to change this so it doesn’t happen? a preference setting maybe?
Thanks,
Geoff
Geoff:
The razor blade has two states: Single track and Multi-track. Either type “B” a second time, or click and hold the razor blade icon to select between them.
Larry
Awesome! Thank you!
Larry,
If a recording from a Yamaha TF3 was saved directly from the mixer and handed to as a Wav file, can the Wav file be opened again where all the channels are able to be adjusted for a final mix???
I hope I am explaining myself well enough! I apologize if I am not!
Eric:
This all depends upon how the WAV file was exported.
If it was exported as a stereo file, then all the tracks are merged together and you no longer have access to individual clips or tracks.
If the WAV was exported as tracks, you’ll have access to each track in your mix.
Larry
Larry, my problem is simple and I really don’t think it’s a problem at all. Am new to CS6 and there are only six tracks. How can I add another track? Say track 7
Praise:
A simple question with a simple answer: Go to the Sequence menu at the top and select “Add Tracks.”
Larry
Hey Larry,
I have a question, I am using the multitrack editor to put together a radio show. Every time I save the project and reopen it the host’s audio has slid about 2 – 3 seconds to the left. I have to then use the slip tool to fix it one by one then export>save>close>reopen and the audio has moved over again.
Thanks,
Kyler
Kyle:
This is very, VERY! strange. I’ve never seen this happen. Please call Adobe Support and see what they can suggest.
Larry
Hi Larry,
I love your site and really appreciate your clear explanations! I was wondering the best approach for using Audition for simply editing down a narration session. I typically prefer to have two single waveforms open, the complete recording session and a second one that I build by taking the best parts of the full session. I was able to do this in Audacity, but Audition doesn’t seem to allow two waveform files to be open at the same time. Perhaps there is a more well-advised approach to this? I could use the multitrack editor and work across two tracks, and I guess I’d just have to mute and unmute the two tracks as I work to avoid playing the tracks back on top of each other. I hope the question is clear. Do you have a suggestion either for the best way to use this approach, or a better approach to editing down a narration track? Thanks so much in advance!
Oops, I notice now I can keep two wav files open in the left hand files panel and just switch between them. I just can’t keep two timelines open at once in the main work area without doing a multitrack session. Perhaps this is the best approach?
Lon:
For this, I would always use a multitrack session. All changes are non-destructive, which means you can go back and change your mind. And comparing two waveforms in a multitrack session is dead easy.
Larry
Thanks Larry!
Larry,
I’ve been experiencing a very slight difference in sound quality between waveform and multitrack views. This is problematic as I am trying to tweak room sound in a video clip and need to know which audio is real.
For the very same clip of audio, waveform seems to present a quieter and less noisy sound, while multitrack seems to have more noise (ie the wind noise is audible in multitrack but not in waveform.)
Is this something you’ve ever heard of and/or can explain?
Thanks.
Simon:
No, I’ve never heard of this and, no, I can’t explain it.
I’ll forward your question to my contacts at Adobe to see if they have any ideas.
Larry
hi there Larry, i have a multitrack session, and the tracks of the mix on separate auditions. i go to save and close, but it says: “One or more media files used by this multitrack session are located outside of the session folder. Would you like to copy these media files into the session?” I say no and go to close the singular audio tracks, and it silences the deleted audio in the multitrack! Is this something you can sort?
Thanks!
Ruben:
The multitrack session file is linked to those single audio files. Leave them alone and in the session when you save it and your multi-tracks should sound fine.
Larry