
![]() It would be nice if everyone we interviewed spoke at the same consistent level, with enthusiasm and good diction. But, sadly, that is a fantasy that I’ve never seen connect with real life.
It would be nice if everyone we interviewed spoke at the same consistent level, with enthusiasm and good diction. But, sadly, that is a fantasy that I’ve never seen connect with real life.
The best interviews and performances are those where the speaker is so involved with what they are saying, that they don’t pay any attention to how they are saying it.
Which means that, later, during editing, we need to even out all those levels.
Adobe Audition CS6 has some very nice tools which can make this process fast and easy:
FIRST, THE MANUAL METHOD

You can change audio levels for a clip by dragging the yellow audio level line up or down; the same as in any video editing package.
NOTE: By default, Audition creates a keyframe whenever you click a yellow audio level lines. To avoid creating keyframes, press the Command key when clicking. This allows you to change the level without creating any keyframes.
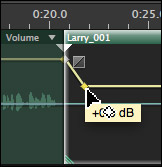
You can also create keyframes (by clicking the yellow audio level line), which allows you to create level changes as a clip plays back. Keyframes in Audition work the same as keyframes in Premiere or Final Cut, they allow you to create changes in a setting during playback.
NOTE: I define keyframes as a point of change during playback. Also, we always work with keyframes in pairs; a starting and ending keyframe. You can use more than two, but two is the minimum.
These manual methods work perfectly well, but, they are often slow and require that we adjust each clip manually. Also, there is no automatic way to protect against raising the level so high that we distort the audio.
SECOND, ADJUST THE TRACK
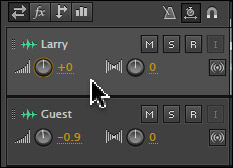
One of the benefits of using audio software for mixing is that we can set levels and effects for the track, rather than just a single clip. This track setting then affects all the clips contained in that track.
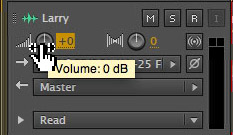
To adjust track volume, either drag the volume control (rotary dial) left or right, or enter the value you want into the text entry box to the right of the control.
The benefits of adjusting track gain is that it is faster than adjusting individual clips, but, just like adjusting clip gain, there is no protection against distortion.
MATCH CLIP VOLUME
But, what if you have a whole lot of clips and each of them is at a different level? Time to turn to more powerful tools.
A much faster way to get your audio under control is to use Match Volume. This feature, called “normalization” in other applications, raises the level of the entire clip by the same amount such that the loudest portion of the clip does not exceed the level that you specify. (Yeah, it’s a long definition.)
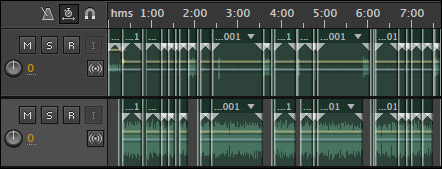
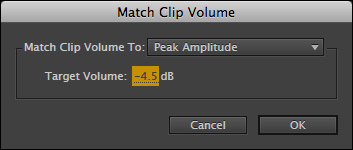
As illustrated here, select the clips containing the audio levels you want to match.
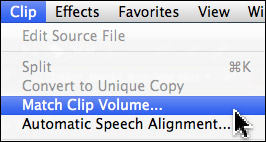
Choose Clip > Match Clip Volume.
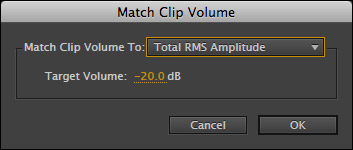
The Match Clip Volume dialog allows you to change the levels in all the selected clips to match the level you specify (“Target Volume”) based on how you measure the audio.
What you are doing is applying a clip gain effect that changes the gain of each individual clip. While the amount of gain the filter applies will vary between clips, the amount of gain the filter applies will not vary within the clip.
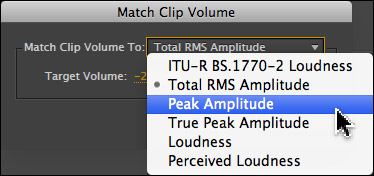
There are six standards you can use to match the volume of your clips. All of them are variations of average levels, except for Peak Amplitude.
With a resigned sigh, KNOWING that any discussion of levels causes fist fights, here are my suggestions:
The benefits to using Match Volume is that it is very fast, guarantees that the audio level changes applied to each clip will not cause distortion, and allows you to select the measurement standard and level that is appropriate to your mix.
The disadvantage is that if you have wide variations in audio levels within a clip, the loudest portions will sound fine and the softest passages will still be too soft. A typical example is an audio file with clicks or pops, or one where the actor is whispering and shouting in the same shot.
To fix these kinds of variations, we need to switch to two more powerful tools: the Hard Limiter and the Multiband Compressor.
EFFECT: HARD LIMITER
The Hard Limiter is an effect that amplifies soft passages more than louder passages, while, at the same time, guaranteeing that the loudest portion of the audio does not exceed the level that you specify.
I’ve written articles about this (click here to read), so here’s a quick summary about using this filter.
Filters are effects that can be applied to either clips or entire tracks. (I strongly recommend applying them only to tracks). You can apply up to 16 filters per track.
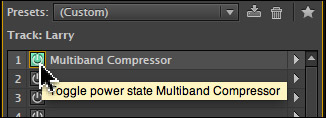
Select the track to which you want to apply the filter by clicking either in the track or the track header. A selected track turns light gray, as illustrated by the Larry track here.
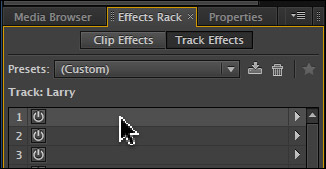
Select the Effects Rack panel and select the “track” where you want to apply the filter.
From either the Effects menu at the top, or the small right-pointing arrow to the right of each Effects Rack line, select Amplitude and Compression > Hard Limiter.
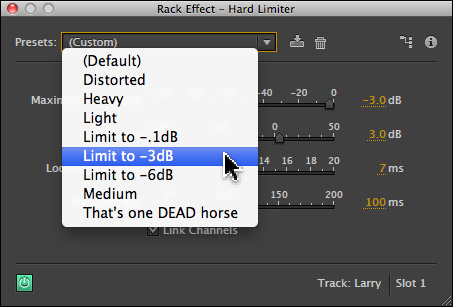
From the Presets pop-up menu at the top, select Limit to -3dB. This means that the loudest the audio on this track allowed by the filter is -3 dB.
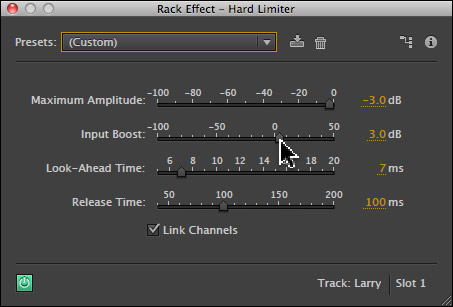
You adjust this filter by dragging the Input Level Boost slider up, or down, until your audio starts hitting the maximum level of -3 dB. The goal is to get your audio to consistently reach the limit of -3 dB.
Don’t try to over-amplify the audio by dragging this slider too far. You won’t hurt anything, but your audio will start to sound “fat,” “blatty,” or unnecessarily harsh.
Every track is different, there’s no one setting that works everywhere; but I’ve found this filter to be VERY helpful and use it a lot.
The benefit to this filter is that you apply one setting to an entire track, which makes changes very easy. It prevents against distortion, and makes softer passages louder without damaging louder sections.
The only disadvantage is if you drag the slider too far, the audio sounds unnecessarily compressed.
EFFECT: MULTIBAND COMPRESSOR
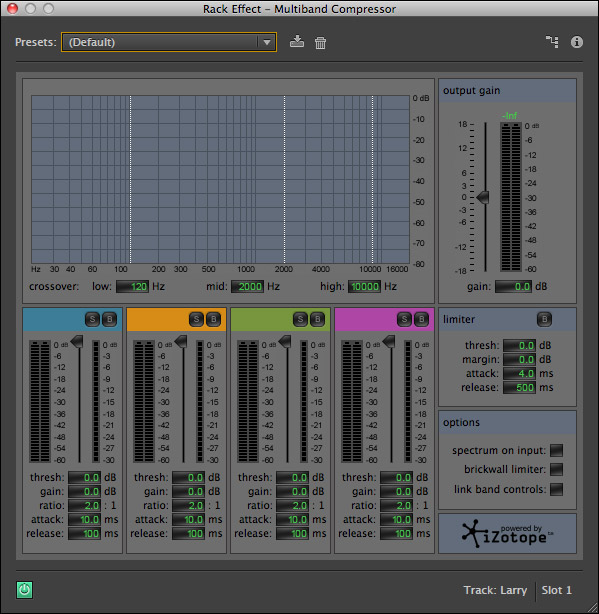
This brings us to the Multiband Compressor. At first blush, this interface would scare small children. But, this filter is absolutely worth learning.
NOTE: The Single-band Compressor tends to be better for music, while the Multiband Compressor tends to be better for the spoken word.
The process of applying this filter is the same as the Hard Limiter:
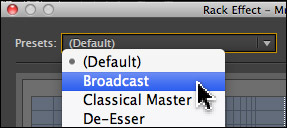
From the Presets popup menu, select Broadcast. This tends to sound the best for spoken dialog.
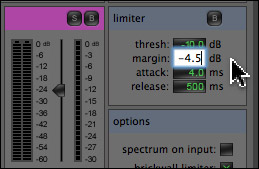
Change the Margin (on the right side) to -4.5 dB. This sets the maximum “limit” to your audio.
NOTE: If you have only one speaker with no effects or music, set the Margin to -3 dB.
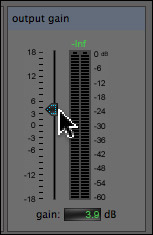
Then, adjust the amplification of this filter by dragging the Output Gain up, or down, until your audio is consistently bouncing the audio meters at the Margin level you specified.
While one of the benefits to this filter is that it tends to make voices sound smoother, and less “compressed;” the KEY benefit to both the Hard Limiter and Multiband Compressor is that they easily cope with audio with extreme variations – such as soft voices combined with pops and clicks – without distortion, and while making the soft passages louder.
Both the Multiband Compressor and Hard Limiter affect all the clips on one track. Both prevent distortion. And both can be applied and adjusted very quickly.
The Hard Limiter tends to make softer passages louder. The Multiband Compressor tends to make louder passages softer. Play with both filters and see which one sounds the best to you.
In the past, I used the Hard Limiter almost exclusively on all my Digital Production Buzz recordings. Recently, as in two months ago, I switched to using the Multiband Compressor and tend to like the sound better.
MAKING ADJUSTMENTS
NOTE There is NO difference in putting a filter higher or lower in the Effects Rack if there is only one filter applied to a track.
SUMMARY
Getting audio levels to be clear and consistent is the first major step to making any project sound great. And Adobe Audition has a variety of ways to make that level-setting process fast, simple, and effective.

2,000 Video Training Titles
Edit smarter with Larry Jordan. Available in our store.
Access over 2,000 on-demand video editing courses. Become a member of our Video Training Library today!
Subscribe to Larry's FREE weekly newsletter and
save 10%
on your first purchase.
14 Responses to Audition CS6: Improve Audio Levels Fast!
This is great information, Larry! Thanks for this post.
Hi Larry, this is a great article.
I’ve just started podcasting and trying to fix poor audio on one track, so this is helpful.
I’m an Audition newbie, so have a question about the manual method.
1. How do you actually select a portion of track? Click and drag?
2. Do you split the track before adjusting?
3. Would love to see an article on podcast improvement.
Incidentally, I do have an unrelated question. If I had 2 .mov files – one for each speaker of an interview – I presumably need multi track editing (.sesx) to manage editing of both, maintaining sync?
Thanks!
Tim
Tim:
Thanks for writing.
1. You can’t select a portion of a track. A better approach is to create a new track and move just those clips that need help into the new track. When it comes to audio, 20 – 40 track mixes are very common.
2. I won’t “split the track,” but I will separate the clips. My goal is to get one voice / sound per track. That way, I have complete control over levels and panning, as well as effects.
3. I’ll add this to my list.
4. Correct. Mixing two separate clips is best done using multitrack.
Larry
Hey Larry, thanks for taking the time to answer.
Adding the .mov files then Audition created wavs when creating the SESX.
Worked out today with time editing how to highlight section and change audio.
Also clicking on volume to drop it.
I am used to managing audio in Premiere Pro (which makes it reasonably easy).
Mostly, I have some “ums” and pops I want to delete/dampen, so I had a play with selecting a section and deleting.
Works a treat.
I have two stereo tracks – two sides to an interview – and need to run through podcast filters (which Garageband has)….do you advocate Audition for this sort of work? Or Garageband for ease of posting to iTunes?
DeEssing in Audition looks good, but is there a “podcast” filter? Just use “Broadcast” in the multiband compressor per your post above?
For your podcast article, so far my workflow has been (remembering I interviewed someone on Skype and I had no mic):
– record using ecamm in Skype
– split to two stereo tracks in ecamms recording splitter (or Audacity)
– import to Audition (or Garageband)
– delete/cut/mix
– post to iTunes via Auphonic
Tim
Tim:
Your workflow sounds fine to get you started. Audition was designed for audio cleanup (many years ago). Since then its been eagerly adopted by radio broadcasters, music producers and folks that need to improve their audio and don’t like ProTools. As such it provides much broader tools than GarageBand, which is focused on the Prosumer market.
This is a long way of saying there’s no “podcast” filter because why should a podcaster expect poorer results than a broadcaster? All the filters in Audition are designed for professional use.
Larry
Larry,
I’ve been using Audition for many years, problem is I don’t use it everyday. I’m a writer/publisher, use inDesign, Lightroom, and Photoshop more now, although I used to be an analog film editor many years ago.
When I don’t use an App like Audition everyday, I forget. Right now, I’m trying to master a previously recorded Audiobook to meet Audibles’ submission requirements, which include an Average RMS Amplitude of between -18db to -23dB.
1) I load my clips into Audition, but the Clip > Match Clip Loudness is grayed out. Can’t seem to select it, no matter how I click clip.
2) I used the Effects > Amplitude and Compression > Multiband Compressor to set Clip Levels. Is there a way of setting the Average RMS Amplitude?
Thanks…
JJ:
Yes, the new ESP panel in Audition allows you to set levels based upon LUFS, which are an average level, rather than peaks.
Then, you can QUICKLY measure your average levels for the entire clip by opening the clip in the Waveform Editor and choosing Window > Amplitude Statistics.
Larry
Hai… my prob is im recording my own voice using Audition CS6 for song composition but the output sound is not satisfacting me … other song in my samsung mobile is well audible at 50% of sound. But my song is giving well audible at 90% of the total phones sound…. so give me the idea to get that perfect sounding at 50% in my phone.. plz help mam
Akil:
This sounds like your recording levels are too low OR your final mix levels are too low. You should be bouncing the audio meters around -12 dB on recording and around -3 dB for the total mix.
Larry
Great article Larry… when I normalize I notice that peaks above infinity hit the mark… i.e. -1 db…but they area shorter than peaks below infinity in the bottom half of the wave form. What causes this and what is the cure? Shouldn’t they be a mirror image? Many thanks!!
Tom:
They are often mirror images, but need not be. It depends upon the electronics in your mic, preamps, amps and digital processing. Also, if a pre-amp is not calibrated properly, this asymmetric problem will appear.
I had it on one of my amps until I got it tweaked.
IDEALLY, they should mostly match. However, it is not a crisis if they don’t, though it may indicate your gear needs to go in for repair/adjustment.
Larry
Thanks for the quick reply… so when normalizing can I just go by the upper peaks of the wave and ignore the lower even if they indicate clipping or do both matter?
thanks
Tom:
In terms of clipping, both top and bottom matter. In cases of uneven levels, but not clipping, you can ignore the shorter of the two segments.
However, a severe shift where one side is significantly different than the other generally indicates a gear problem that you should get looked at.
Larry
Amazing info. Thank you!