Adobe Premiere Pro CC: The Wrench in the Timeline
 Over the years, Adobe has worked to clean up the Premiere interface, remove the clutter and make the remaining tools easier to find and use. But, there is one tool hiding in plain sight that you may not have looked at: the Wrench in the Timeline.
Yup, there’s a wrench in the works for Premiere. Let’s take a look at what it does.
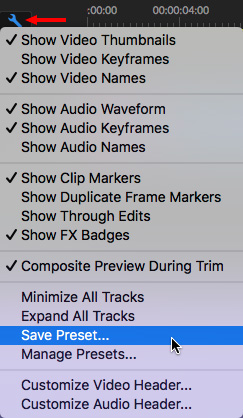
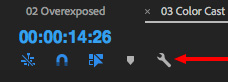
When you click the Wrench icon – located in the top left corner of the Timeline – it displays a menu of options, grouped into six sections, that control the display of the Track Header and clips in the Timeline. (The Track Header are those icons to the left of each track in the Timeline.)
VIDEO CONTROLS
The first three settings determine how clips are displayed in the Timeline:
- Show Video Thumbnails displays small images at the beginning of each timeline clip. These images don’t display if the vertical height of a track is too small to display them. A fast way to increase the height of a video track is to type: Cmd/Cntrl+[plus] (On by default.)
- Show Video Keyframes allows you to see opacity keyframes applied to a clip. (Off by default.)
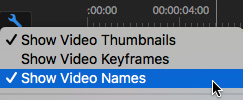
- Show Video Names enables the display of video clip names in the Timeline. Turning these off can reduce clutter in large edits. (On by default.)
AUDIO CONTROLS
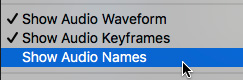
- Show Audio Waveforms enables the display of waveforms in the Timeline. (On by default.)
- Show Audio Keyframes enables the display of volume keyframes within an audio clip. (On by default.)
- Show Audio Names enables the display of audio clip names in the Timeline. (Off by default.)
OTHER COOL STUFF
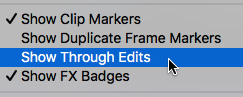
- Show Clip Markers enables the display of markers applied to a clip. Turning this off does not remove any marker, it simply does not display it nor does Premiere allow you to use a keyboard shortcut to jump to invisible markers. (On by default.)
- Show Duplicate Frame Markers displays a thin blue bar at the bottom of a clip when the same frames are used more than once in the same project. Most of the time, we don’t care. But, in the old days when projects originated on film, there was only one negative of a shot, so avoiding duplicates was really important. (Off by default.)
- Show Through Edits displays an edit when there’s a cut in a clip, but nothing was removed or altered. In other words, the clip plays as though no edit were there. Again, most of the time, we don’t care. But, hiding through edits can reduce clutter by eliminating non-meaningful edits. (Off by default.)
- Show FX Badges are the small “fx” icon displayed in the top left of a clip. These change color as different visual effects are applied. This option allows you to hide their display, though hiding the display does not remove the effect. (On by default.)
A SECTION OF ONE

- Composite Preview During Trim allows you, when you drag trim an edit point in a Timeline panel, to see a preview of what the final composited frames look like in the Program Monitor by displaying both clips on either side of the edit point. When this is off, you only see the clip you are trimming. (On by default.)
TRACK AND PRESET CONTROLS
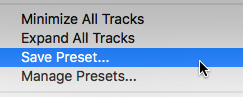
- Minimize All Tracks makes the vertical height of all tracks as short as possible. This mimics the keyboard shortcut Shift + –.
- Expand All Tracks makes the vertical height of all tracks as tall as possible. This mimics the keyboard shortcut Shift + =.
- Save Preset saves the current settings in this menu.
- Manage Presets allows you to switch between different presets, assign them to a keyboard shortcut, or delete the presets you no longer need.
CUSTOMIZATION CONTROLS
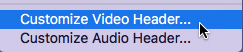
- Customize Video Header allows you to change the default icons associated with all video track headers. By default, all icons are currently displayed in the track header, provided the track height is tall enough. Customization is only necessary if you want to remove icons.
- Customize Audio Header allows you to change the default icons associated with all audio track headers. By default, all icons are currently displayed in the track header, provided the track height is tall enough. Customization is only necessary if you want to remove icons.
SUMMARY
Most of the time, the default settings will be fine. But, for those times where you need something special, the timeline customization options give you lots of options to work with.
Bookmark the
permalink.
2,000 Video Training Titles
- Apple Final Cut Pro
- Adobe Premiere Pro
- DaVinci Resolve
Edit smarter with Larry Jordan. Available in our store.
Access over 2,000 on-demand video editing courses. Become a member of our Video Training Library today!
JOIN NOW
Subscribe to Larry's FREE weekly newsletter and
save 10%
on your first purchase.


6 Responses to Adobe Premiere Pro CC: The Wrench in the Timeline
Hi – for some reason I don’t see this wrench, and I can’t seem to change any of the timeline settings (e.g. adjusting the height of a track in the timeline). Did I accidentally toggle something that disabled this function? Is there a way to access the timeline settings other than the wrench? I’m using Adobe Premier Pro 6.0.5.
Thanks,
CK
CK:
Your version of Premiere is too old for this setting. When Adobe moved Premiere to the Creative Cloud, they made major changes to the interface by removing elements. It was at this time that the wrench appeared.
Larry
HI Larry
I have been dragged kicking and screaming into PP CC 2019 from PPCS6. This due to hardware upgrades.
As well as loseing Encore which is a real pain.
I am only getting half of the audio wave forms I like to see peak to peak audio displays.
Am I missing something. OS: Mac 10.13
I have the audio but only a peak view>
Hope you have the answer
Terry:
I’m not clear about your question. When you say you are “getting half the audio wave forms” do you mean you are not seeing both pairs of a stereo signal, or that you are not seeing the negative (downward) part of a waveform?
Stereo pairs display automatically as you increase the height of the audio track.
The timeline only displays “rectified” waveforms, which is the top half, simply to save vertical space. However, if you move these files into Audition for mixing, you’ll see the entire waveform.
Larry
Great
Thanks!!