
![]() During an Adobe Premiere training class this weekend, one of my students asked how to display footage shot at a higher frame rate in Premiere so that it creates a high-quality “super slomo” effect.
During an Adobe Premiere training class this weekend, one of my students asked how to display footage shot at a higher frame rate in Premiere so that it creates a high-quality “super slomo” effect.
The answer is that we can do this easily in Premiere, but the process certainly isn’t intuitive or obvious.
SHOOT SLOW-MOTION ON AN iPHONE
There are two ways we can change the speed of a clip. The easiest is Clip > Speed/Duration. This allows us to specify the playback speed of a clip; from very fast to very slow.
However, what this is actually doing is either dropping frames to make a clip play faster, or play an existing frame multiple times, which slows the clip. The problem with playing the same frame more than once is that motion doesn’t really slow down, rather, it turns a clip into a series of still images. This “works,” but there is no improvement in image quality, and the slower you play the clip, the more it looks like a series of still images.
For example, to play a clip at 50% speed, which creates the illusion of slow motion, every frame is played twice. For 25% speed, every frame is played four times. For 10% speed, every frame is played ten times. As you can see, the slower the clip, the more it looks like a series of still images, rather than motion. Yes, you can add frame blending or optical flow, but all these are doing is putting lipstick on a pig.
A second option yields much better results, but requires planning ahead. For images that we want to slow down, yet still see movement between every frame, we “over-crank” the camera. This is an old film term that means to shoot at a faster frame rate, then play the clip back at a slower frame rate.
The good news is that our iPhones, and many cameras, allow us to shoot at a high frame rate. So, let’s use this to create our source footage for this example.
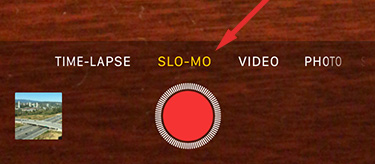
When you shoot video on an iPhone, you can choose to shoot Slo-Mo. This records whatever you are shooting at a high-frame rate.
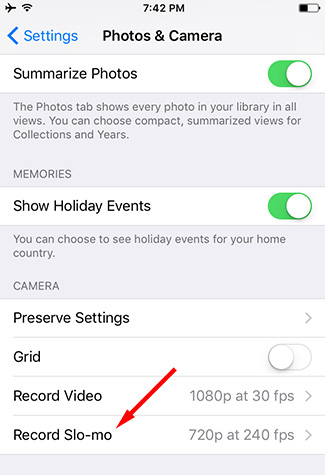
More specifically, go to General > Photos & Camera and tap the settings for Record Slo-mo.
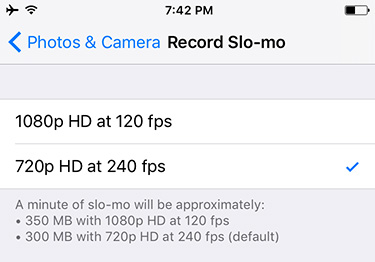
Here you can set the image size for slomo recording. Personally, I prefer going with a smaller image size in order to get a higher frame rate video.
Shoot video of something moving, then transfer the video from your phone – or camera – to your computer and open Premiere.
NOTE: Shooting over-cranked footage on a camera will generally give you more frame rate options. The faster frame rate you shoot, the slower it will play back.
INSIDE PREMIERE
Import the high-frame-rate video into Premiere, the same as any other clip. Once the clip is inside the Project panel, the magic happens.
NOTE: Once a clip is edited into the Timeline, you can’t change the frame rate. This must be done before editing.
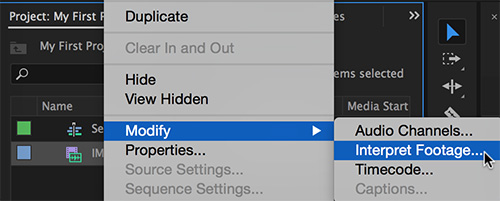
Select a clip, or clips, in the Project panel then either:
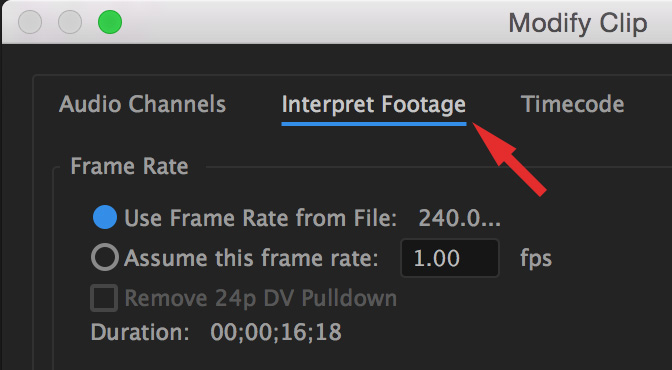
The default setting, which equals the frame rate the source clip was shot at, plays the clip at what appears to be normal speed.

Changing this setting to equal the frame rate of your project will play every frame in your super-slow-motion clip and yield really nice, extreme slomo results when the clip is edited into the timeline.
NOTE: Feel free to experiment with other settings for the second radio button and see how they affect the playback speed and quality of the source clip. Changing these settings will not make any destructive changes to the source clip.
SUMMARY
I’m seeing this effect used more and more – especially as more cameras support shooting at faster frame rates.
Try this for yourself by shooting something with your iPhone and editing it in Premiere. For my test, I was shooting traffic which worked great. After you learn this technique, the only limit is your imagination.
EXTRA CREDIT
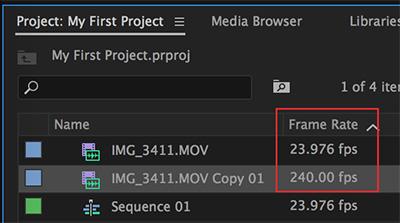
To have a clip start at “normal” speed, then slam into extreme slow motion, duplicate the clip in the Project panel. Then, set one copy to normal speed – the top radio button in Interpret Footage – while the second clip is set to the second radio button, as outlined above.
Edit both to the Timeline, then trim to get the effect you want.
To “ease-into” the effect, apply a variable speed change to the “normal” clip, then cut to the second clip.
As you start to play with this, you’ll think of all kinds of ways to use this technique.

2,000 Video Training Titles
Edit smarter with Larry Jordan. Available in our store.
Access over 2,000 on-demand video editing courses. Become a member of our Video Training Library today!
Subscribe to Larry's FREE weekly newsletter and
save 10%
on your first purchase.
3 Responses to Adobe Premiere Pro CC: Display High-Quality Slow Motion Video
Amazing.
My iPhone has more flexibility than my EX3
Hello!
In my Premiere Pro CC, by some reason, I can’t choose “Interpret footage”. The actual slo-mo video file has, after i imported it, converted to a audio file.
Could there be some setting in my Iphone X, when i exported it to the PC?
Thanks, and regards,
Peder
Sweden
Peder:
Make sure you can play the video file on your PC before importing into Premiere. If you can, then the process of moving it from the iPhone to the PC works fine. If you can’t, the export process is a problem.
Then, once the file is imported into Premiere, make sure you can play it in the Timeline successfully before interpreting the footage. If it works there, then we have isolated the problem into the Interpret Footage command. I suspect the problem is before the file gets into Premiere. Check your workflow and, if you still have problems, get back to me and we’ll try to figure this out.
Larry