 Editing using proxies can relieve your stress. Proxies allow you to successfully use less-powerful hardware for editing, reduce your storage requirements, and allow you to focus on creating the best possible rough-cut, rather than worrying about whether your computer is powerful enough to edit the dailies.
Many editors feel that editing proxies is a sign of weakness. Personally, I’d rather focus on getting the job done faster with the least stress possible.
And, if you edit using Premiere, there’s a very nice way to set up an automated proxy workflow that allows you to switch between proxies and masters at the click of a single button.
BACKGROUND
Proxy files are reduced-quality copies of your camera-native media. Generally, proxies use lower resolution and lower bandwidth to reduce file size. They are designed for simplifying the rough cut process, especially for higher-resolution media. They are not designed for final effects, color grading or output.
Proxies are designed to let you easily see the content of a shot without requiring a lot of processing power.
NOTE: Because of how Premiere calculates X,Y positions during scaling and compositing, you’ll have the best success using proxies that evenly divide into the master file. For example, a 1920:1080 master could use proxies that are 960:540. UHD at 3840:2160, could use proxies at 1920:1080 or 960:540; both resolutions divide evenly into 3840:2160. The lower the resolution, the smaller the file.
There are three major stages to any editing project:
One you ascertain that the master files have the overall quality and specs you’ll need for the final master, you don’t need to access the master files until you have a solid rough-cut complete.
The rough-cut is where you spend the vast bulk of your time in editing – trying to figure out the best way to tell your story visually. This doesn’t require seeing high-quality clips. Proxies fill this role perfectly.
Then, when its time to polish, you switch from proxies to the high-quality master file and make your story look glorious. Premiere makes that transition in exactly one mouse-click.
Here’s how this works.
AUTOMATE PROXY CREATION
Somewhere around the spring, 2018, Premiere update, Adobe added Ingest presets. These are special settings created in Adobe Media Encoder that can be applied when importing video files.
By creating a special ingest preset, you can automate the process of creating proxies in the background and in the location of your choice.
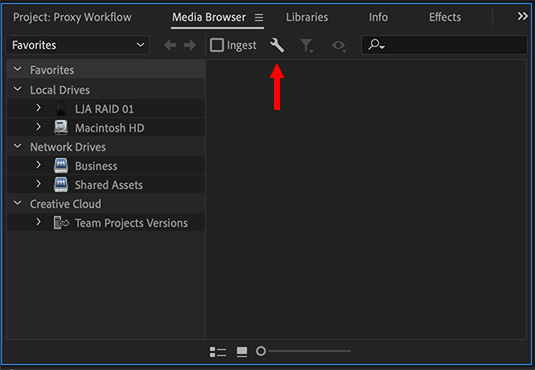
To start, go to the Media Browser panel. Then, click the Wrench icon to open the Settings window.
NOTE: If the Media Browser is not displayed in your workspace, check it in the Window menu.
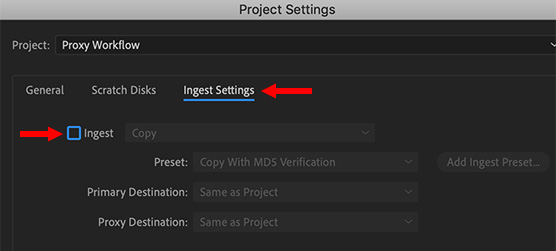
By default, all ingest presets are turned off.
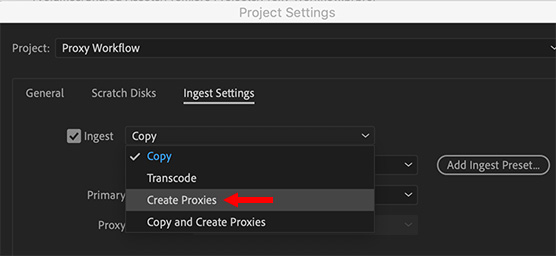
Once enabled, you can make copies of your master files, transcode the master files into different formats, and/or make proxy files.
Select Create Proxies. This toggles on the automatic creation of proxies while at the same time allows you to specify which proxy format is created. As well, it automatically “attaches” the proxy files to the master files allowing instant switching between displaying proxy or master files in Premiere.
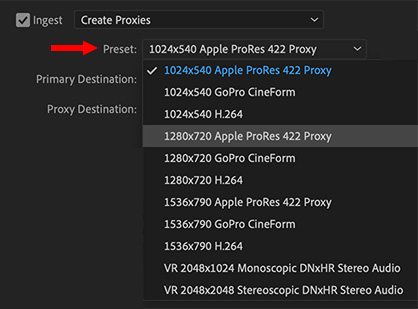
As you can see from this list, there are a number of choices. However, none of the choices in this list precisely match a UHD or 1920×1080 frame. Instead, we need to create a custom proxy setting.
NOTE: For Mac users, I recommend ProRex Proxy. For Windows users, I recommend GoPro Cineform Proxies.
CREATE A CUSTOM PROXY SETTING
Ingest presets are created inside Adobe Media Encoder (AME). So, launch AME.
NOTE: When creating an ingest preset in Adobe Media Encoder, marking the frame size and frame rate as “Match Source” is categorized as a Transcode preset. If either the frame size or the frame rate is not marked as Match Source, then the preset is categorized as a Proxy preset for generating proxies. The BIG problem is that Premiere does not make this easy.
As an example, let’s create a proxy ingest setting for UHD (4K) media.
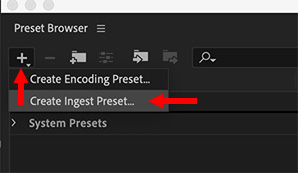
In the top-left corner of the Preset Browser, click the Plus icon and select Create Ingest Preset.
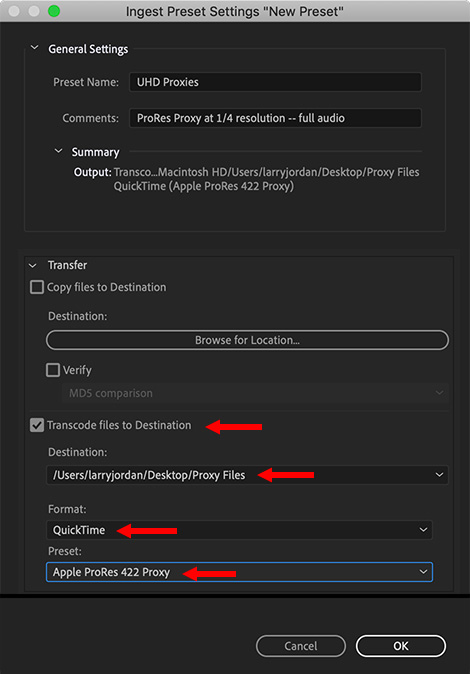
In the Ingest Preset Settings window:
NOTE: The Destination doesn’t really matter. The actual destination is set in Premiere and varies by project. The destination you set here is ignored.
You can pick other formats than ProRes. However, ProRes is optimized for editing and requires the least load on your system during the edit of other potential codecs.
Click OK.
NOTE: It is important to note that, by default, choosing Apple ProRes 422 Proxy creates a proxy file at the same resolution as the camera master file. To create proxy files at reduced resolutions requires an extra series of steps. I’ll cover this process in the next section.
MODIFYING PROXY FRAME SIZE
By default, ProRes Proxy files match the camera master frame size, frame rate and bit-depth. Which doesn’t save us a lot of space. Worse, there’s no way, in the ingest settings, to change the frame size of the proxy file. Instead, we need to create a custom encode setting, then apply it to the ingest setting.
Sigh… I know, awkward. Here’s how.
Click the Plus icon in the Preset Browser and select Create Encoding Preset.
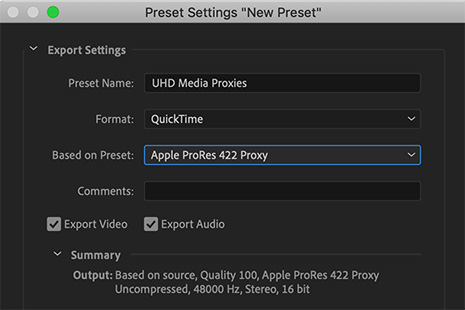
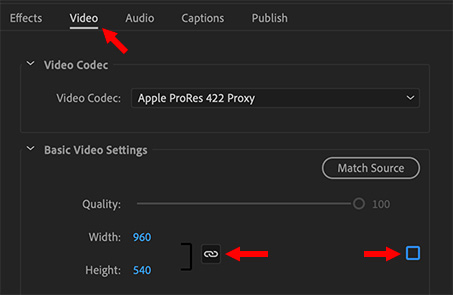
In the Video tab, make just two changes:
NOTE: Remember, the new frame size needs to divide evenly into the camera master frame size. The smaller the frame size, the smaller the file size.
Now that you’ve changed the frame size, add a descriptive Comment that explains what this setting does.
NOTE: Audio settings are ignored when creating proxies. Proxies contain the same high-quality audio as the master files.
Click OK, at the bottom, when done.
Next we need to apply this new custom setting to our ingest setting.
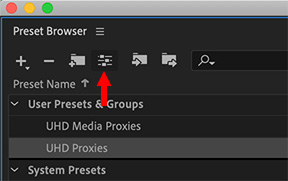
Select the Ingest Preset (“UHD Proxies” in my example above).
Click the Modify Preset icon (red arrow)
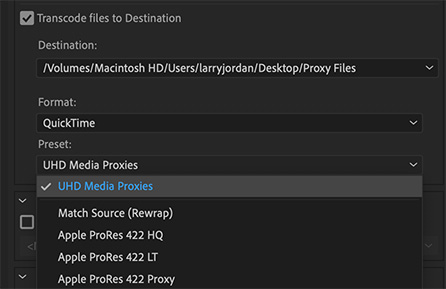
Select the custom encoding preset you just created. It will be at the top of the list.
Click OK to save the change.
EXPORT THE PRESET
Finally, we need to get this custom preset into Premiere.
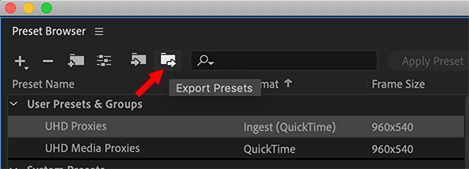
Select the Ingest preset you want to export.
Click the Export Presets icon (red arrow)

Give the preset a name and click OK
ADD THE PRESET TO PREMIERE
We only need to create an ingest preset once. After we import it into Premiere, we can use it as many times as we want.
In Premiere, click the Wrench icon at the top of the Media Browser.
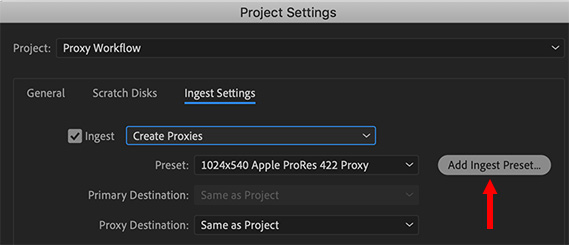
Enable Ingest > Create Proxies
Click Add Ingest Preset
Navigate to and select the Ingest setting you just exported from AME. It will have an .epr file extension.
Click OK.
Whew. Done.
NOTE: The ingest preset is copied from wherever you stored it to a special “Presets” folder that Premiere uses. This means you can export the preset to the Desktop for convenience, then delete the desktop copy after you have added it to Premiere.
INTERIM SUMMARY
Now, whenever you import a media file into this project, Premiere will automatically start AME, and create the proxy file to match the settings you created for this ingest setting.
Keep in mind that you can vary ingest settings by project and that proxy file destinations are set in the Project, not based on the destination you set for the ingest setting.
ONE LAST STEP
It is nice to create proxies automatically, but how do you see them? This is the last step in the process.
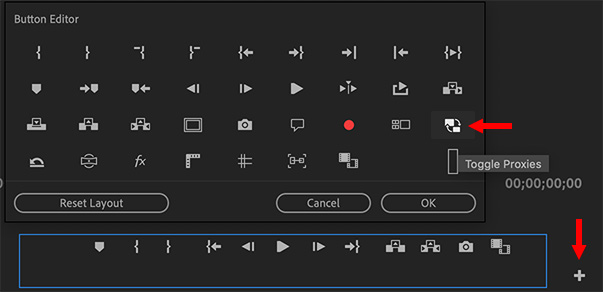
In the Program Monitor of Premiere, click the Plus icon.
In the second-from-bottom row, drag the Toggle Proxies button down into the monitor box.

Click OK. Then, click the Plus icon again to close the Button box.
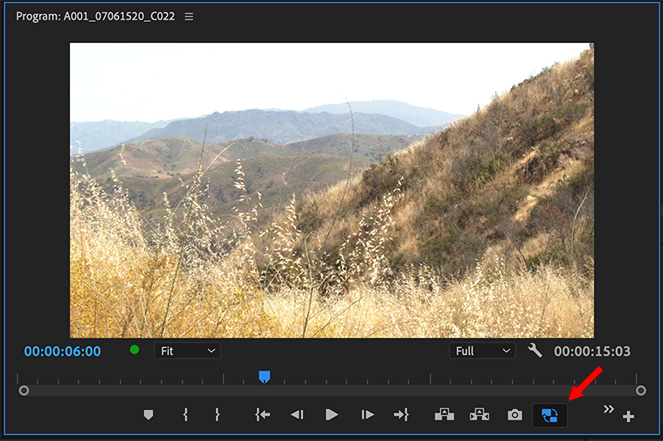
Now, whenever you want to edit or view proxies, click the Toggle Proxies button.
SUMMARY
While creating a proxy workflow seems a bit intimidating, you only need to create presets and configure the button bar once. After that, enabling proxies takes just a few seconds for each project.
And, if you save proxy files to a separate location than camera master files, it becomes very easy to copy the project and proxy files to a laptop for editing on the road without ever having to worry about relinking or the power of your laptop.
Which, thankfully, allows us to concentrate on the truly important task of figuring out the best way to tell our story.
NOTE: It takes time to create proxies and/or copies of media. While AME processes these files in the background, it is important not to quit AME or shut-down your computer until all this processing is complete. However, Premiere is not involved in proxy creation. You can quit Premiere at any time without affecting proxies in progress.
EXTRA CREDIT
If you need more information on ingest presets, this link from Adobe will help:
7 Responses to Adobe Premiere Pro CC: Create an Automatic Proxy Workflow
Have you tested trying to edit from just the proxies on a drive separated from the camera original files for editing away from the main storage as you mentioned at the end of the article? I’ve tried it and there have been two problems every time:
1) Premiere Pro searches the for the camera original clips every time the project is opened, so for a large project it can end up taking 10 – 15 minutes to open the project because it’s trying to search for and load those camera original files that aren’t there on the proxy drive.
2) You end up having to relink files every single time the project is moved between the proxy only storage and the main storage with the camera original clips. And, in the process of that relink certain Long-GOP formats can end up with the dreaded “danger stripes” issue where even when relinked Premiere Pro will tell you that the “clip extents do not match” the original clip.
Jamie:
Very interesting.
I’ve forwarded your comments to my contacts at Adobe to see if they have better advice. I’ll let you know what I learn.
Larry
Thank you very much ! It was exactly I looked for…
Hi Larry, great article. I do have a question.
My editing set is a Windows PC. I usually transcode my camera footage to Proress 422 and i edit with these proress 422 files. But let’s say i want to use proxies. Does it make sense to transcode my raw camera footage to Proress 422 first, and then make proxies of the transcoded proress files or can or should i just make proxies of the raw mp4 files? I was wondering this because proress 422 is a much better master file to have than MP4.
Ruben:
Make proxies of the master files you’ll use for editing. In your case, make Proxy files of the ProRes 422, not MP4, files.
Larry
Right, ofcourse! Just the space ProRes takes on the drive.. pfoe, tricky.. And you mentioned in this article that you recommend Cineform for windows, not ProRes. I’m on windows, is it not advisable to use ProRes (for master file, proxies, preview files) on windows? And if i use ProRes to edit with should i use cineform or prores for the proxy settings?
Thanks a a lot, have a great day.
Ruben:
Given Adobe’s formal support for ProRes on Windows, I would recommend a ProRes workflow from master files thru to proxies.
As always, test your whole workflow before starting your project.
Larry