
One of the newer features in Adobe Premiere Pro CC is how it handles multi-channel audio. In the past, we first needed to specify what type of audio we were editing into each track. Or, editing a stereo audio clip in the the Timeline would result in the two audio channels occupying two separate audio tracks.
With the CC release, things have changed. Let me explain.
ASSIGN AUDIO TYPES IN A NEW PROJECT
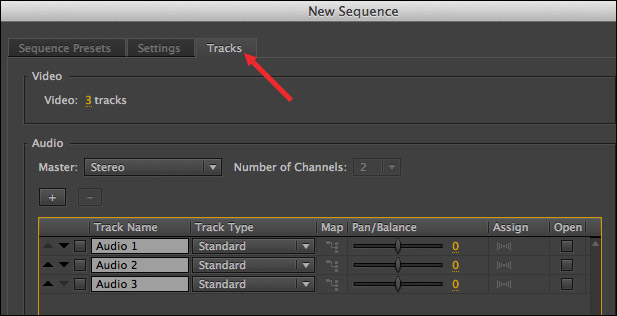
Audio types allow you to define which audio can be edited into what tracks. Making editing life even easier is a new default setting called “Standard.” We can access these new choices when we create a new sequence, but they are easy to overlook unless you navigate to the Tracks tab.
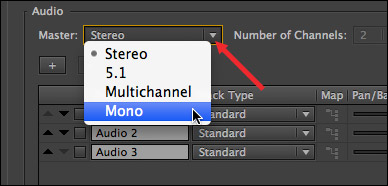
The Master drop-down menu sets the audio output format for the entire sequence. By default, this is Stereo. Other choices allow you to select 5.1 surround, Mono, or multi-channel audio output.
NOTE: Once a sequence is created, the Master Track output setting can’t be changed.
Setting the Master track to multi-channel means the sequence will export the final mix as up to 32 separate channels of mono audio. You can specify the number of output channels in the menu to the right. Multichannel is a good choice, for example, when you need stems exported as discrete audio channels.
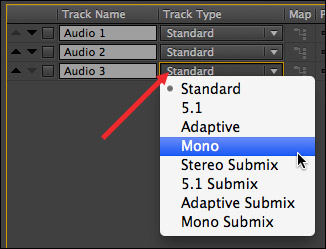
While the Master track is important, the Track Type menu, associated with each track, is the key to this new system. Audio tracks in Premiere can contain mono, stereo, and 5.1 surround audio.
NOTE: Once a sequence is created, these track settings can’t be changed.
There are two categories here:
Tracks contain audio files. Submixes only contain signals routed to them from tracks or other submixes.
There are four track types:
Keep in mind that once a track is created, you can’t change its type; though you can add and delete audio tracks as necessary to support your edit.
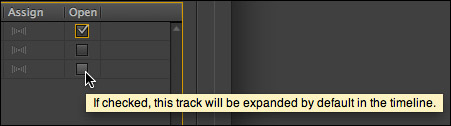
While we are in the Track panel, see these Open checkboxes? When these are checked, the audio tracks are expanded to full-height in the Timeline when you open the sequence, or until you change them.
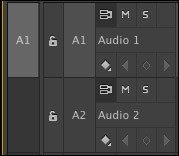
Full height audio tracks look like this, with all controls available.
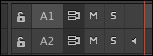
Collapsed tracks take less room and look like this.
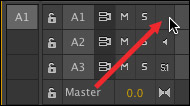
To expand or collapse a track, double-click the gray box to the right of the “S” (Solo) button.
NOTE: By the way, Premiere uses secret indicators to tell you about the track type.
WHY THIS IS IMPORTANT
If all you do is shoot, edit, and output stereo files, you don’t need to worry. All of Premiere’s default settings are perfect for you. However, to simplify a complex edit, you may want to group similar clips into the same track. In which case, these settings can help.
NOTE: Also, this system allows Premiere Pro CC to be compatible with earlier version Premiere projects.
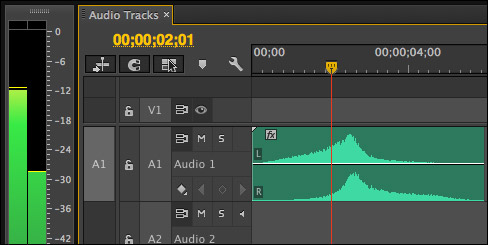
In this example, track A1 is a Standard track, into which a stereo clip is edited. Notice that both channels of the stereo clip are displayed in a single track.
Though, when we play the clip, the audio meters show a clear difference in levels between the two channels.
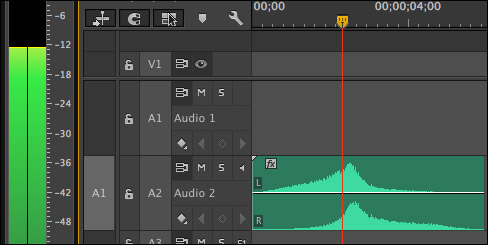
Now, let’s assign that same audio clip to track A2, which is a Mono track. We still see the two audio channels, but, as the audio meters indicate, this stereo clip outputs as a mono track.
This is a fast and easy way to convert a stereo clip to mono, without wasting time transcoding the clip or deleting channels.
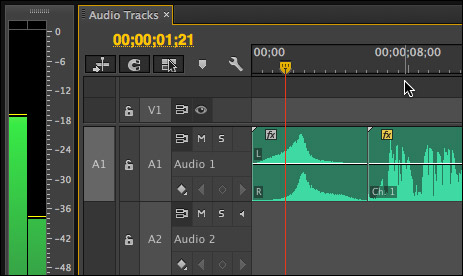
Just to show the flexibility of a Standard track type, track A1 has both a mono and stereo clip in it. Both clips will output as stereo, as displayed by the audio meters, however the mono clip, since it has only one track, will output panned center.
EXTRA CREDIT
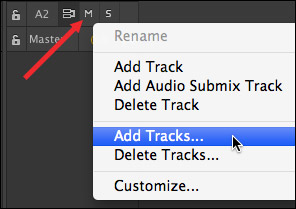
When you right-click an audio track header, if you select Add Track (at the top), Premiere will add a single Standard track.
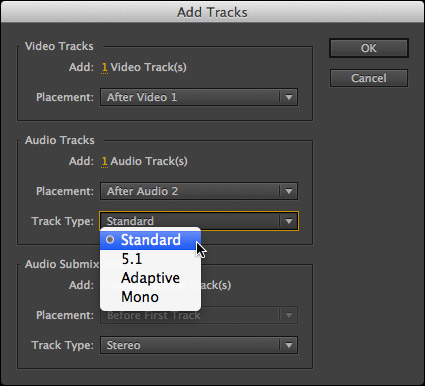
However, if you select Add Tracks… (at the bottom), Premiere opens an expanded dialog allowing you to select which Track types you want to create.
SUMMARY
These new track types make working with audio in Premiere Pro CC much easier than it was in earlier versions when we needed to specify the track type before editing a clip into a track.
Understanding what track types are, where they are set and what they do can help you make sense of even the most complex audio project.
NOTE: Here’s an article I wrote that explains how to separate a stereo audio clip into two dual-channel mono tracks.

2,000 Video Training Titles
Edit smarter with Larry Jordan. Available in our store.
Access over 2,000 on-demand video editing courses. Become a member of our Video Training Library today!
Subscribe to Larry's FREE weekly newsletter and
save 10%
on your first purchase.

36 Responses to Adobe Premiere Pro: Audio Track Types
← Older Comments Newer Comments →-
 Glenn says:
February 20, 2016 at 9:30 am
-
 Steve Marce says:
April 7, 2016 at 5:13 am
-
 Larry says:
April 7, 2016 at 7:34 am
-
 Steve Marce says:
April 7, 2016 at 9:55 am
-
 Nora says:
May 22, 2017 at 9:33 pm
-
 Larry says:
May 23, 2017 at 9:53 am
-
 nancy says:
September 4, 2018 at 9:29 am
-
 Larry says:
September 4, 2018 at 10:25 am
-
 Ocatvio Warnock-Graham says:
January 23, 2019 at 1:16 pm
-
 Larry says:
January 23, 2019 at 1:53 pm
← Older Comments Newer Comments →Thanks, Larry.
Glenn
Hello Larry,
I am facing a challenge and got no solution for this anywhere… The problem is:
A clip in a sequence with stereo master track sound louder than the same clip in the sequence with 5.1 master track…
I’m using premiere pro cs6 for a project. Initially when I created a new project in cs6 I knew very less about audio mixing and so I created a sequence for my project using the default dslr 1080p preset coz this preset had all that I needed and by default the master track in this preset is stereo. :'(
Later I needed to do a 5.1 mix for the project and the master track in my sequence was stereo. I tried to change the master track type to 5.1 but couldn’t do it. I did some research and found that i can’t change the master track type of a sequence later once the sequence is created.
So i created a new sequence in the same project and this time I changed the master track to 5.1 in the dslr 1080p preset and saved it as a custom preset. But now comes my big problem… When I copied the clips from the sequence with stereo master track and pasted them into my new sequence with 5.1 master track, the clips sound low in volume in my new sequence with 5.1 master track and when i play the same clips in the stereo master sequence they sound normal, loud enough. Its just that I copy pasted the clips to the new 5.1 master track sequence and when I play the clips there they sound low in volume than in the sequence with stereo master track… I play the same clips first in my old stereo master track sequence and then the same copy/pasted clips in 5.1 master track sequence and the clips now sound low in volume.
I’ve checked all the parameters of the clips and they are same in both the sequences. When I play the clips with the audio mixer opened, the bar rises to the same level, shows the same readings of dBs but I can’t understand why they sound low in 5.1 master track sequence.
I’m greatly stuck here…done all the editing, just the audio is left… Help would be greatly appreciated…
And yes the clips sounding low are the dialogue clips, the actual raw footage from the camera. Music and dubbed dialogues are not yet done so haven’t copy pasted them, just the raw camera footage.
I’m using headphones…is that the reason why I’m hearing less sound..? Will the final product after editing and mixing, when heard in 5.1 sound normal?
Best,
Steve
Steve:
You are correct that you can’t change Project audio settings once a project is created. And you are also correct that the mixing levels are different for mono, stereo and surround clips.
However, rather than try and diagnose this via email, I suggest you transfer your audio to Adobe Audition for mixing or contact an audio post-production house to create your mix. You’ll be much better off.
Larry
Thanx a lot Larry. This is exactly what I was looking for!? Appreciate it.
Hi Larry,
I’m working on a multichannel premiere file with 4 audio tracks, but I need to travel and work on it with only my headphones, not the setup with 4 speakers. When I changed to the headphones now, I can’t hear channel 3 and 4 anymore. what is the easiest way to change this? In the presets, I cannot add the channels to my audio output.
I would be extremely grateful for your reply!
thanks,
Nora
Nora:
Its not obvious.
You change audio output channel mapping in Preferences > Audio Hardware. Adjust which channels go where at the bottom in the Output Channels section.
Larry
Thanks Larry. I find PP audio tracks etc a mess. Avid is sooo much easier. That being said I’m using PP because it imports video so quick and easy. Here’s my question, I have no audio channel blank spaces or speaker icons in my sequence. Next to my S button I have a mic on all audio tracks. How do I find out if I’m on stereo track or mono? How do I get rid of the mic for the speaker icon or grey space? thanks Nancy
Nancy:
Premiere has continued to improve audio handling with each new version. Be sure you are running the latest version. Also, to see more icons, widen the track header.
As of about a year ago, Premiere allows you to put either stereo or mono clips on the same track.
Larry
Can you mention the +3db that gets added when a mono track gets put in a standard sequence track on output. I could not figure out why some dialog was peaking on export but just fine in the timeline.
Octavio:
More accurately, a mono track is 3 dB lower than a stereo clip. This is called, I think, the Pan Law. If you added a mono clip to a mono track, there is no difference in volume. Adding a stereo clip to a mono track, or a mono clip to a stereo track will change the level.
Larry