
![]() Last week, I wrote about how to use Apple Compressor to resize video between HD and SD. (Read that article here.) This week, I want to talk about the same process using Adobe Media Encoder.
Last week, I wrote about how to use Apple Compressor to resize video between HD and SD. (Read that article here.) This week, I want to talk about the same process using Adobe Media Encoder.
NOTE: The process of resizing an image has multiple names. “Resize” and “Scale” both mean to change the size of an image. “Up-res” means to make a small image larger; such as from SD to HD, or HD to 4K. “Down-res” means to make a large image smaller, such as from 4K to HD, or HD to SD.
BACKGROUND

All video images are composed of bitmaps; rows and columns of pixels that are fixed in size, creating a fixed image resolution. This means that changing the size of an image always changes the image quality. When scaling smaller images larger, the images get soft and a bit blurry. When scaling larger images smaller, they lose resolution. This is caused by altering the limited number of pixels in a video image. We can try to minimize the damage, but nothing we do will make it go away.
Because of this, it is a good idea, in general, to avoid enlarging smaller images. Sometimes, though, that can’t be helped.
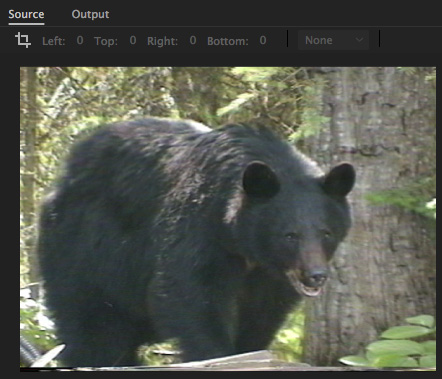
Additionally, most SD images have an almost-square 4:3 aspect ratio, as illustrated here in Adobe Media Encoder (AME), while the default aspect ratio for HD is 16:9.
NOTE: This image is typical of many SD images. It was shot on VHS tape, has poor exposure and is not completely in focus. In other words, it is like many, many movies in the archives. Resizing will make this image bigger, but it won’t make it look better.
The Aspect Ratio describes the proportions between the height and width. There are two principle ratios: 4:3 and 16:9. Because video changes “size” based on the size of the monitor displaying it, it is often easier for us to describe video using aspect ratio and total pixels than inches.
There are two image sizes for SD video:
Both these formats use rectangular-shaped pixels, rather than the square pixels we are used to seeing on our computers and the web. (Converting these rectangular pixels to square pixel values leads to all sorts of different apparent image resolutions for SD video.)
For the purposes of resizing from SD to HD, the actual number and shape of the pixels is not important; though they are very important when resizing from HD to SD.

If, when we resize, we don’t take aspect ratio into account, we end up with a very stretched image. This is bad. Instead, follow the guides below to resize your images.
IMPORTING AN IMAGE
There are several ways to import an image in Adobe Media Encoder:
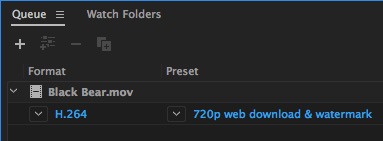
While, in most cases, I am a keyboard junkie, when compressing files I normally just drag them into the Queue tab; as I did with this Black Bear clip.
Once a file is imported, it always shows up in the Queue tab, with a format, preset and output file name and location assigned to it.
NOTE: You can change any of these settings by double-clicking the blue text. Since this article focuses only on resizing an image, I won’t be discussing most of these settings.
When resizing a file, all the settings we need to adjust are in the Preset that’s assigned to the clip. Double-click the blue Preset text under the file you want to modify to open and display the settings.
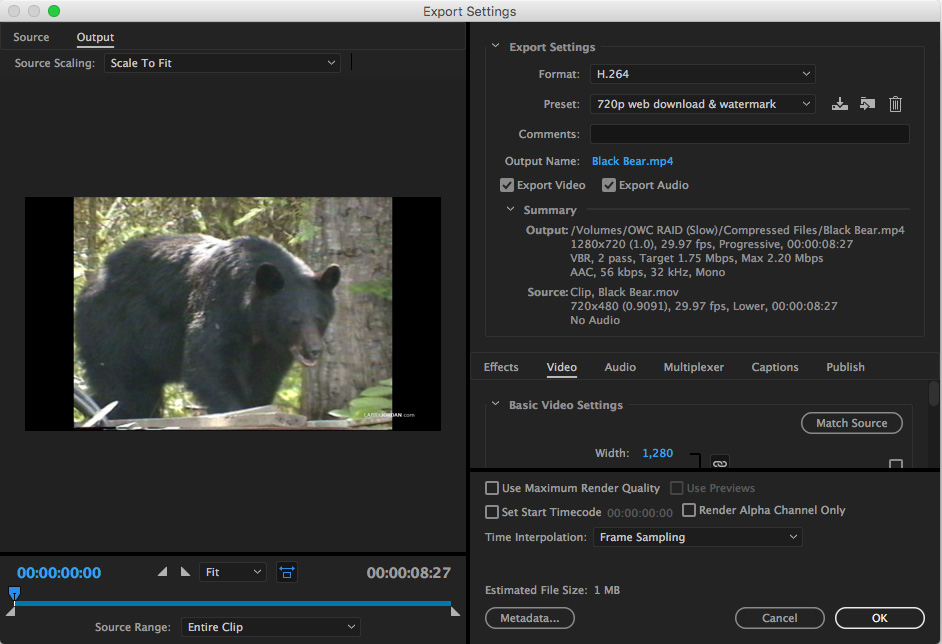
(Click to see the full image)
OK, yeah. This looks pretty intimidating; and not just the bear. However, the settings that control scaling (which is the fancy name for resizing) are all in one place. So you don’t need to learn the entire interface to resize your videos.
CONVERTING SD TO HD
The first thing you need to know about resizing an image is that the codec you use does not affect the process. Yes, different codecs will yield different file sizes and images quality, but the PROCESS of changing image size is not affected by the codec.
Second, when you resize an image, you are determining what size you want the finished image to become. AME will figure out what the source image is and what needs to be done, your job is to specify the results.
Third, almost all HD video uses a 16:9 aspect ratio, or greater. Which means that not only do we need to enlarge the image, we need to figure out how to place a 4:3 source image so that it fills a 16:9 frame. There are three options:
AME supports all three – HOWEVER, if you want any of your actors, or black bears, to ever talk to you in the future, NEVER stretch the image.
Add Pillar-Boxing
Double-click the blue Preset name in the Queue tab to open the Export Settings window.
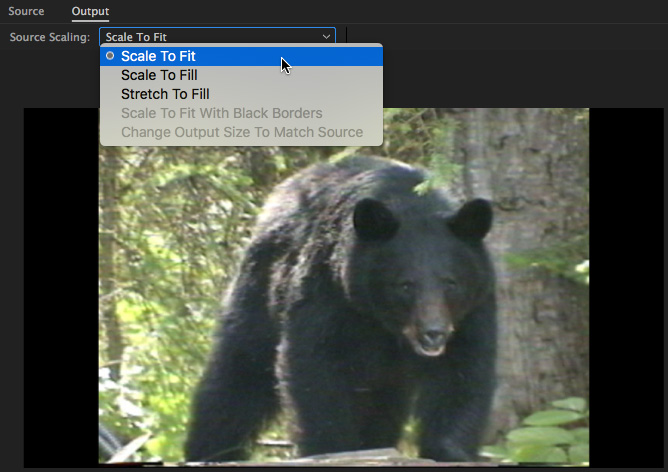
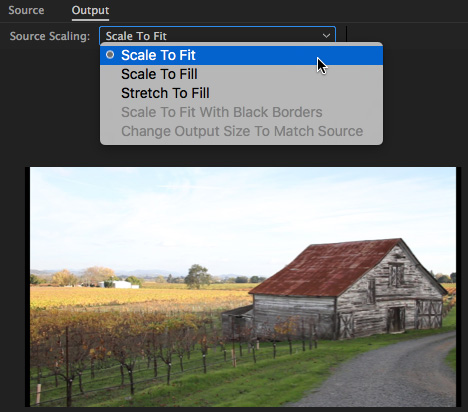
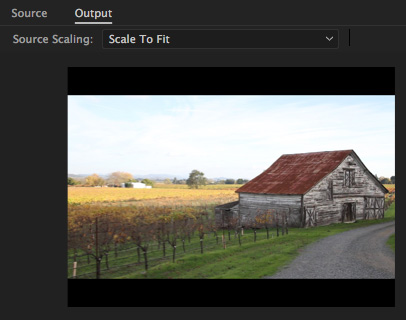
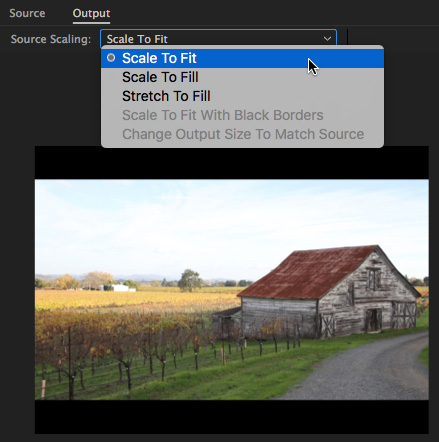
Click the Output tab in the top left corner to display what the output file will look like when compression is complete.
Select Scale to Fit from the Source Scaling menu. This fits the entire SD image into the frame using its 4:3 aspect ratio, and adds black bars on each side to extend the image to the full 16:9 frame.
The is the best option when you want to see the entire SD image.
Fill the Frame
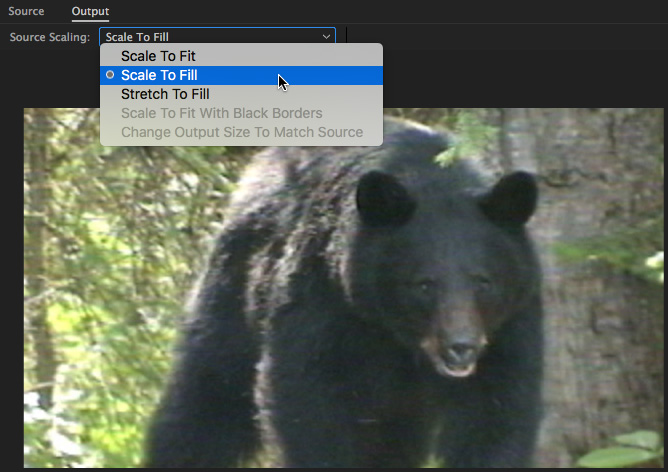
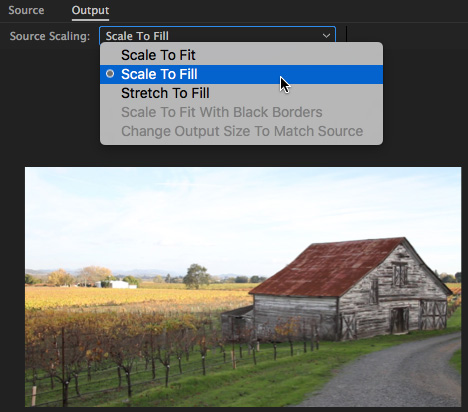
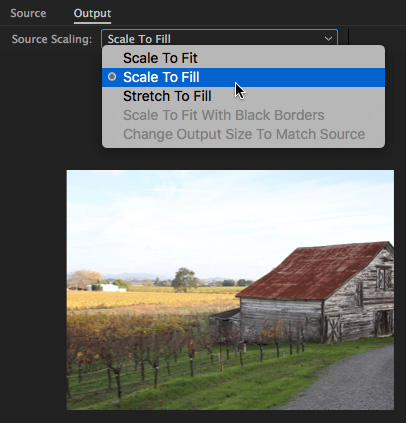
Choose Scale to Fill when you don’t want pillar-boxing. Now, the image zooms in so that the center of the image fills the frame.
While this creates a “larger” image, it does so by cropping pixels off the top and bottom of the frame. Notice how the space above the bear’s back, along with its feet and what it is walking on, is now missing.
There’s no right answer on whether to use pillar-boxing or crop the frame. But, my personal feeling is that I would prefer to see the entire image and pillar-boxing doesn’t bother me that much.
Stretch to Fit
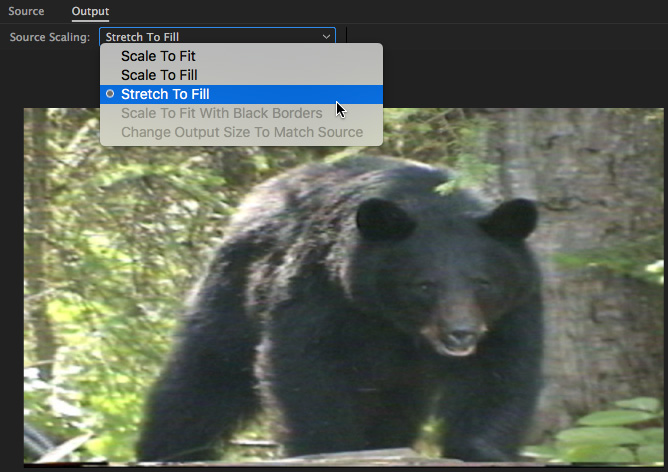
There is a third option, Stretch to Fill. Not to mince words, but this is just awful. Don’t use it.
IMPROVING IMAGE QUALITY

When you are scaling a video larger, you can marginally improve image quality by checking Use Maximum Render Quality. (Its located at the bottom right of the window. While this doesn’t work magic, it will improve the image. For example, I can see a different in the texture of the bear’s fur when this option is turned on.
This option will slightly slow compression times, but not significantly.
DOWN-RES FROM HD TO SD
Up-resing SD to HD is comparatively easy, because:
NOTE: Yes, HD has interlaced images. However, when converting SD to HD, you retain higher image quality by up-resing to a progressive image, then add interlacing during the actual edit.
Down-resing to SD is much more complex, because:
In short, SD is a mess.
BIG NOTE!!
There appears to be a bug when a video is down-sized in the current version of Adobe Media Encoder (2017.0.2 release) then displayed in QuickTime Player 7. Regardless of whether the image is 16:9 or 4:3, QT 7 displays it as 4:3.
This problem does NOT appear when the image is viewed in QuickTime Player X or Adobe Premiere.
Here is the work-around:
1. Apply the NTSC DV Widescreen preset that matches the source video’s frame rate
2. Double-click the blue Preset name to open the Export Settings window
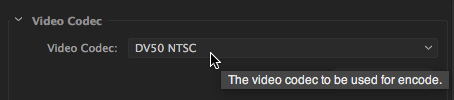
3. Change the video codec from DV25 NTSC to DV50 NTSC. The rest of the settings are fine.
NOTE: Another good thing about using the DV50 codec is that it has the potential for much higher images quality than DV25.
CONVERT HD to NTSC SD 16:9
Unless you’ve been give other instructions, converting HD to DV retains the most image quality and provides the most options for broadcast, DVD or future editing.
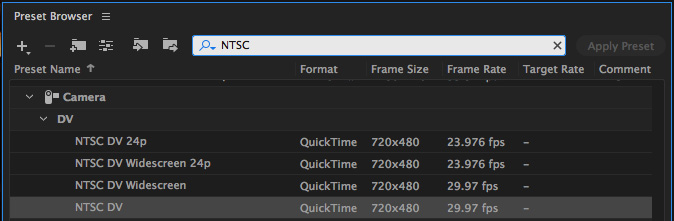
The easiest way to find all the NTSC presets is to search for NTSC in the Search box, as illustrated here. Which ever preset you choose, the sizing process is the same.
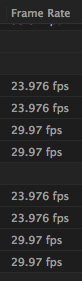
With NTSC video, you have the option for two different frame rates. The best advice is to match the frame rate of the source video to the frame rate of the scaled video. This also minimizes motion artifacts.
NOTE: If you shot 30, 59.94 or 60 fps, select a preset using 29.97. If you shot 23.976, 23.98 or 24 fps, select a preset using 23.976.
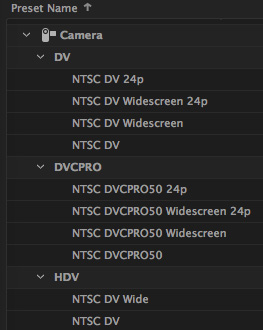
The aspect ratio is indicated in the Preset name: “Widescreen” means 16:9, while the absence of “Widescreen” means 4:3. In general, convert HD to widescreen, however some satellite and broadcast distributors are still using 4:3, which means you can’t totally ignore this option.
Here is a 1080p HD image, with the DV Widescreen option applied. Both frame rates are 29.97.
Note that Scale to Fit is chosen and, if you look carefully, you’ll see two thin pillar bars (thick black edges) on each side.
Because the HD image has plenty of extra pixels to work with, I could choose Scale to Fill to get rid of the black bars. Yes, this slightly zooms into the image, losing some pixels at the top and bottom, but the ability to have a full-frame image, to me, makes this slight image loss worthwhile.
Unlike Up-resing, I didn’t see any difference when Use Maximum Render Settings was turned on or off. Leave it off to save time.
CONVERT HD to NTSC SD 4:3
Converting the image to SD 16:9 is easy, because the entire image is preserved. Converting to 4:3 means you have two choices:
Apply the NTSC DV preset, then double-click it to open the Export Settings window.
NOTE: While not required, considering changing the codec to NTSC DV50 for files which will be viewed in QuickTime Player 7.
Scale to Fit is the default, which automatically adds letter-boxing. Again, I didn’t see a difference when choosing Use Maximum Render Quality.
Or, choose Scale to Fill. This zooms into the center of the image, losing pixels on the left and right edge but filling the frame without letter boxing.
Again, be sure to match the frame rate of the source with the frame rate of the compression preset.
CONVERTING HD TO PAL
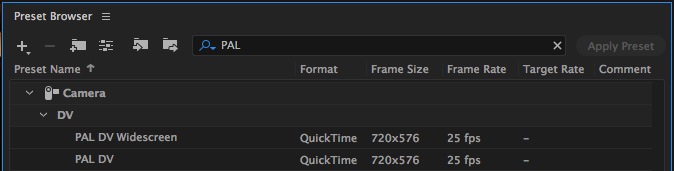
The process of converting HD to PAL is very similar, except we don’t have the issue of frame rates to worry about. PAL is always 25 fps.
NOTE: If you shot 50 fps in HD, this will convert easily to 25 fps. If you shot 24 fps, you can convert to 25 fps PAL or 24 fps NTSC.
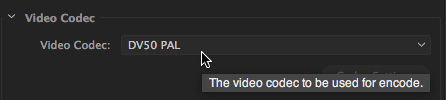
Again, you have the option to convert the codec to DV50 PAL. This is not required, but will yield potentially better image quality. Note that the video will not display properly in QuickTime Player 7, but will display properly in QuickTime Player X and Adobe Premiere.
Again, use Scale to Fit if you want letter-boxing. Or use Scale to Fill if you don’t.
SUMMARY
The process of resizing an image involves paying attention to the technical limitations of each video format. But, once you understand how this works, you can create a custom preset to apply to all clips you plan to up-scale, which will automate the entire process.
I’m puzzled by the scaling problem that appears in QuickTime Player 7 – however that problem does not appear when the video is opened in QuickTime Player X. And Premiere handles all these converted files perfectly. Experiment for yourself to see which of these two codecs works the best.
If possible, use the DV50 codec for the best image quality, though DV25 yields good results.

2,000 Video Training Titles
Edit smarter with Larry Jordan. Available in our store.
Access over 2,000 on-demand video editing courses. Become a member of our Video Training Library today!
Subscribe to Larry's FREE weekly newsletter and
save 10%
on your first purchase.
17 Responses to Adobe Media Encoder: Resize SD Video to HD – or – HD Video to SD
Hi Larry,
Very helpful instructions. I have a project where the video was filmed using old Sony DV camera. Half 4:3 and 16:9 aspect ratios. When I play the 16:9 using the camera on a HD TV it looks good when trying to edit on old FCP-5 it looked bad. Will resizing the 16:9 video to 4:3 in Adobe Media Encoder help improve for editing? I will be using Adobe Pr. for editing.
Steve:
I suspect what you are seeing is interlacing, which was built into almost all cameras shooting SD, especially Sony. TVs are designed to make interlacing invisible, while computers make it look horrid. This is the BIG advantage of progressive (non-interlaced) video – it can look good on both TVs and computers.
Resizing won’t help, but deinterlacing will. Both Premiere and Adobe Media Encoder support deinterlacing. In fact, you can resize and deinterlace at the same time in AME.
Larry
I had no problem with editing the 4:3 video in FCP only the 16:9. Would it be better to resize the 4:3 or the 16:9 video?
Steve:
There are multiple answers to that:
1. You don’t need to resize at all. Perhaps you want the stylistic differences between 4:3 and 16:9 to emphasize some part of your story – for instance to make clear when a flashback is occurring. There is no requirement to resize.
2. You want to resize so that all images are consistently 720p or 1080p. This simplifies editing; at which point you can decide to add or remove pillar boxing.
3. Since all HD is 16:9, my recommendation would be to resize the 4:3 footage first, then see if FCP X can handle the 16:9 rescaling automatically.
4. If you are having problems with the 16:9 footage, then create a test where you both resize it and convert it to progressive. See if that looks better in FCP X. Keep in mind that resizing will never make SD footage look like HD.
Larry
True, but the de-interlacing method used by Adobe does not lead to good results, especially on text or sharp edged graphics. FCPX sequences exported through Apple’s Compressor does a somewhat better job as long as you use the correct settings. The best de-interlacing available in software affordable by mere mortals is DaVinci Resolve Studio where fantastic (and fast) de-interlacing has been built in since version 12.5. Resolve also does the highest quality downscale to SD that I’ve found.
Jamie:
Thanks for the feedback.
Larry
Larry,
I have a windows question. As I understand it, the SD widescreen setting involves using a pixel aspect ratio of 1.212 which in itself determines whether there is a black bar along the sides of the hd video. In other words it would seem logical to try to change the PAR to some number that would allow correct fitting of the footage into the SD wide screen frame instead of stretchng. Obviously, for some reason, the 1.212 isn’t the correct PAR.
Do you have any thoughts about how to use Media Encoder to change the PAR (to whatever the correct number might be)? Thanks in advance.
John Rich
John:
Not quite true. 4:3 NTSC SD uses a pixel aspect ratio (PAR) of 0.9. 16:9 NTSC SD uses a PAR of 1.2. PAL ratios are different.
All images posted to the web – still or video – use square pixels (PAR of 1.0). The reason the black bars exist is that pixels that are 0.9 wide don’t take as much horizontal space as those that are 1.0 wide. Hence, the black bars fill the rest of the space. Without the black bars, posting a video with non-square pixels makes it look stretched.
The web has no ability to deal with non-square pixels. What Adobe Media Encoder does is widen each pixel slightly so that they are square and look proper when posted to the web.
ALWAYS, when compressing SD video for the web, be sure to select square pixels and everything will look good.
Larry
I am working with uncompressed MXF files captured by avid software, that show bitrates of 175,000, 30fps, 720×486. I am compressing them into MP4, using Loosless mode at both 30fps and 60fps. At 30fps my bitrate is 7,500 and at 60fps my bitrate is round 10,000. Do I gain quality at 60fps, or is this a waste of time and space? If convert any of my rendered MP4 files into 1280×720, at lossless bitrate mode, at 30fps, will I degrade quality? Which MP4 file should I work with, the 30fps or 60fps, or go back to my MXF file.
Steven:
In general, you should match the frame rate of your compressed movie to the frame rate of your project. Frame rate doesn’t affect image quality so much as the illusion of motion.
If you change the frame rate – to save file space – of the compressed file, it should be 1/2 the frame rate of the master file. Anything else will cause jittery movement during playback due to dropped frames.
You are correct. Faster frame rates require faster bit rates because there is more media that needs to be compressed per second.
For compressed files, use the source frame rate. Image quality is determined by:
* Frame size
* Frame rate
* Bit depth
* Codec
* Bit rate
Larry
Thank you. This was very helpful. My background in editing is photoshoping my photographs, where I use my native file size to limit or increase my dpi when I shrink a photo to 8×10 (from the excessively large native size). The increase in pixels is relative to the decrease in file size, so I return to the original file size, avoiding distortion, time rendering and maintain the highest quality digital photo without interpolating to add or delete pixels. Video with bitrates adds a 3rd dimension. So I am now rendering my uncompressed files at their native frame rate of 29.97 using the highest bitrate in lossless mode permited by my codec K-Lite and Vlogger by VideoProc, also using the native frame size 720×486. This render will be my archive in MP4, and I will thereafter apply crop, color and filters to sharpen to new versions, using same process: native frame rate of 29.97, bitrates at lossless mode as permited by software, and working within those parameters to set a frame size that works for my needs without distortion. (I was hopeful that by doubling frame rate the software would then boost my bitrate and when editing later, I could reduce my frame rate and maintain higher quality. If you think this can work, please comment, otherwise I assume it will not.)
Steven:
Whoa!!! If you are saving the file with a frame size of 720 x 486, you are doing FAR MORE DAMAGE to your image than any thing you do with frame rate or bit rate.
At a minimum you should save your images at 1920 x 1080, ideally, 3840 x 2160. Total pixels is incredibly important. DPI is irrelevant for digital video and digital images. It is only relevant for print. Bit rate is also, essentially, irrelevant. Keep it high to retain quality. The most important setting is frame size.
Larry
Hmm, Not sure if I fully understand. To paraphrase, even though my native frame size is 720×496 from the Sony camera, that was converted by Avid to 720×486 in the MXF file (and frame rate 29.97), you believe I should increase my frame size to something higher than the native 720×486 that exists in these uncompressed files. I have not observed any distortion compressing using same frame size and frame rate, nor at 60fps. I will however consider and try a higher frame size it that is what you recommend. Can I also drop my bitrate rendering to “medium 3” or high 4 or 5 vs. lossless mode, or keep lossless mode and live with the inflated file size.
Steven:
My apologies. If the original frame size is 720×486 (729×496 is a nonstandard size) then there is no reason to increase frame size. I misread your first note.
If you plan to edit these in the future, use lossless. If you simply plan to archive without editing you Dan decrease to bit rate.
Larry
Thank you. I had rendered them all at 60fps and now I an rendering at 30fps on the advice of my son and you. Should I bother to keep the 60fps files. They are about 20% larger, but I have no need if they offer no long term benefit.
Steven:
If you are happy with the copies there’s no reason to keep the originals except as a backup.
Larry
Thank you for helping me navigate this new world! You seem to have all of the knowledge I needed. FYI, both my 30fps and 60fps were from the same originals, the Avid MXF files, but I will keep both versions in the Cloud and the original MXF files on hard disks, just in case these videos and interviews turn into a documentary about the history of Palm Springs, CA. I will be sure to put on the credit list. Thank you again.