
![]() Last week, I wrote an introduction to using Adobe Media Encoder CS6 (AME). This week I want to follow-up with a step-by-step tutorial on how to compress video for YouTube using AME.
Last week, I wrote an introduction to using Adobe Media Encoder CS6 (AME). This week I want to follow-up with a step-by-step tutorial on how to compress video for YouTube using AME.
While we can use Watch Folders to automate the entire process, which I talked about last week, this week we’ll keep it simple and work directly with AME itself.
In which case, the first step is the easiest: Start Adobe Media Encoder CS6 (you’ll find it in the Applications folder).
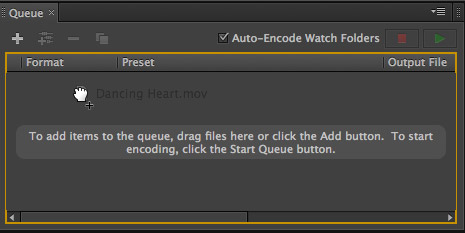
Drag the file, or files, you want to compress into the Queue panel in the top left of the interface. AME automatically applies a default compression setting which we will remove later in this tutorial.
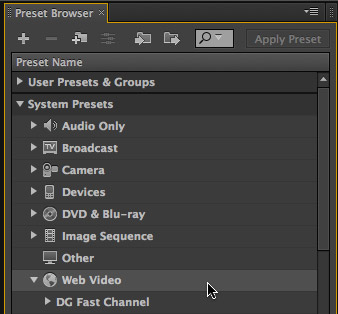
In the Preset Browser, twirl down System Presets, then twirl down Web Video.
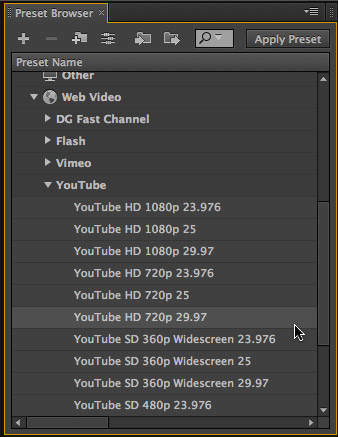
Look for the YouTube category and twirl it down. Then, select the format you want to turn your movie INTO.
NOTE: Never worry about the video format, file size, image size, or frame rate of your source video. They are irrelevant. AME will figure them out perfectly. You always select what you want the movie to become.
Personally, I shoot and edit all my web videos at 720p/60 and compress them to 720p/30 (or, as AME calls it 720p 29.97) for posting to the web.
Drag the YouTube setting you want to use – in this case, I’m using YouTube HD 720p 29.97 – onto the video you imported into the Queue panel. The video turns orange when your cursor is in the right position.
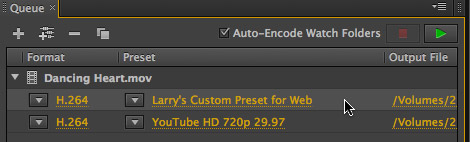
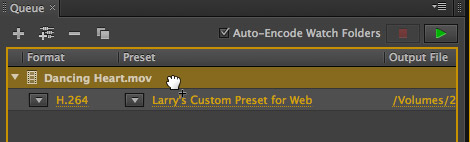
Highlight the compression setting that was originally applied to the clip when you imported it and delete it. (Your setting will have a different name than the one illustrated here.) Now, you should only have only one compression setting applied to the clip – the YouTube setting.
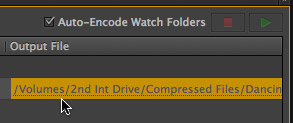
Check to make sure the Output File location is correct. This is where the compressed movie will be stored. Click the orange text to change the location, if necessary. (If you can’t see the setting, enlarge the size of the Queue panel.)
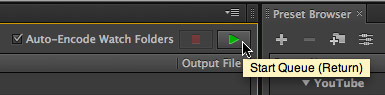
Click the green Start Queue button in the top right corner of the Queue panel to start compression.
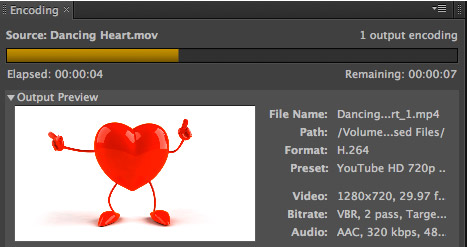
Instantly, the Encoding panel lights up and AME displays a frame-by-frame playback during the compression – along with a variety of other statistics. (The Dancing Heart video is courtesy of Pond5.com.)

Remember compression can take a long time. However, AME runs in the background so you can do other things in other applications while waiting for the compression to finish.
When compression is complete go to the Output File location and admire your new file. At this point, your file is ready to upload to YouTube.

2,000 Video Training Titles
Edit smarter with Larry Jordan. Available in our store.
Access over 2,000 on-demand video editing courses. Become a member of our Video Training Library today!
Subscribe to Larry's FREE weekly newsletter and
save 10%
on your first purchase.
3 Responses to Adobe Media Encoder: Compress for YouTube
Thank you so much! Even in 2018 and the colours are different – still a perfect walk through 🙂
Talluah:
You are welcome – happy to help.
Larry
Yaaay. Worked. Thanks a lot!