
![]() Since I’m thinking about efficiency this week, here are three tips that can speed compression tasks in Adobe Media Encoder.
Since I’m thinking about efficiency this week, here are three tips that can speed compression tasks in Adobe Media Encoder.
NOTE: Here are more tips for Adobe Premiere Pro CC and Adobe Audition CC.
GROUP SETTINGS
When I compress my weekly Webinars, I need to create several versions for distribution:
Each of these has different settings, yet is the same from week to week.
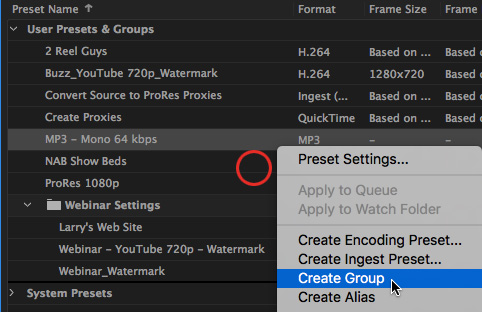
To quickly apply multiple settings at once, Control-click inside Preset Browser > User Presets and Groups and choose Create Group.
In the screen shot above, you can see a group I created called “Webinar Settings” which has three different compression settings stored inside it. Simply drag the group folder on top of a clip in the Queue to apply all those compression settings at once.
A FAST WAY TO TEST COMPRESSION SETTINGS
When you are creating custom compression settings, you should test them before committing the time to compressing your entire project.
Here’s the secret: Things that move are harder to compress than things that are still. So, the way to test your compression settings is to compress a short section from your movie that contains a lot of movement.
To do this, double-click a compression setting that’s applied to a clip in the Queue. This opens the Output / Settings dialog.

At the bottom of the Output section, on the left, is a small timeline. Drag the blue playhead to the start of the test section, then type I to set an In. Drag to the end of the section and O to set an Out.
NOTE: You only need to compress about five seconds to see if your compression settings are creating artifacts or other unwanted effects. No reason to waste time compressing the entire movie just to check quality.
Click the OK button on the right panel, then compress the test section. If it looks good, it is good.
WATCH FOLDERS
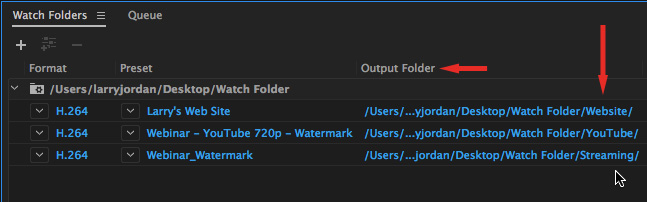
Watch Folders are an excellent way to automate compression, once you know your settings are correct.
What you may not know is that you can apply multiple compression settings to each folder, with a separate destination for each setting. This makes it easy to create multiple versions of the same source file without any extra work.
NOTE: Here’s an article on how to create Watch Folders.
Here’s how:
And that’s it. This is also a simple way to easily transcode media for editing and proxies.
NOTE: In order for Watch Folders to work automatically, AME must be running.
SUMMARY
Media compression may be boring, but it is also essential to almost every edit. Fortunately, AME has lots of ways to make compression simpler and faster.
Share your own tips in the Comments section below.

2,000 Video Training Titles
Edit smarter with Larry Jordan. Available in our store.
Access over 2,000 on-demand video editing courses. Become a member of our Video Training Library today!
Subscribe to Larry's FREE weekly newsletter and
save 10%
on your first purchase.