 [Updated Aug. 17, 2019, with information on how to import or export markers using CSV files.]
I edit in Adobe Audition almost every day, generally for my weekly podcast (DigitalProductionBuzz.com). And, as with all the software I use, I keep looking for better or faster ways to do something.
Many times, I want to take a short section of audio and move it from one place to another, either in the timeline or the waveform editor. While it is easy to drag a clip to move it, I started wondering about whether markers could help.
That got me wondering about markers in general, and THAT made me realize that I didn’t know a whole lot about how markers work in Audition. This became the impetus for this article.
NOTE: Adobe’s Help files are seriously out of date regarding markers. This article contains information not found in the Help files.
UPDATE: Here’s a second article that describes how to export and import markers using Audition.
BACKGROUND
A marker specifies a location in time in either the Waveform Editor or Multi-track Timeline. There are four marker types within Audition:
Cart timer markers are part of an old-fashioned technology radio stations used to copy commercials and other short programs to audio tape for instant playback on air.
CD Track markers are used to indicate the start of tracks when creating audio CDs.
Subclip markers are used by Premiere Pro and Prelude to define clips within longer recordings. This clip type is useful when working back and forth with Premiere, but perhaps less so in an Audition-only workflow.
Cue markers are a general purpose marker for use within Audition.

NOTE: Cue markers are gray. Subclip markers are blue. Operationally, within Audition, these two marker types are identical. If you are moving files between Premiere and Audition, use subclip markers.
In Audition, a marker can either be a point or a range.
WORKING WITH MARKERS

To add a marker, position the playhead where you want to locate a marker and type M. This adds a Cue marker at the position of the playhead. The default marker name can be changed in Preferences > Markers & Metadata.
NOTE: You can also add markers using the Markers panel, but M is MUCH faster!
To move a marker, drag it.

To rename a marker, right-click the marker icon, and select Rename Marker.
To delete a marker, right-click the marker icon, and select Delete Marker.
NOTE: Here’s a really cool tip. Once you create a marker press / — this selects the marker name in the Marker panel so you can quickly rename the marker. If the Marker panel is not open, press / twice.
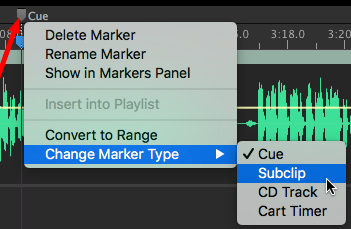
To change the marker type, right-click the marker icon and select the option you want under Change Marker Type.
Markers created in the Waveform view are attached to the audio file, so if you insert or delete segments of the WAV file, the marker(s) will move. They also show up as static lines in the clip when used in Multitrack. Markers added to multitrack sessions are tied to the session timeline, and do not move with clips. However, they WILL move if you insert or delete time in a session.
WORKING WITH RANGES
Ranges allow you to label a section of an audio file.

If you are in the Waveform Editor, select the region that you want to convert to a range, then type M. This is a very fast way to build a collection of sound bites for later editing (see below).
NOTE: You rename marker ranges the same as markers.
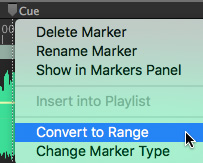
To convert a marker to a range, right-click the marker icon and select Convert to Range; both Cue and Subclip markers can be converted to a range.
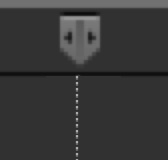
This displays the two sides of a range marker.

To set the range, drag one of the two edges.
USING THE MARKERS PANEL
Open the Markers panel from the Window menu or type Option + 8.
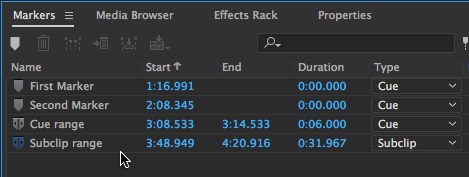
The markers panel allows you to do even more with markers. For example:
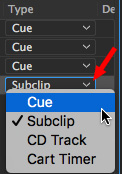
To change the marker type, click the downward-pointing arrow next to the marker type.
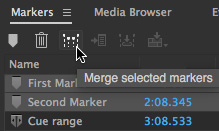
To merge two adjacent markers to create a range in either the Waveform Editor or timeline, select the two markers in the Markers panel, then click Merge Selected Range icon in the top tool bar.

To rename a marker, double-click the name.

To change the start time, or range duration, double-click the timecode you want to change. (Or simply drag the marker where you want it in the Timeline.)
THINGS TO DO WITH MARKERS
The most obvious reason for using a marker is to label sections of your audio. This makes jumping between markers a simple keyboard shortcut:
But there are less obvious things to do with markers that can speed editing.

If you have selected a marker range in the Waveform Editor, you can export it as a stand-alone audio file using the Markers panel.
Or, you can copy the selected range and automatically insert it into a multitrack timeline. However, every time I tried this, the inserted range was always placed at the beginning of the selected track, not at the position of the playhead. And it is often difficult to select the correct track, then switch to the Waveform Editor.
If you create range markers in a clip, you can drag the range directly from the Markers panel into a track in the multitrack timeline. This is a very fast way to build a collection of sound bites.

This button – on the far right side of the Markers panel – allows you to see all the markers in all files that are currently open in the project, not just the currently selected file or timeline.
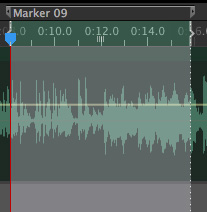
In what is a very useful function, if you have a marker range in the Timeline, double-click the edge of the marker to select the entire range. Once the range is selected:
I REALLY like dragging marker ranges applied to a clip from the Marker panel into the timeline. That is just a really fast way to edit.
MARKER PREFERENCES
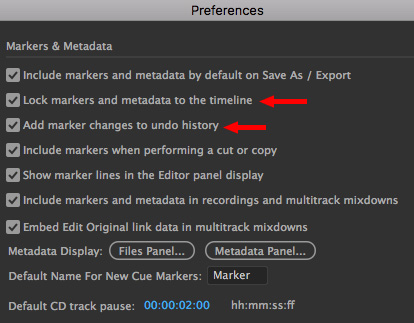
There’s an entire preference panel devoted to markers. While I like all the defaults, there are two settings I want to call to your attention:
However, in general, I leave these settings at their default.
KEYBOARD SHORTCUTS
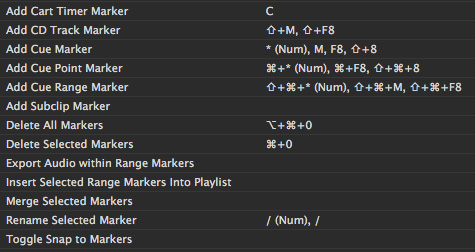
There are 17 keyboard shortcuts for markers in the default keyboard shortcut set in Audition. While M creates a default Cue marker, Shift + Cmd + M creates the much more useful Cue Range marker.
The only shortcut that drives me nuts is “C”, which creates a Cart Timer marker. Since Premiere uses C to cut clips, I am forever inserting Cart Timer markers when I want to cut a clip. In my personal shortcut set, I set this shortcut to blank.
THINGS I WISH MARKERS DID, BUT THEY DON’T
Markers in Audition are useful and range markers, though hidden, are really useful. Still, there are a number of things I wish Adobe would implement for markers in Audition:
SUMMARY
The most powerful feature of markers in Audition – range markers – is really hidden. And unless you know how to use the Markers panel, most of the benefits of using markers are also hidden.
Using Subclip markers to log audio before importing it into Premiere is a great way to keep files organized and speed your editing.
In short, once you know how markers work, they can make your editing more organized and much more efficient.
16 Responses to Adobe Audition CC: Using Markers [u]
This is gold! I only knew the basic M marker, and not only didn’t know I could make a range; I had no idea what those little button icons meant. Thanks!
My studio is about to embark on a new type of project – recording audio textbooks for visually impaired students. The state’s format requirements include markers for pages, sections, and chapters. (Daisy compliant – http://www.daisy.org)
Will markers help accomplish this and how?
David:
Maybe. I read the Daisy specs and they are focused on eBooks (meaning visuals) not audio books. I couldn’t find any reference to what type of markers they need in an audio book file. I also didn’t see any reference to what file format you need to submit.
Some audio formats support embedded markers, other require external sidecar files. My suggestion is to contact Daisy directly to determine which audio codec and marker specs they require.
Audition may be able to help, but I don’t know enough, yet, to answer your question.
Larry
To answer this a little better…
WAV\BWF files usually have METADATA associated with them, usually in the HEADER area of the file, but occasionally as a SIDECAR xml file. In fact, most audio formats allow for metadata in either form.
MARKERS are a great way to have motion points, but they need to be addressed a certain way.
First, you need to be working in the Waveform editor. This will ensure your markers are in the final file, the main WAV or whatever format you choose. IF you are still mixing, just know that the file you export will have the markers embedded in the file, but you might not be able to actually edit them (it’s hit and miss, sometimes they are editable, other times I have to create new ones).
Lastly… CUE markers are typically useable, but more than likely, you will want to use CD markers and set them up against one another very tight. If you drop them to a CD at this point, you will have a CD that can be traversed by the markers for pages, or any other break you choose. However, if you want to utilize markers in a standard audiobook format, find out which kind of marker they use, and set that in your file instead. Typically the Audiobook is just an AIFF or an MP4a file wrapped in a different extension that contains sidecars for more metadata. Get the specs from your distributor.
Use the right kind of marker. There are other apps that can drop a sidecar file of the metadata, but such files are typically superfluous anymore.
Hal:
Thanks for your explanation.
Larry
Your wish that markers added in the multitrack timeline were able to be pinned to clips and move around as you add and subtrack is my greatest wish too. Right now you can drop a marker down at some relevant clip… like one you’re not sure about…. maybe you’ll keep it, maybe when you notice something else down the line that is better, you’ll go back to that marker and delete the clip it is attached too…. but right now if you edit clips before that market, then the clips after it get moved around and that marker you placed is instantly rendered useless because the editing has moved it out of place! You really need to be able to pin a clip to a multitrack clip.
This explanation of Audition markers is head and shoulders above the rest. I am Ok with FCPX, but quite new to Adobe Audition. I spent a few hours today looking for explanations of how to work with really long audio files…longer than one hour. In particular, I recorded an event…the two event speakers were miked, and there was an in-room audience mic which picked up a few intermittent questions. So three tracks in an Audition multi-track. So there is a one hour time line of two speakers. It has to match up with maybe 7 minutes of 10 audience questions in the 1 hour long audience audio file. I think markers in the wave form of the audience file will let me enhance the questions AND get them in the right place in the multi-track time line.
Norma:
Very cool. Happy to help – and good luck with your project.
Larry
Very intertesting and useful article.
…and if you want a shortcut for starting a range while recording, and another shortcut for ending the range? This would be a great time saving feature.
Stefano:
This exists. It’s called “Punch In/Out.” Set a range and Audition will start recording at the beginning of the range and exit record at the end. Here’s an Adobe article that explains how: https://helpx.adobe.com/audition/using/recording-audio.html
Larry
Have you thought of or know of a way to set the default export format setting to 320kbps CBR? It is annoying to have to go into the dialogue everytime to change the setting.
Jerry:
Ha! Interesting.
No, I don’t. However, send me an email directly and I’ll send it to my contacts at Adobe and see if we can either learn how or get them to add this ability.
Thanks,
Larry
I just found the marker range today! but I can’t save a multitrack marker range as an exported file. Know of any work arounds for that?
Tigre:
You can.
Double-click either the leading or trailing marker in the Timeline. This selects the range of the marker.
Type Shift + Cmd + E to export the selected timeline range. At this point, the export process is the same as any other export.
Larry
This tutorial is fantastic. The one think that I could not get to work was selecting a marker range in the Markers window and having the Download icon appear. Any suggestions? I am using Audition CC 2019.
I love the spirit of useful exploration in which this article was written. Thanks very much, Larry!