
![]() There is an extremely helpful analytical tool in Adobe Audition CC that I find essential to all my important mixes: Amplitude Statistics.
There is an extremely helpful analytical tool in Adobe Audition CC that I find essential to all my important mixes: Amplitude Statistics.
HOW TO USE IT
Open any audio clip, or a video clip with an audio component, into Audition. Then, double-click the clip to open it in the Waveform Editor. (This tool doesn’t work in a multitrack mix and it only works for one clip at a time.)
NOTE: The way I use this for my mixes is that, when the mix is done and exported as a WAV file, I use this function to check the stats. If everything checks out, I then import it into Premier or Final Cut for final output.
Choose Window > Amplitude Statistics. (I use this so much I’ve assigned it a custom keyboard shortcut.)
Click Scan, or Scan Selection, at the bottom of the window.
HOW TO INTERPRET IT
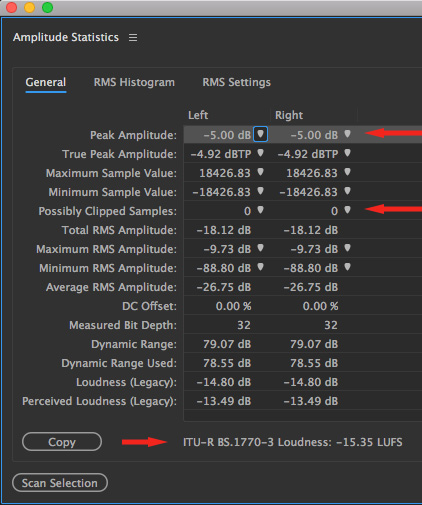
There are 16 different measurements in this window, with four that are truly important.
For me, this is the most essential measurement. I don’t release any audio that has the potential to be distorted.
I used to look exclusively at this number, but I’ve learned that peak values are deceptive. I generally want my peaks between -6 and -3 dB. Also, click the small “home base” shaped icon to jump to that portion of your clip with the loudest peak. This simplifies fixing a problem.
For the web, I want this ±1 of -16 LUFS. Most of my mixes end up around -16.5 to -17 LUFS. (1 LUFS is, essentially, 1 dB.)
NOTE: Broadcast and cable require average levels closer to -24 LUFS. The web isn’t that restrictive.
SUMMARY
I’ve used this measurement tool for years, but only recently started paying attention to the average levels (LUFS) rather than peaks. When I did, my mixes started sounding better.
While the Loudness Radar is also bundled with Adobe Premiere, Amplitude Statistics is only in Audition and, for me, this one tool makes using Audition essential for any mix that I care about.

2,000 Video Training Titles
Edit smarter with Larry Jordan. Available in our store.
Access over 2,000 on-demand video editing courses. Become a member of our Video Training Library today!
Subscribe to Larry's FREE weekly newsletter and
save 10%
on your first purchase.
3 Responses to Adobe Audition CC: Explaining Amplitude Statistics
Hello,
This is very useful. But I would like to know what is the conversion between dBFS and dB SPL. what does a -17 LUFS could mean exactly in dbSPL?
Thank you,
Ioana
Ioana:
Great question and I don’t know the answer. Perhaps another reader can suggest one.
Larry
dbFS means “decibels Full Scale.” This is the same FS in LUFS (Loudness Units Full Scale). As I understand it, “full scale” simply means “the entire dynamic range possible” — or in digital audio, “How does this sound measure relative to 0 decibels, the maximum volume?”
For example, -10 dBFS may differ from -10dB. If someone says “That electric guitar was too loud, but I lowered it 10 dB,” we get that it’s quieter now but we don’t really know the amplitude of the guitar. It’s 10 dB quieter, but that 10 db could be sliding around anywhere on the full scale of possible volume. If they said, “That guitar was really loud, but I lowered it to -10dBFS,” we know the amplitude of the guitar is -10dB, relative to 0 — the top of the full scale. So -10dB is relative but -10dBFS is absolute.
LUFS are conceptually similar to RMS in that loudness units measure PERCEIVED volume, by averaging all the waves in a file. Sound Pressure Level is an instantaneous measurement, like Peak. Its relationship to LUFS is the relationship of any given wave peak to the average volume of the file. SPL measures a split second, LUFS measures an average. In that sense any wave peak in a file might equal the average volume, or may be more, or less; there is not really a relationship that is mathematically constant.