
![]() Recently, a client gave me a challenge to improve the quality of their audio for on-air promos. However, since they were a broadcast outlet, speed was everything. Whatever we created needed to be done – start to finish – in 30 minutes.
Recently, a client gave me a challenge to improve the quality of their audio for on-air promos. However, since they were a broadcast outlet, speed was everything. Whatever we created needed to be done – start to finish – in 30 minutes.
Now, to be truthful, they were dealing with excellent audio to start with. The shows they were creating promos for were already cleaned up and mixed. Still, the techniques presented in this article can apply to any audio situation.
NOTE: I am a big fan of Adobe Audition. Avid ProTools is another excellent tool, however, I’ve had miserable luck with iLoks, which ProTools requires, so I long ago stopped using the program.
DEFINITIONS
Bus. A special kind of audio track that collects audio from one or more tracks and sends it to the location you specify. The benefits to using a bus are that:
A good analogy for a bus is that, similar to a real-world bus that collects people from a variety of stops and delivers them to a single location, an audio bus collects audio from a variety of tracks and delivers it to a single output.
Busses (which is (are?) also spelled “buses”) can be mono, stereo, or surround. For this example, I’m working with mono audio and creating a stereo bus output.
Stem. The output of a bus placing similar audio into a single audio file. The three most popular stems are:
The three stems are then combined into the final master mix. Like busses, stems can be mono, stereo, or surround. For this example, we will create stereo stems.
INITIAL SETUP
The initial project was edited in Adobe Premiere Pro CC, then sent to me as a set of eight AIF audio files because the studio and I were on different computer systems.
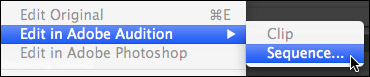
NOTE: If you are mixing the audio on the same computer you did the edit, an even easier way to move files is to select the project in Premiere’s Files panel, then choose Edit > Edit in Adobe Audition > Sequence. This instantly moves the project into Audition, with the clip layout intact.

For this project, I have:
All clips were spotted, trimmed, and edited using Premiere.
CREATE A BUS
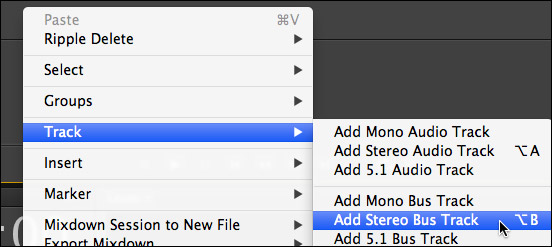
Busses can be created anywhere in a project, however, by tradition, they are placed after all source audio tracks and before the Master track. If it makes you feel better to place them somewhere else, feel free to do so.
To add a bus:
A bus is given a yellow color tag and a default name.
Double-click the default name and change it to something more useful. Because I like clear, obvious track names, I use:
Repeat this process until you have created all three busses.
NOTE: There is no limit to the number of busses you can create. For example, to mix a recording session, you might want to create a bus containing all the mics in the drum kit, another for all the brass, or for strings… and so on. Anytime you want to control a variety of different tracks using a single control, a bus is your best choice.
ASSIGN TRACKS TO BUSSES
Next, we need to assign specific tracks to specific busses. (If you don’t assign a track to a bus, the output of the track goes directly to the master output and bypasses the bus completely.)
Tracks can be assigned in the mixer or the timeline. To assign a track to a bus in the timeline, expand the track header so you can see the Master output menu. (It will be the second of three drop-down menus in the track header.)
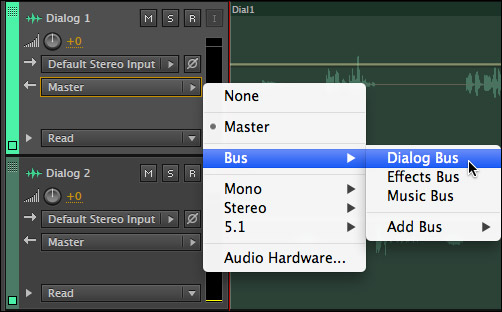
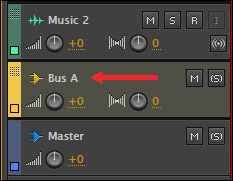
To change the output of a track, click the word “Master” and change it to the name of the bus where you want to route the file. In this example, I’m sending one of the dialog tracks to the Dialog bus.
Repeat this process until all the tracks you want to assign to a bus are assigned. For this project, I’m assigning all my tracks to one of these three busses.
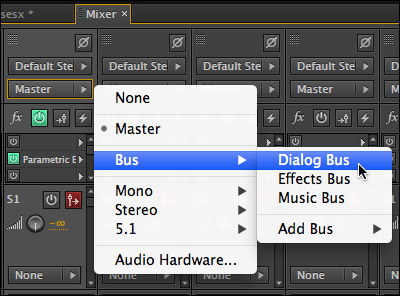
To assign tracks to a bus using the Mixer, again, click the “Master” drop-down menu and change it to the bus you want the track audio to go to.

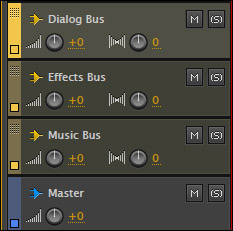
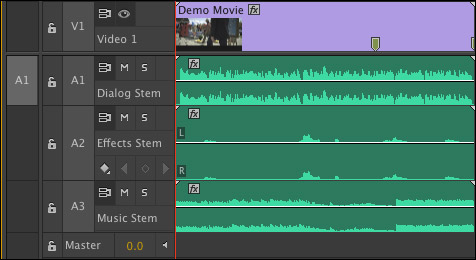
Here, in the mixer, all eight tracks are now routed to a bus. One track can only be routed to a single bus.
USING BUSSES
At this point, we use busses the same as a track. A bus can change levels, use keyframes, include effects and route itself to another bus or to the master output track.
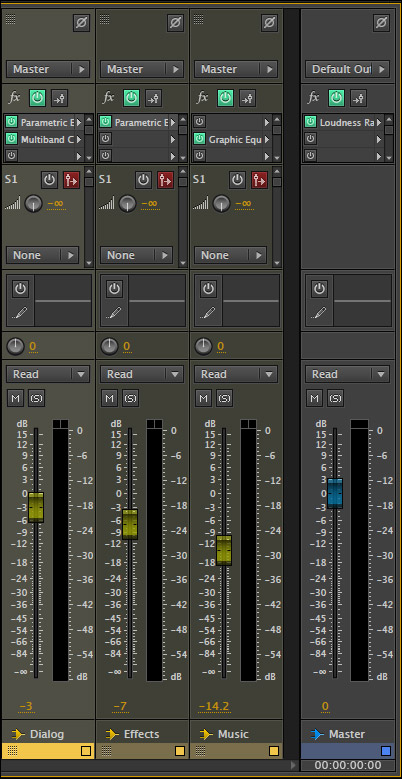
In this example, I “shaped” the audio on each of these three busses differently.
Bus 1 – Dialog
Bus 2 – Effects
Bus 3 – Music
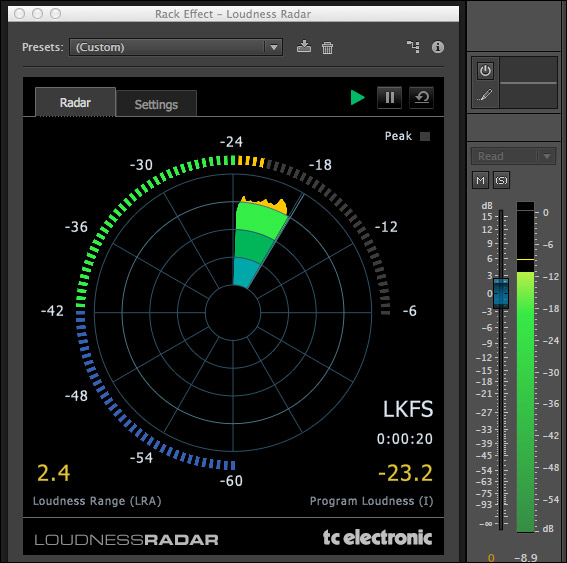
With broadcast and national cable mixes, we need to worry about more than peaks. We also need to make sure average audio levels stay within the parameters of the CALM Act. Which means we need to measure loudness. So, on the Master output track, I added the Loudness Radar filter to make sure that my peaks were not distorting and the average audio level stayed within their spec (-22 to -24 LKFS)
I spent a bit of time tweaking the levels and adjusting the filters, but, at this point, the organizational process of adding the busses for control and effects was complete.
OUTPUTTING THE MIX TO PREMIERE PRO
Assuming you sent the project from Premiere to Audition on the same system, to output the stems and mix for Premiere:
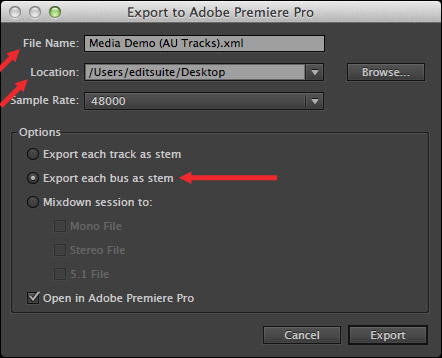
When you click OK, the mix is almost instantly transferred to Premiere and loaded into the timeline. At which point, you are ready for final output.
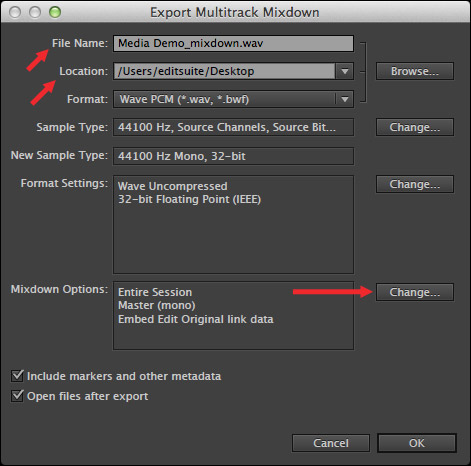
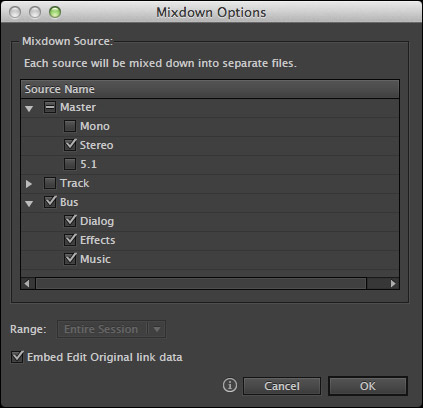
OUTPUTTING THE MIX TO FINAL CUT PRO X
If the original file was not directly sent from Premiere to Audition, or if you want to output files for Final Cut Pro X:
SUMMARY
For simple projects, I don’t use busses. But, for any project that has more than a few tracks, I find busses are indispensable for organizing and controlling my mix.
Oh! And how long did this whole process take? From creating a new project, importing media and setting effects to final output was 14 minutes; and the difference it made to the mix was amazing.

2,000 Video Training Titles
Edit smarter with Larry Jordan. Available in our store.
Access over 2,000 on-demand video editing courses. Become a member of our Video Training Library today!
Subscribe to Larry's FREE weekly newsletter and
save 10%
on your first purchase.
3 Responses to Adobe Audition CC: Create Busses and Stems
Hi Larry, thanks for the super helpful tips! The exporting buses to separate files is already saving me a bunch of time.
Here’s a question you might be able to help with, I couldn’t figure out a way to do this yet… In my multitrack session, I have multiple stereo tracks, and I want to find a way to mix down the left channels together into one file, and the right channels together into another file, ideally in one operation or with some kind of bus setup that does the right thing automatically when exporting.
I know I can export a stereo file and then extract the mono files in a separate step, but do you know of some way to make this even faster?
Thanks!
Ellen:
I would set your pans accordingly and export as a stereo clip, then extract to dual mono files.
To me, that seems much faster.
Larry
Ok, thanks for the tips!