
![]() I use Adobe Audition almost every day, either to edit and mix my audio podcasts, or to mix video projects I created in Adobe Premiere Pro or Apple Final Cut Pro X.
I use Adobe Audition almost every day, either to edit and mix my audio podcasts, or to mix video projects I created in Adobe Premiere Pro or Apple Final Cut Pro X.
These three tips are ones I use in every session to select clips, improve levels and save time.
NOTE: Here are more tips for Adobe Premiere Pro CC and Adobe Media Encoder.
SELECT CLIPS
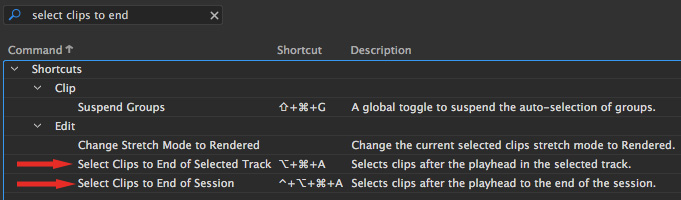
When I’m editing, I often need to move multiple clips in the same track, or across multiple tracks to the left or right. Moving a few clips is easy, but how do you select all the remaining clips in a track? Yes, we can zoom the entire timeline to fit in the window, but if you have lots of small edits, this is both time-consuming and impractical.
Well, there are two hidden keyboard shortcuts that make this easy. However, they don’t have shortcuts assigned to them – you need to do that yourself.
Here’s how:
Now, with one of these two shortcuts, I can select every clip in a single track or across multiple tracks from under the playhead to the end of the session and move them easily.
A MAGIC WAY TO ADJUST LEVELS
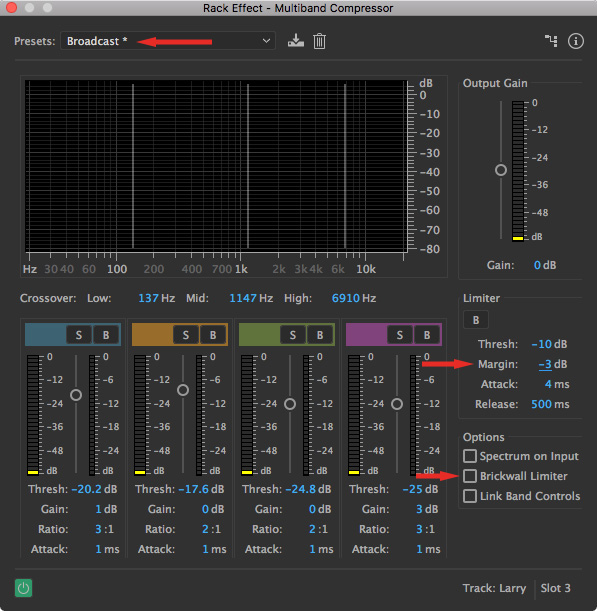
A tool that I use in every mix is the Multiband Compressor. This automates the process of setting levels and makes them as loud as I need without having to set innumerable keyframes (envelopes). This is a track-based filter, which means I apply it once to a track and it affects all the clips inside that track.
I far prefer this filter to the standard Hard Limiter, because of how it sounds and because a limiter filter is built into this effect, even though I don’t use it most of the time.
NOTE: Here’s an article on how this works.
Here’s how to apply this:
The rest of the settings in this effect are fine, as is. If your original levels are REALLY low, boost the track gain 1-3 dB to give the Multiband Compressor more to work with.
SAVE TIME WITH A TEMPLATE
I just realized I’ve never written an article about the templates in Audition. Since I use these every week, I’ll get that corrected in the next few weeks with a new article.
A template is basically a complete session, which is saved so that you need to rename it each time you reopen it.
Templates are great when you are doing the same audio work over and over. For instance, because of the constant audio production from my weekly podcast – Digital Production Buzz – I have four templates that I use every week:
What you may not know is that a template can contain:
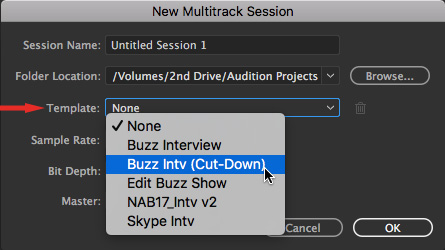
You access a template when choosing File > New Multitrack Session.
You save an existing session as a template, including all settings and clips, by choosing File > Export > Session as Template.
(Click to see a larger image.)
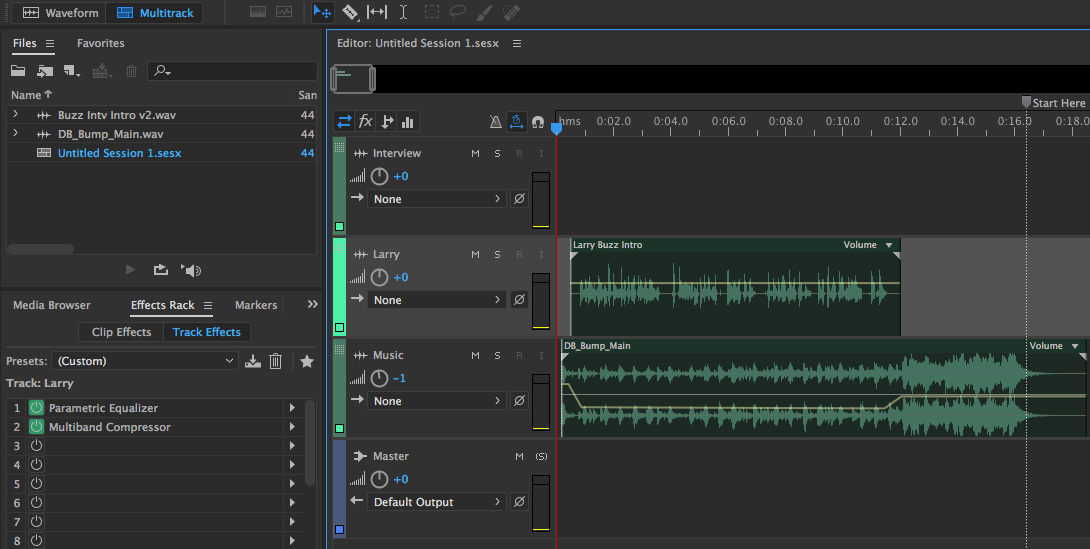
And here is an example of a simple template, including clips, markers and effects that I use each week when creating stand-alone interviews from the Buzz podcast.
I find templates invaluable at keeping a consistent sound, while speeding my workflow because I don’t need to rebuilt the same settings each time I start a new edit.
SUMMARY
These tips are part of my regular weekly audio workflow. Share your own tips in the Comments section below.

2,000 Video Training Titles
Edit smarter with Larry Jordan. Available in our store.
Access over 2,000 on-demand video editing courses. Become a member of our Video Training Library today!
Subscribe to Larry's FREE weekly newsletter and
save 10%
on your first purchase.