 New with the 10.4.4 update to Final Cut Pro X is a Noise Reduction filter. This is specifically designed to quickly reduce video noise – and the results can be quite stunning.
Video noise is a common problem in video clips shot in low light or with small sensors, such as cell phones or action cameras like the GoPro. The problem is that, from a software point of view, it is very hard to tell the difference between noise and texture. Your eye can spot it immediately; but, software? Not so much.

Here’s a sample image. Notice all the grain (called “noise”) in the image. You can see it especially clearly in the sky, the side of the red car and the darker parts of the pavement.
NOTE: The ideal solution is to shoot with more light – or a larger sensor – or, um, a better lens. But that helps you not at all once you are in the editing room, trying to salvage a shot.
Edit the clip you want to fix into the Timeline.

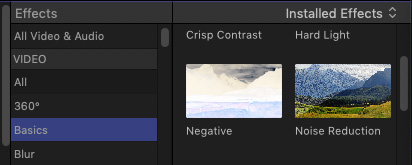
Go to Effects Browser > Basics and drag the Noise Reduction effect onto the clip you want to fix. (Shortcut: Double-click the effect to instantly apply it to all selected timeline clips.)

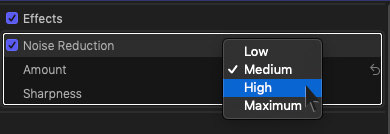
Adjust the Amount menu to dial out the amount of noise you want to remove. Your settings will vary based upon the amount of noise in the image and how much you want to remove.

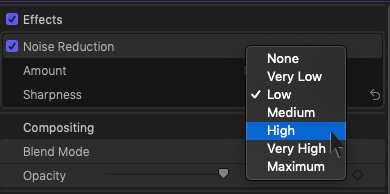
NOTE: Many times, reducing video noise decreases sharpness in the image. To add sharpness back, adjust the Sharpness menu. In general, apply the least amount of sharpness to minimize edges starting to “vibrate.” What sharpness does is emphasize edges. When it comes to sharpness, too much is not a good thing.

Here’s a before (on the left) and after (on the right) of the same scene with Noise Reduction applied.

Here’s a detail from the same image. Yes, edge detail and sharpness is diminished, that’s inherent in the process. But, the overall image looks a whole lot better with much of the noise removed.
EXTRA CREDIT
If you’re applying multiple clip effects to the clip, Apple’s Help Files suggest that you add Noise Reduction as the first effect (so that it appears at the top of the Effects list), or rearrange the order of processing by dragging the Noise Reduction effect to the top of the list. This ensures the best performance and results.
2,000 Video Training Titles
Edit smarter with Larry Jordan. Available in our store.
Access over 2,000 on-demand video editing courses. Become a member of our Video Training Library today!
Subscribe to Larry's FREE weekly newsletter and
save 10%
on your first purchase.
16 Responses to Final Cut Pro X: New! Remove Video Noise
I extensively tested Apple’s Noise reduction on 8mm Film which I transfer and compared it to Neat Video’s plug-in. Apple’s Noise reducer does a nice job but doesn’t have all the added features and control that Neat Video’s Noise Reducer has. For most noisy video Apple’s filter will do the trick. But do note that both Apple’s and Neat’s plug-in requires extensive processing time – not too noticeable on short clips but very prominent on long (whole film reels) videos.
Richard:
Thanks for the update. I think you have clearly described Apple’s approach – take something complex and give it a simple and accessible interface.
Larry
One of my best Super 8 experimental films has black areas that I needed to key on for some composite scenes. My telecine lab, however, gave me video with a lot of blue specks in the black. I could never find a color correction in FCPx that would effectively remove the color blue, leaving broadcast black. So instead I would up using the Luma Key effect. That worked, but it also left the entire frame looking starker (not bad for this film). I was very excited to see this new Reduce Noise effect in 10.4.4 but the results are a joke. They should have called it a Soap Opera effect!
Todd:
Be sure to use the Send Apple Feedback menu in Final Cut so that Apple is aware of the limitations.
Thinking about removing the blue specks, send me a screen shot that I can play with. If I can figure out a better method, I’m happy to share it.
Larry
FCPX (10.4.7) is perfect in most respects and I am a big fan of you, but this one is frustrating: the Noice Reduction looks fantastic, but only on the frame where the clip is stopped! As soon as the clip is running, the whole noice reduction effect is gone. Did I do something wrong?
Thanks in advance!
Evert:
Maybe and maybe not.
Noise reduction needs to render. If you play an unrendered sequence you won’t see the results of the effect.
Also, if the Viewer is set to Better Performance, this will also hide the results of the noise filter.
The best way to tell is to export a short sequence. That is the only way to REALLY tell if the effect is applied and working.
Larry
Gee, that is quick! Thank you!
I tried a to export a short clip, but after about an hour it reached 7%. I tried to export direct and via Compressor, but no difference. After disable NR export went on normal speed again. I am afraid my late 2013 with Geforce 755 (on Catalina) had its best time…
Evert:
Yup. You noticed a KEY fact: Video noise reduction requires significant computer horsepower. Essentially, you are evaluating every pixel in every frame, determining whether it is noise and, if so, figuring out the best pixel to replace it with.
This requires a high-performance GPU to do well.
Your project will ultimately export, but, as you discovered, it will take a long time.
Larry
Thank you, Larry! You are very kind!
Greetings from wet and a bit cold Netherlands!
(I’ll go out for a new Mac tomorrow)
Evert
I have noticed that I must keep the sharpness at None or I get moving moire effects in most clips I have tried it in. With the setting at off the problem goes away at the expense of a softer image than I would like.
Jeff:
Good to know. Thanks,
Larry
Isn’t that the same image being used by NEAT VIDEO? hmmm
AC:
It’s possible. I can’t remember where I got that image – I’ve used it on a number of different reviews of noise reduction software.
Larry
Hi Larry,
Is there any denoise plugin that works on Final Cut Pro 10.3.4.? I use High Sierra.
Thank you!
Best,
Ivana
Ivana:
Not as a plug-in, but, assuming you mean audio noise, look into Izotope RX7 or Accusonus ERA 5. Both of these are stand-alone noise reduction applications.
If you mean video noise, check out Neat Video.
Larry
[…] Cut Pro X. There is a multitude of effects to choose from, but the best I’ve seen is the Noise Reduction effect in Final Cut Pro X. In FCPX you can even combine this with other effects such as sharpness to […]