
 ( Please read my disclosure on product reviews here. )
Recently, the folks at Promise Technology sent me an 8-bay Pegasus2 Thunderbolt RAID to evaluate.
NOTE: This is due to my meeting Elaine Kwok, product marketing manager for Promise, at the recent Storage Visions 2014 conference. You can hear her audio interview here.
As I was researching and testing this unit, I realized that this article needs to be part technical review and part a discussion on our expectations on storage technology today.
EXECUTIVE SUMMARY
The Promise Pegasus2 Thunderbolt RAID is fast, easy to setup, fast, easy to use, fast, provides a ton of storage space, fast, and runs like any other Macintosh hard disk. Oh, and did I mention that it is fast? It is.
It provides massive storage, excellent speeds, all at a reasonable price. It isn’t as fast as an all-SSD unit, but it costs far less and holds far more.
WHAT I WAS SENT
Promise sent me their latest Pegasus2 8-bay RAID, containing eight 3 TB drives configured as a RAID 5. It formatted to 21 TB of usable space. All the drives were installed prior to shipping. It has a retail price of around $3,500, including all drives.
NOTE: Here’s an article that describes what RAID 5 means.
In the box are seven Quick Start Guides in fourteen languages. New users should quickly skim this because of an important note on synchronization. Connecting the drive is trivial: Plug in two cables – power and Thunderbolt – turn on your computer and the Pegasus, and get to work.
The Pegasus arrived formatted, but not synced. What syncing does is build the parity data between all the drives so that if a drive dies, you don’t lose all your data. While the drive is useable immediately out of the box, you don’t get access to its full performance until syncing is complete. For a drive this size, syncing took 10 hours, 42 minutes and 33 seconds. (Um, why, yes, I did time it.)
IMPORTANT NOTE: Before doing any work requiring maximum performance, wait until syncing is complete. The best advice is to plug the unit in and let it do its thing overnight. In the morning both you and it will be ready to work.
I ran these tests based upon the factory default settings. You can improve performance a bit more by turning on “Forced Read Ahead,” which is disabled by default. However, this requires working with Terminal and the Unix command line interface. Promise can provide instructions.
This unit comes configured as a RAID 5. You can also configure it using Disk Utility as a RAID 0. This will be faster than RAID 5, and store more, but in the event one drive dies, you lose all your data. I happily use smaller RAID 0’s in my editing. But for something this big, I want the security of knowing my data is safe in the event of a drive crash.
WHAT MAKES THIS SPECIAL
![]() The Pegasus2 is the first RAID that supports Thunderbolt 2, the new communications protocol that was released with the new Mac Pro. This new protocol supports data transfer rates up to 2.2 GB/second.
The Pegasus2 is the first RAID that supports Thunderbolt 2, the new communications protocol that was released with the new Mac Pro. This new protocol supports data transfer rates up to 2.2 GB/second.
NOTE: That preceding paragraph is a completely true statement, but it leads to some wildly incorrect conclusions. I’ll explain further in the next section.
Thunderbolt 2 is fully compatible with Thunderbolt 1 devices. As you’ll see below, the Pegasus works perfectly – though not at the same speeds – with both iMacs and Mac Pros, and operating systems 10.8.5 and 10.9.1. In other words, you can use this unit on any Mac with a Thunderbolt connection.
THE PROMISE RAID UTILITY
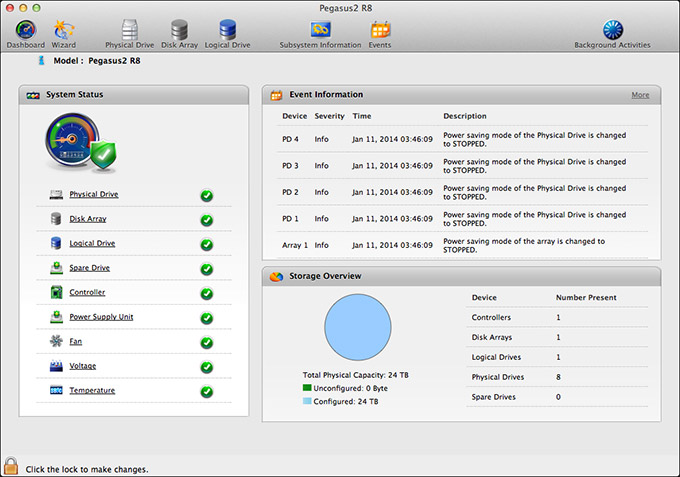
Shipped on the Pegasus RAID is a utility that allows you to configure and monitor your RAID. I found this utility cleanly designed, simple to navigate and with access to the controls that I needed to configure and monitor the unit.
My only wish for this was that it would allow us to turn on Forced Read Ahead and avoid a trip to the Terminal.
THE THUNDERBOLT TRAP
Thunderbolt 1 supports data transfer speeds (also called “bandwidth,” or “data transfer rate”) of up to 1.1 GB/second. Thunderbolt 2 supports data transfer speeds of up to 2.2 GB/second. EXCEPT… that is the speed of the connection between the two devices. Actual device speeds are less, sometimes FAR less, than the protocol will support.
In the “olde days” of USB 2 and FireWire, both of which are communications protocols between hard disks and computers, the protocol was slower than the hard disk. So the protocol determined how fast your storage could transfer data.
Now, with Thunderbolt, the protocol is FAR faster than a hard disk. This means that the speed of your storage is determined by the speed of the hard disk, NOT the protocol.
Here’s the secret formula: For every hard disk in your storage device, the data transfer rate is about 120 MB/second. There is some variation between drives, but this number is a good place to start.
Solid State Drives (SSD) will transfer data faster that spinning hard disks, but even an SSD drive is slower than the protocol itself.
NOTE: The Pegasus2 only uses spinning hard disks, driven by a hardware RAID controller, without any SSD acceleration. Hardware RAID controllers are MUCH faster than software RAID controllers. (Drobo, for example, uses a software RAID controller.)
Here are some speed examples:
In other words, the Thunderbolt protocol is screaming fast. But the speed of your storage is determined by the number of drives contained in it.
NOTE: For comparison of how much speed you need, a single ProRes 422 clip in HD requires about 18 MB/second for playback. AVCHD files require about 3 MB/second. So if you are doing single-camera editing, ANY Thunderbolt device will be fast enough for editing. The challenge comes in editing multicam footage, or higher resolutions than 1080p HD.
The advantage to the Pegasus2 supporting Thunderbolt 2 is that, while the RAID won’t take advantage of the speed of this protocol, any Thunderbolt 2 devices (think monitors) that are connected into the Pegasus will get the full benefit of the Thunderbolt 2 protocol.
MAC PRO PERFORMANCE TESTING
I decided to do four types of performance testing:
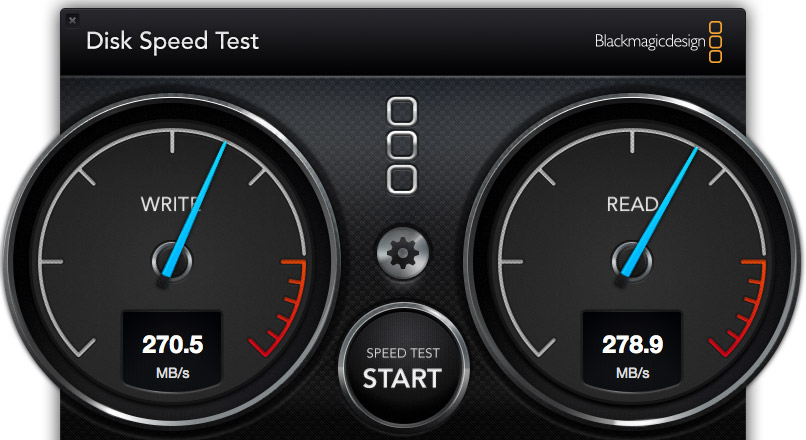
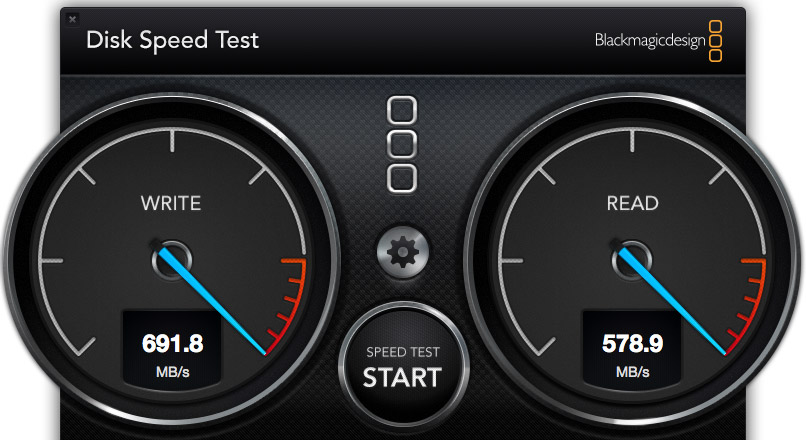
All speeds were measured using the Blackmagic Design Disk Speed Test utility.
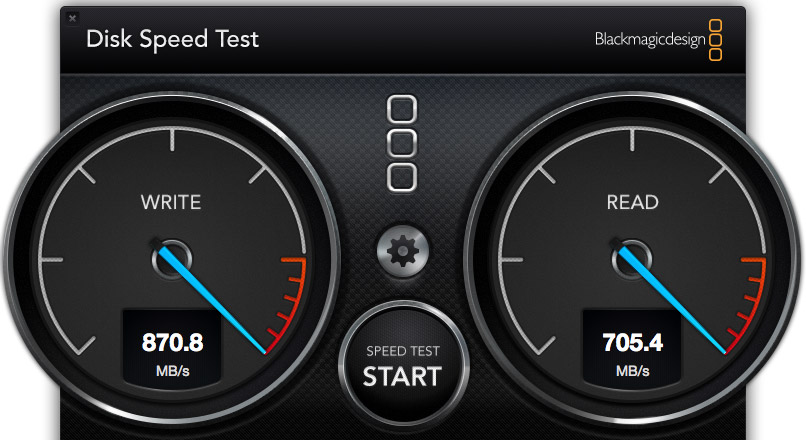
The Pegasus2, when directly attached to the Mac Pro, generated these results. Write speed shows how fast the unit records information (think importing, rendering and exporting), while the Read speed shows how fast it plays back information (think editing).
These speeds are the fastest of any RAID I’ve measured to date.
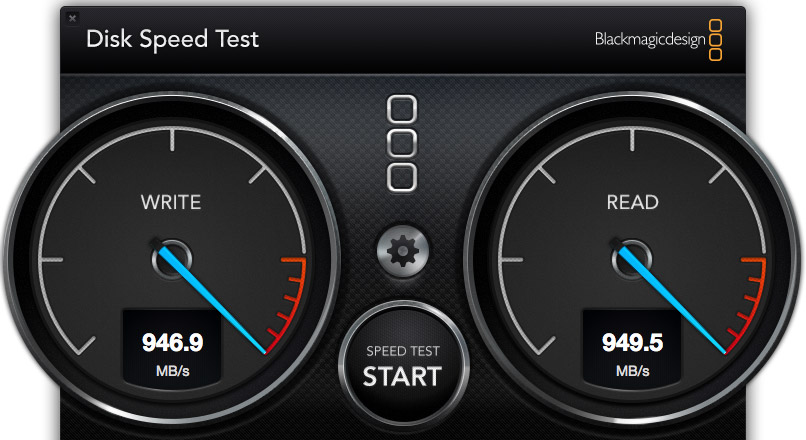
However, compare the speed of the Pegasus to the internal SSD drive of the Mac Pro. WOW! Much faster. Obviously, we should only use the internal Mac Pro drive for all of our editing.
Wrong. Really, really wrong!
First, the internal Mac Pro drive only holds 256 GB of data. Just one season of my 2 Reel Guys web series has more than 2 TB of data, which far exceeds the size of any SSD drive affordable by mere mortals. Or, more recently, my FCP X training created 8 TB of master video files! SSDs can’t handle media files of this size.
Second, as I discovered later in my testing, performance drops when background processes run, in fact, it often fell 30 – 50%. This means that we can’t count on consistent performance from the internal drive, because it is serving the needs of the operating system, all active applications, and all background processes. What may be fast enough one second is too slow a second later because some process is now running in the background.
Third, it is easy to add more external storage. Expanding the internal SSD is not simple.
Fourth, it is easy to move external storage from one computer to the next by simply unplugging the cable.
The internal drive is useful and has some advantages for certain specialized edits, but external media storage is essential for any except the smallest projects.
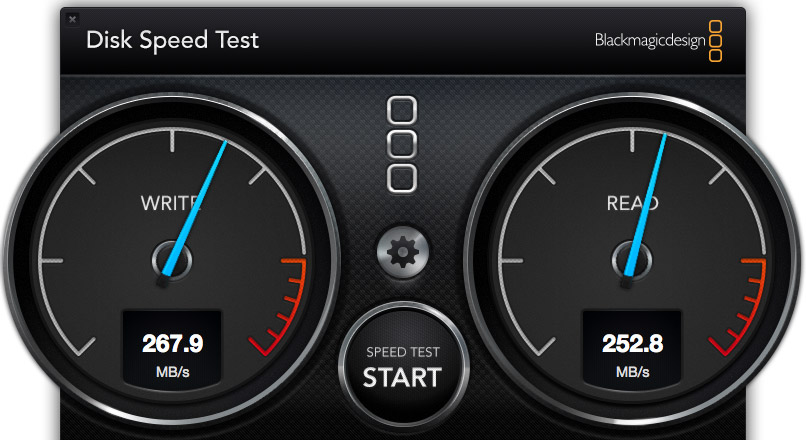
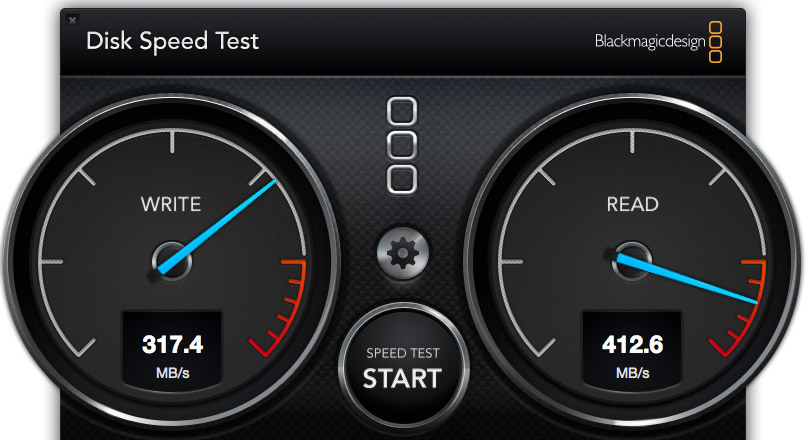
I also wanted to test whether there was any loss in speed when connecting a second RAID to the Promise. These are the results when connecting a G-Technology 2-drive RAID 0 directly to the Mac Pro.
NOTE: The G-Tech, too, is a Thunderbolt device, but its speeds are less because it only contains two drives. Hence my earlier discussion about the protocol not determining the speed of your storage.
These are the results when connecting the G-Tech RAID as part of a three-drive chain. The RAID was at the end of the chain. It was faster, in fact. So there does not appear to be any significant speed loss when daisy-chaining devices. Essentially, the G-Tech transferred data at the same speed, regardless of whether it was attached directly to the Mac Pro, or as part of a storage chain.
NOTE: Another weird fact is that test results vary. Hard disk speed is a factor of how empty it is – empty is faster, how big the files are – bigger files transfer faster, and the size of the data blocks being transferred at one time – bigger blocks transfer faster.
iMAC PERFORMANCE TESTING
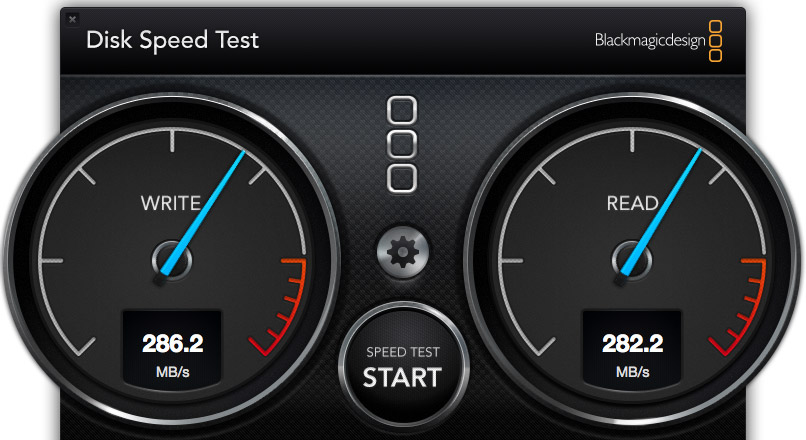
Here’s the speed of the iMac’s internal Fusion drive, running under Mac OS X 10.8.5, in a dual-boot configuration. Notice that it is about 1/3 the speed of the Mac Pro, even though the iMac is accelerated with an internal SSD drive.
NOTE: It was when running this test that I saw the 35% drop in performance when a background process started running.
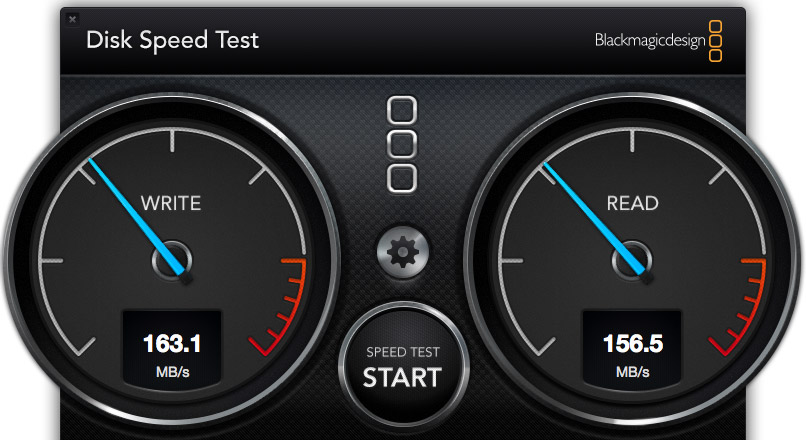
To further complicate matters, this speed test shows the same iMac, running under Mac OS X 10.9.1, and accessing its internal drive. The speeds are 50% slower than when running 10.8.5. This is probably because the dual boot drive doesn’t have enough free space. Using the internal drives is easy, but is no guarantee that we will get consistent performance.
Here’s the speed of the Pegasus direct connected to the iMac running 10.8.5. Not as fast as when connected to the Mac Pro, but still pretty darn quick.
Here’s the speed of the Pegasus direct connected to the iMac, running 10.9.1. Essentially, while the speed of the Pegasus is not as fast as the Mac Pro, the speeds are pretty much the same for both 10.8.x and 10.9.x.
Here’s the speed of the G-Tech when connected to the iMac. In this case, it is about 10% faster on the iMac than on the Mac Pro. (The speeds were the same regardless of operating system, and regardless of whether the unit was directly connected or looped through the Pegasus.)
REAL-WORLD TESTS
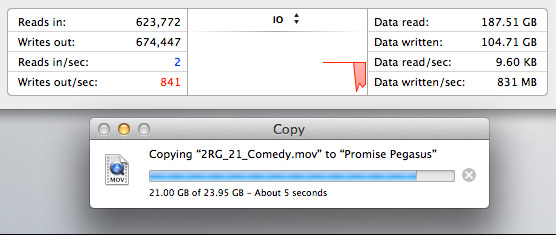
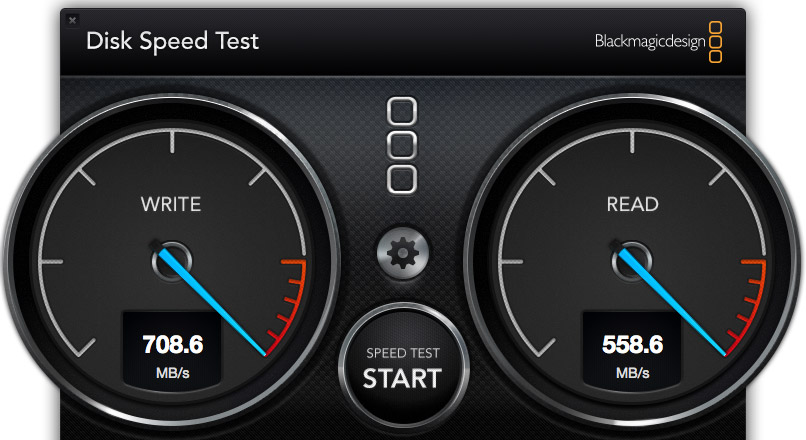
The Pegasus copied a 23 GB file from the Mac Pro’s internal drive to the Pegasus at more than 800 MB/second. I ALWAYS want file transfers to go faster, but these are excellent numbers.
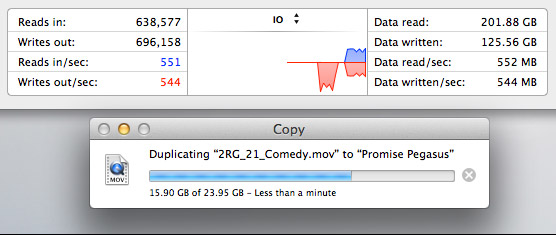
The Pegasus duplicated a 23 GB file stored on the Pegasus back onto the Pegasus at about 550 MB/second. This is slower because the file needs to be read from the RAID, then written back to the RAID all at the same time.
MULTICAM EDITING
Multicam editing taxes your computer and storage systems more than any other form of editing.

So, to test this, I created 12 versions of a 12 minute 2 Reel Guys episode.
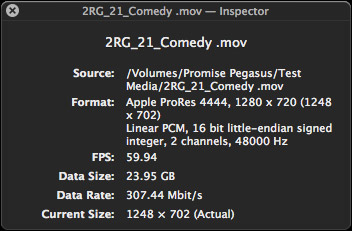
Each movie was 23 GB in size, using the ProRes 4444 codec with a 720p image size and 59.94 frame rate. (ProRes 4444 is both the highest quality and largest file size of all the ProRes codecs.)
Upon importing into Final Cut Pro X v10.1, the software immediately started creating audio waveforms and transcoding the media into proxy files (at my request). Just as a test, I tried doing multicam editing while those background processes were running. Didn’t work, I got dropped frames immediately. It took the system about fifteen minutes to finish all its prep work.
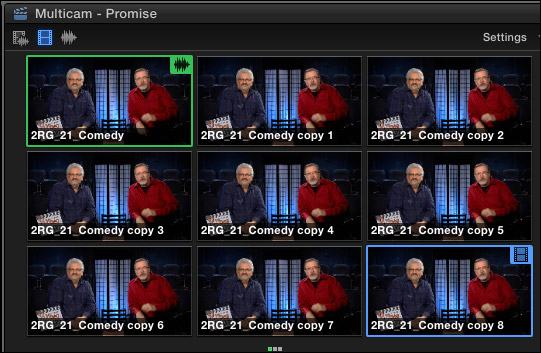
Once the background processing was done, FCP X could play and edit a nine-camera multicam clip with image quality set to Better Quality with no dropped frames. Wow. Just, wow…
NOTE: I did get dropped frames when trying to play 12 clips, however.
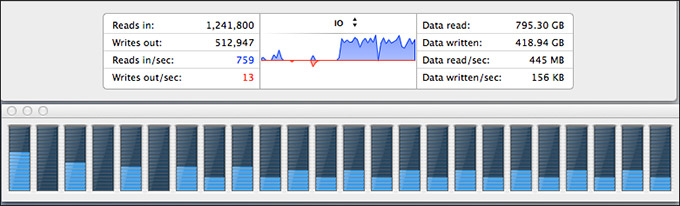
As you can see, playing all nine streams did not tax the storage system….
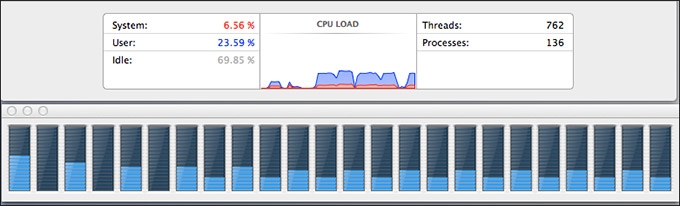
… or the CPUs.
However, my STRONG recommendation for multicam editing is to edit using proxy files. For example, the Mac Pro edited all twelve proxy streams without breaking a sweat. Based on what I saw, I would expect the Mac Pro, combined with a Pegasus RAID to easily, easily edit 24 streams of multicam video with horsepower to spare.
MISC. OPERATIONAL NOTES
The Pegasus follows the computer in terms of sleep. If the computer goes to sleep, so does Pegasus. It can take up to 20 seconds for it to wake back up after going to sleep. It the computer doesn’t go to sleep, the Pegasus stays awake, too.
The Pegasus took longer to mount to the desktop than the G-Technology drives. G-Tech was ready in about five seconds. The Pegasus was ready in about 15.
The RAID management tool shipped with the Pegasus is very nicely done.
CONCLUSIONS
The Pegasus2 is a very fast RAID, easy to setup and as easy to use as any other Macintosh hard disk.
It runs on any Mac that has a Thunderbolt connection, with the added advantage of supporting the new Thunderbolt 2 protocol. It runs the fastest on a Mac Pro, but, for most editing projects, the Promise has speed to burn for any editing project on any Mac.
Apple has long supported these devices for any intensive media application, and, now, after working with one myself, I can agree.
The Promise Pegasus2 Thunderbolt RAID is an amazing tool at a very reasonable price.
Learn more at www.promise.com.

2,000 Video Training Titles
Edit smarter with Larry Jordan. Available in our store.
Access over 2,000 on-demand video editing courses. Become a member of our Video Training Library today!
Subscribe to Larry's FREE weekly newsletter and
save 10%
on your first purchase.
142 Responses to Product Review: Promise Pegasus2 RAID
← Older Comments Newer Comments →-
 Tom Wheeler says:
January 20, 2014 at 11:02 am
-
 Larry Jordan says:
January 20, 2014 at 11:07 am
-
 Boan says:
May 12, 2014 at 9:20 am
-
 Victor says:
January 20, 2014 at 11:14 am
-
 Tom Wheeler says:
January 20, 2014 at 11:23 am
-
 Victor says:
January 20, 2014 at 11:36 am
-
 Victor says:
January 21, 2014 at 3:38 pm
-
 Tom Wheeler says:
January 21, 2014 at 4:37 pm
-
 Victor says:
January 21, 2014 at 6:30 pm
-
 Tom Wheeler says:
January 21, 2014 at 7:36 pm
-
 Tom Wheeler says:
January 21, 2014 at 8:01 pm
-
 Victor Pacheco says:
January 22, 2014 at 12:34 am
-
 Thomas Wheeler says:
January 22, 2014 at 7:11 am
-
 Victor says:
January 22, 2014 at 10:41 am
-
 Tor Lindseth says:
January 21, 2014 at 12:40 pm
-
 Blair Thornton says:
January 22, 2014 at 7:30 am
-
 Victor says:
January 23, 2014 at 6:21 pm
-
 Tom wheeler says:
January 23, 2014 at 2:13 pm
-
 Fabrizio Rizzo says:
January 25, 2014 at 9:03 pm
-
 Marc says:
January 28, 2014 at 1:15 am
-
 Larry Jordan says:
January 28, 2014 at 12:29 pm
-
 Fabrizio Rizzo says:
January 28, 2014 at 1:26 pm
-
 Larry Jordan says:
January 28, 2014 at 1:34 pm
-
 Fabrizio Rizzo says:
January 29, 2014 at 5:16 pm
-
 Fabrizio Rizzo says:
January 30, 2014 at 5:01 pm
-
 Barry Wul says:
February 21, 2014 at 2:23 pm
← Older Comments Newer Comments →Larry,
Partly as a result of your thorough and excellent review of the Pegasus2 raid system, I purchased a Pegasus2 R6 (18TB) model and installed it on my new fully maxed out Mac Pro which just arrived last week. I am delighted with the Pegasus2 and get speed results fully in line with those you determined for your Pegasus2 R8 unit (about 700 Mb/sec read/write measured using BMD’s Disk Speed Test software).
However, in your review of the Pegasus2 you stated: “If the computer doesn’t go to sleep, the Pegasus stays awake, too.” While thes is technically true, i.e. the Pegasus2 unit itself does not go to sleep when my Mac Pro is running, I do find that the hard drives in my Pegasus2 do spin down, and that I have to wait for the drives to all spin up when about 15-20 minutes has passed without my using the Pegasus2. Please note that I have made certain to uncheck “Put hard drives to sleep whenever possible” in System Preferences>Energy settings so that is not responsible for the hard drives in the Pegasus2 spinning down.
I have writen Pegasus2 Support asking them if there is any way to set the time before the Pegasus2 hard drives to spin down in the Promise Utility, but I have not received a response. It is a bit irritating to be frequently waiting for the hard drives in the Pegasus2 raid to spin up. Note that I have a Drobo 5D attached to the same Mac Pro and I do not have any issues with its hard drives spinning down between intervals of use.
Thank you for your fine review, and I appreciate any thought you might have on this issue of the hard drives in the Pegasus2 spinning down after some period of not being addressed.
Tom
Tom:
Thanks for your comments. I got my impressions from reading the printed materials supplied with Pegasus. I know that Promise has been monitoring this article and, hopefully, they will respond to you.
Larry
What do you recommend the Pegasus 2 or the Drobo 5D?
Hi Tom. Currently we cannot turn off the power management. appreciate your candid feedback.
i have this on my radar and plan to have an improvement in the next service release. Meanwhile this feature is a “feature” and not a
bug. You don’t see it on Drobo or prior generation Pegasus because they don’t offer this level of advanced power management.
in reality this feature prolongs the life of the drives..
Noted and thanks again.
Victor Pacheco
Larry and Victor,
Thank you both very much for taking the time to respond.
Victor, I am very pleased to hear that this is on your radar. I can well appreciate that this advanced power management feature does indeed lengthen the life of the drives in the Pegasus2. What I really would like to see is the means within the Promise Utility to turn on or off this feature or to set a period of time when the feature is turned off. My reasoning is that most of the time having this feature on and having the hard drives in the Pegasus2 spin down after a period of no use is a good thing. However, when I am editing and don’t want to have to wait for the Pegasus2 hard drives to spin up when I need them, it would be great to be able to turn the feature off while editing or to have been able to set a longer period before the hard drives spin down. The Pegasus2 is a great product, and thank you again, Victor for responding.
Tom
Tom,
Messaged received and noted.. the enhancement is along those lines.. will make it happen.
in my book the customer is always right!
Best Regards,
Victor Pacheco
Tom,
I was digging into how to disable the spin down of the drive. Turns out this can be done from our GUI (Promise Utility).
We can set the interval or disable all together. I want to test this out before i send you the KB link with the steps.
Stay tuned..
Victor Pacheco
Victor,
This is great news! I really look forward to learning how to change the hard drive spin time settings and how to disable it when needed. Thank you so much for looking into this and I really look forward to hearing from you when you have tested the procedure
Tom
Tom,
A KB is in the works.. meanwhile follow these steps:
1. From a terminal in your Mac host type “promiseutil”
2. From our CLI type: ctrl -a mod -s “powersavinglevel=0”
3. Confirm the settings by typing: ctrl -v
This will completely turn off the various levels of power management.
Let me know the results.
Thanks
Victor Pacheco
Victor,
Here is what I got on following your instructions within terminal:
RevertibleGlobalSparePresent: 0 RevertibleDedicatedSparePresent: 0
RevertibleGlobalSpareUsed: 0 RevertibleDedicatedSpareUsed: 0
WriteThroughMode: No MaxSectorSize: 4KB
PreferredCacheLineSize: 64 KB CacheLineSize: 64 KB
Coercion: Enabled CoercionMethod: GBTruncate
SMART: Enabled SMARTPollingInterval: 10 minutes
MigrationStorage: DDF CacheFlushInterval: 3 second(s)
PollInterval: 15 second(s) AdaptiveWBCache: Disabled
ForcedReadAhead: Disabled
PowerSavingLevel: 0 SpindownType: All drives
IdleTimeToParkRwHeads: 1 minute IdleTimeToLowerRotationSpeed: 5 minutes
IdleTimeToSpinDown: 30 minutes
SGPIOBackPlane: Default/Generic (0) SASReadyLED: Off
SpinUpDelay: 0 millisecond PowerManagement: Enable
SecurityAdminPassword: N/A
PciFuncAddr: N/A PciLinkSpeed: N/A
PciLinkWidth: N/A
I’ll confirm that this has turned off power management when I see that the hard drives do not spin down.
Tom
Victor and Larry,
I have to say that I am feeling rather stupid. I decided to read the manual for the Pegasus2 R6 that is available on the Promise web site. On page 13 of the manual it says: “The Pegasus2 includes a power saving feature that spins down the hard disk drives if the logical drive is idle for 30 minutes. This can be enabled or disabled and the idle time
can be changed in the PROMISE Utility. Click on the Controller link in the Dashboard, then click
the Settings button to see how to change this setting.?
I followed these instructions and changed the idle time before spin down to 60 minutes. You can set it for much longer if desired. The change was marked as successful and showed up in the Promise Utility.
I short, what I was requesting is already available in the Promise Utility which I would have known if I had bothered to read the manual before using the Pegasus2. I apologize for the time that you have spent on this.
Tom
Tom
There are different levels involved that GUI does
Not cover.
The current firmware release drive default setting for spindown parameter are:
IdleTimeToParkHead : 1 munites.
IdleTimeToLowRotation: 5 munites.
IdelTimeToSpinDown: 30 munites,
There are levels 1-3
The GUI only covers level 3 and not 1 or 2.
Here is PowerSavingLevel: 3 that GUI covers
If the user unchecks “Enable Idle HDD Spin Down” on the GUI only, the disable Spindown for level 3 will be disabled. After 5 minutes, you will see phydrv (using Promise CLI “phydrv -v” command)
drive status: low rotation, when accessing drive, It will take around 10 seconds to be ready (from spin down to spin up may take around 15 seconds)
So user MUST set parameter on CLI: ctrl -a mod -s “powersavinglevel=0” to disable all three status: “park head”, “low rotation” and “Spin Down”
For next firmware release we plan to disable park head and low rotation. This way the user only needs to change from the Promise Utility GUI i.e uncheck “Enable Idle HDD Spin Down”
Best Regards,
Victor Pacheco
Victor,
Many thanks for explaining the sophisticated power management features of the Pegasus2 in detail. I now understand why I had to enter the commands in terminal mode that you gave to me and why just using the Promise utIlity only changes the drive spin down time and not the other two levels of power management.
One more question for you. More than a week ago I filed a web support ticket with Promise asking how to control the power management on the Pegasus2. The next day I received an e-mail indicating I had received a reply. However when I logged into my Promise web support page, there was no response shown. I filed the question again and again the next day I received an e–mail saying there was a response but when I logged in no response was visible. There seems to be some problem with the Promise web support site which you might wish to look into.
Thank you for all your help.
Tom
Tom
Sounds like your pop up blocker is enabled on your browser when you log into our CRM https://support.promise.com
Email me your case ID. I will forward over to
our Support to have a closer look.
victor.p@promise.com
Larry and Victor, Norway says hello!
My long time raid supplier tried Pegasus in the Norwegian market, and quickly got into trouble because of poor performance from the disks. He says that if the disks supplied in the 8-bay (P2-R8 4TB) is 5900 rpm, it’s probably low-end Enterprise disks. He feels he cannot take responsibility selling raids with “inferior” disks and advocates that a high performance system (read Thunderbolt 2) needs enterprise disks. Any reason why Pegasus R8 cannot come with 7200 rpm enterprise disks?
Best regards from the deep forests..:)
Tor Lindseth
I second your request Tor ! We are using these devices for professional applications and we expect high performance and enterprise disks. Why can’t Promise offer enterprise disks?
Hello Gentleman,
Not sure how I missed your post. Promise offers a range of Pegasus2 options optimized for overall performance, capacity and cost. We monitor the best devices available for these configurations and expect to update these periodically.
Thanks
Victor Pacheco
Victor, you are correct. I had the popup blocker turned on and hence could not see the reply. The Promise support WBC site needs to have a warning prominently displayed that you should turn off the pop up blocker because I only discovered this buried deep on the Knowledge Base.
Victor, thank you so much for all your help. My new Mac Pro and the Pegasus2 are now a match made in heaven.
Tom
Hi All,
Thank you for a very informative dialog. I’m convinced and will be ordering a Promise2 R8 fully loaded shortly.
I plan on keeping my edit bay as quiet as possible by using the 10m optical TB cable and placing the array (along with other stuff) in a rack one floor down (directly below with appropriate conduit runs, etc…).
The Pegasus look great on the desk, but really don’t fit well in our desk-side or co-located racks.
My question (for Victor) is this: Will there be a rack-mountable version of the Pegasus2 or other Thunderbolt 2 direct-attach arrays anytime soon?
-Fabrizio
I’m waiting for my Promise2 R8 24 just commanded.
It will be connected to a Macbookpro Retina 2.6 Ghz with Thunderbolt 1.
I actually work with FCProX on 4 Hd multicam pists with no problems with external disk 3TB connected with USB 3.
If i have understood everything here, the Pegasus will allow me to work fluently in the future with 4 multicam pists in 4K without needing the new Macpro?
Thank you
Marc
Marc:
Maybe.
You should convert your 4K files to ProRes 422 HQ, unless they are shot using ProRes. 4K H.264 will choke the system.
Then, while you *can* edit the 4K natively, for initial rough-cuts, I’d recommend editing using proxy files until you finish using the multicam, then switch to optimized media for final color grading and polish.
Larry
Larry,
Can you please provide a good link to docs/training that give example of how to switch between proxy/optimized media for different stages of our workflow?
Thanks,
Fabrizio
Fabrizio:
It’s in the Switch in the top right corner of the Viewer.
Larry
Thanks Larry.
Interesting side-effect now that the Pegasus2 R8 is hooked up – My Drobo 5D is continuously disconnecting and reconnecting every few minutes. Devices before and after the Drobo appear to remain mounted stabily.
A bit of explanation of my array connectivity first:
I have the P2R8 connected to a Mac Pro on TB port 0 with nothing else in TB Port 1 (nothing else directly connected on TB Bus 1)
I’ve used the 10m optical TB cable purchased from the Apple Store.
The P2R8 is humming along initializing itself and mounted happily. The promise utility says everything’s just fine – and it seems to be.
Connected to the P2R8, I have a Drobo 5D (backup / archive array) and a Seagate TB 3.5″ Desktop drive adapter with 3TB single drive after that. Both using the standard electrical TB cables from Apple.
The chain looks like this:
Mac Pro -> Optical 10m TB cable -> P2R8 -> Black Apple 2m cable -> Drobo 5D -> White Apple 2m cable -> Seagate 3TB w/ TBolt Desktop Adapter.
The Seagate has 2 HFS+ volumes: one for CarbonCopyCloner use to backup the internal boot volume, and a time machine volume.
The Drobo 5D has a single large 20+ TB HFS+ volume
The P2R8 has the default single 28 TB HFS+ volume.
The OS tells me that the Drobo volume has been dismounted without being ejected and attempting to access the volume fails until it eventually disappears from Finder, then later it shows back up but I still can’t access it when it does. It keeps doing this ever few minutes. Doesn’t happen to any of the other volumes.
It did NOT happen prior to connecting the 10m optical cable and the P2R8 array.
Any ideas?
I’m going to power down all but the Pegasus2, then disconnect everything from the optical cable and reconnect just the Drobo to the optical cable and see if isolating to just the cable reproduces the problem.
If not, I’ll add the seagate drive on the end (without inserting the Pegasus2 into the chain.)
If that works and remains stable, then I’ll add the Pegasus2 in between the optical cable and the Drobo (as the “first device”) and test again.
If all three scenarios fail (or just the first one) then I’ll bring everything back upstairs to the edit suite and try the same 3 tests again using just the short 2m electrical TB cables.
If it was just the cable, I’d expect all of the volumes to exhibit the same issues.
Betting it’s a problem with the Drobo in combination with the optical cable.
Can’t help but wonder if it’s something weird about channel allocations / Mac Pro EFI firmware issues with TB 2 and TB1 drives on same chain, or a mutant variant of the WD disk issues with Mavericks.
Any ideas would be greatly appreciated.
I’m not looking forward to trying to manage a 3-way support case with Apple, Drobo, and Promise.
-Fabrizio
It seems the move of the Drobo 5D (power down, move, reconnect, power-up) may have caused a hardware fault of some type. Even disconnected from all interfaces, the Drobo 5D will now randomly reboot – even when left alone “disconnected”.
I won’t hijack this thread any further with Drobo issues unless there comes conclusive proof that something relevant to the Pegasus 2 comes to light – related to Mavericks, the optical TB cable, or “inserting” the Pegasus2 into the chain had anything to do with it. It does NOT appear to be the case at this time, but the investigation continues.
-Fabrizio
I experienced some difficulties with my own Drobo 5D, after adding the Pegasus2 (with replacement drive) to my MacPro 2013 System. Looking into the Drop tech support files, I found a recommendation to uninstall the Drobo Desktop application / utility, reboot the system, download a fresh copy of the latest Drobo software, reinstall & finally reboot one more time. Several steps; but this fixed everything. (Note, if your user file is stored on the Drobo … mine was … simply create a new user with administrator privileges. By default, that user file will be on the internal drive. Boot into that user profile, perform the actions prescribed above, then switch back to your primary user profile. Everything should be fine from that point.)