 I had a delightful lunch last week with a member of Premiere’s development team and, in addition to talking about all the features I’d like to see in a future version of the software, our conversation turned to ways we can use to make the current version run faster.
Surprisingly, changing a few preference settings can make a big difference. So, let me share what I learned.
GENERAL

Want to reset a workspace? Double-click its name at the top of the Premiere interface.

Don’t want to run the risk of resetting the Workspace? Uncheck this option in General preferences.
AUDIO

If your audio gear supports it, the best sample rate to use for recording audio for video is 48,000 Hz. (Yes, other settings will work, but unless you have a really good reason to choose a different sample rate, use 48,000 Hz.)
COLLABORATION

Be sure Project Locking is turned on, even if you don’t plan to share projects. There is no performance hit to turning this on, while, if you share a project with this turned off, someone reviewing your edit can make changes that erase what you are working on.
This is a default preference setting that Adobe got wrong.
MEDIA
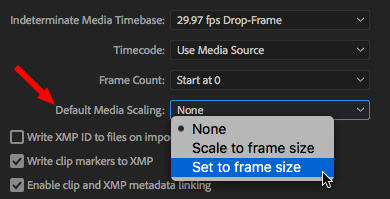
Change Default Media Scaling to Set to Frame Size. This automatically scales an image or clip to fit inside the frame size defined for your sequence AND displays that scaling in the Effect Controls panel.
Setting this to None displays the image at 100% size, which means you have to resize it.
Setting this to Scale to Frame Size changes the size of the image AND resets the Scale setting to 100%, so you have no idea how much the image size of the source image has been changed.
NOTE: Remember video and other bitmapped images always look their best when scaled to 100% or smaller.

Enabling proxies switches your sequence from displaying source media to proxy media. To switch back, turn this preference off.

Turn Growing Files off. These special files allow you to edit media while it is still being recorded. When this is checked, every 60 seconds Premiere will check your hard disk to see if these files have changed.
If you don’t use these type of files, you don’t need your computer wasting time checking for them. (Thanks to Christine Steele for this tip.)

Delete Unused Media Cache Files once a week or so. If Premiere needs them in the future, it will rebuild them automatically.

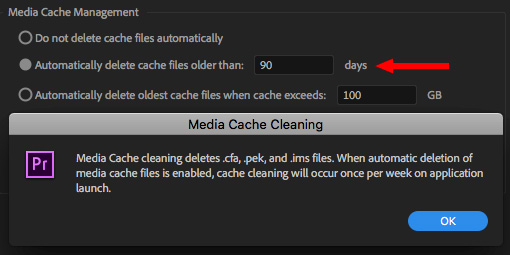
Set Media Cache Management to Automatically delete cache files that are older than 90 days.
MEMORY
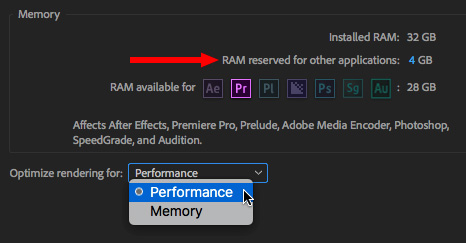
Set RAM Reserved between 3 – 5 GB. Use 2-3 GB if you have 8 GB of RAM or less. The more RAM you assign to Adobe applications, the faster they will run. Most standard business apps – like Browsing and email – only need a few MB to run. Devote the rest of your RAM to Adobe.
NOTE: When you quit all Adobe apps, all RAM reverts back to your system. This is a temporary setting that only applies when an Adobe application is running.
Also, Optimize rendering for Performance unless you have 8 GB of RAM or less.
PLAYBACK

If you are not sending video to an external video monitor (as opposed to a computer monitor), turn off Enable Mercury Transmit. This option is used for external video only.
TIMELINE
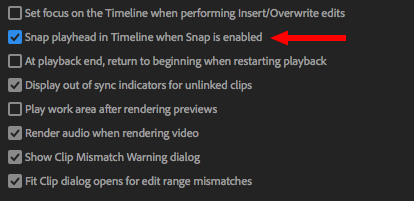
If you liked how snapping worked in FCP 7, check Snap Playhead. This means that not only clips but the playhead will snap to the edges of clips and markers.
ADOBE MEDIA ENCODER

One last setting, but this one is in Adobe Media Encoder. Since AME handles rendering and export, change the Renderer setting at the bottom of the Queue panel to Metal.
NOTE: Apple is moving away from Open CL, Metal will render faster – both now and in the future.
SUMMARY
Obviously, some of us will need to modify these settings for the specific projects that we edit. However, if you are looking for ways to get Premiere to work even faster, optimizing your preference settings is a very good first step.
2,000 Video Training Titles
Edit smarter with Larry Jordan. Available in our store.
Access over 2,000 on-demand video editing courses. Become a member of our Video Training Library today!
Subscribe to Larry's FREE weekly newsletter and
save 10%
on your first purchase.
2 Responses to Optimize Adobe Premiere Pro CC Preferences
Thank you very much for sharing this info Larry
This is so helpful, and there are multiple changes here that I didn’t know to apply.
Thanks!