
(This article was first written as an update to my book: Final Cut Pro X – Making the Transition. However, this update was never published.)
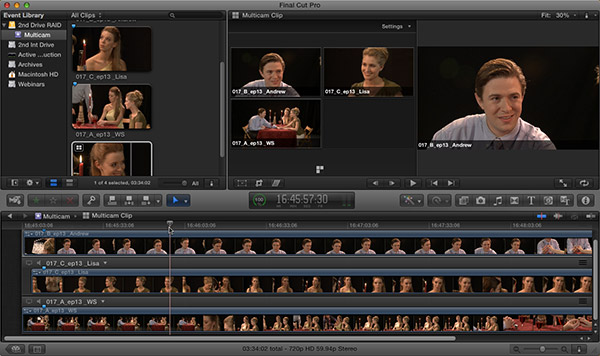
Probably the most exciting new feature in the 10.0.3 release of Final Cut Pro X is multicam. This is designed to edit events that you are shooting simultaneously with more than one camera. Performances and sports come instantly to mind.
Apple set the standard for multicam editing with its initial release in Final Cut Pro 5. In FCP X, they just raised it. In a single multicam clip you can:
Multicam editing is not designed for switching live events. Instead, you record and capture all your video first, then edit it using the multicam feature.
NOTE: Optimizing media, even though it requires more hard disk space, is the preferred way to prep your media for multicam editing. H.264, MPEG-2, and AVCHD are very computer-intensive formats and for large multicam projects will cause your computer to work so hard decompressing the media that it may not be able to process your clips fast enough for real-time playback.
WHAT IS SYNC?
A multicam clip displays all your different camera angles running at the same time. However, in order for the action and audio to match between those shots, all your angles need to start at the same time. That point is called the “sync point;” a specific frame in every clip which is used to align all the clips so they all display the same action at the same time during playback. The sync point is almost never the first frame of each clip.
SETTING A SYNC POINT
Multicam clips assume that all cameras are recording the same event at the same time. (Multicam clips are not appropriate when you are shooting multiple takes of the same thing from different angles using a single camera.) The recording from each camera is called an “angle.” You could also think of each angle as a separate “stream” of video.
You can synchronize (“sync,” which means “lock together and match to time”) all these streams using one of five methods:
If you are at a live performance where using a clapper slate is not possible, a great “Plan B” is to have someone shoot a flash picture after all cameras are recording. The flash is short and bright enough that, while it only lasts for a frame, it is bright enough to be seen by all cameras.
Another great tip is to record audio on all cameras, even if you have to use the camera mic. That way you can sync either on the flash or the audio. Choices are always good.
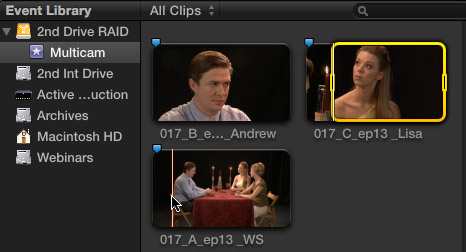
This screen shot is an example of three shots that I want to build into a multicam clip (which is also called a “multiclip”). On this shoot I used a clapper slate to indicate the sync point for all three cameras and set a marker (shortcut: M) at the moment the clapper closes. (This scene is taken from an episode of my podcast: www.2reelguys.com.)
Theoretically, FCP X should sync clips based upon matching the audio waveforms from each angle. However, this is not always reliable. Either one camera doesn’t have audio, or some cameras are wildly out of sync. Plus, using audio to match sync can take a while.
For this reason, I made it a habit to always use either a clapper slate or, on productions with a budget, matching timecode. This is MUCH faster than waiting for automatic sync on audio to work. This way, if audio sync works, great. If not, you have a fall-back option.
Once you have your markers (or other sync point) set, select the clips you want to build into a multicam clip and select File > New Multicam Clip. You can only select and assemble multicam clips using source clips in the Event Browser.
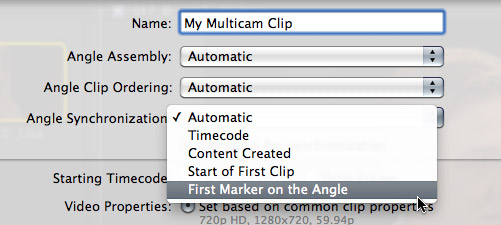
This opens the Multicam Setup dialog. Give your clip a name, then change the option in Angle Synchronization from Automatic (which means it syncs on audio waveforms) to First Marker (or whatever option you’ve decided to use for sync).
If you decide to sync on markers, be sure to turn “Use Audio for Sync” off. When using markers, or any sync other than Automatic, using audio synchronization will significantly delay the creation of your multiclip and may throw off your sync.
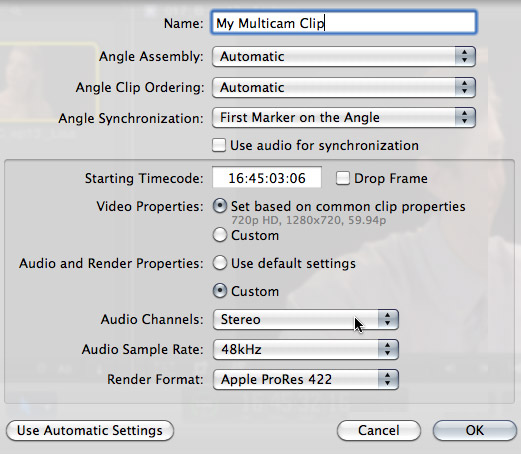
The remaining section of this dialog is just like starting a new project. When the rest of the settings are to your liking, click OK. (As a note, Apple changed the default audio setting from Surround to Stereo in this release as well.)
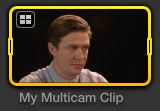
A new icon is displayed in the Event Browser for your multiclip. Notice the small “four squares” icon in the top left corner? That indicates this is a multiclip.
THE ACTIVE ANGLE
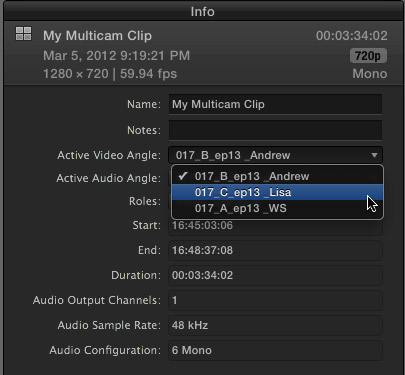
The Active Angle is the image and audio displayed in the Viewer for a multiclip before you do any editing. There are several different places you can change this, but the easiest is the Inspector. (Another is the Angle Editor, which we will talk about in a minute.)
Select the multiclip and open the Inspector. Change the Active Video Angle, or Active Audio Angle to the clips you want to see and hear. You can also use the Inspector to change the Roles assigned to this multiclip.
EDITING A MULTICAM CLIP
Just as with any other clip, set an In and an Out to mark the portion of the multiclip that you want to edit to the Timeline. (The sync point is just used to get the clips to match, in almost every case, the actual multiclip you edit to the Timeline starts somewhere else.)
For instance, say you recorded a dance recital. Instead of editing one gigunda multicam clip to the Timeline, it makes more sense to edit each individual performance piece as its own clip into the Timeline, and separate them with shots of the audience applauding. So, if you have ten dances, you would have ten different clips derived from the same multiclip.
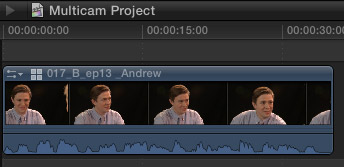
A multicam clip edited to the Timeline looks just like any other clip – except for the small “four squares” icon in the top left corner of the clip icon. Also, a new multicam clip displays the active video and audio angles.
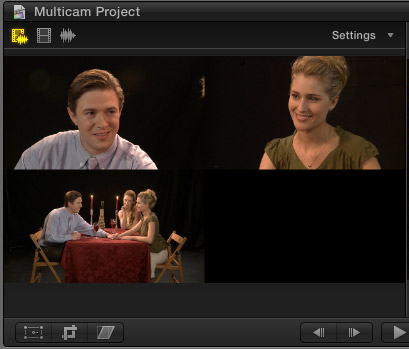
To see the individual angles within a multiclip, select Window > Show Angle Viewer. This displays all the individual angles of the multiclip in a new window – the Angle Viewer.
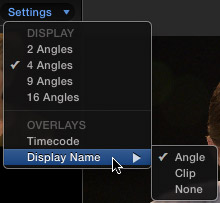
To change how images are displayed, click the Settings text button in the top right corner. This allows you to set how many images are displayed at one time, along with any text shown at the bottom of each image.
Also, you can toggle the display of timecode, angle name, and other clip information using the Display Name menu. Feel free to experiment with changing these to see what happens.
If there are more shots in your multicam than will fit in the window — the options are 2, 4, 9, and 16 images — FCP creates “banks” of images where each bank holds up to 16 images and there are four banks in all, for a total of 64 discreet angles. These three squares indicate there are three images in the multiclip. The yellow square indicates the active angle. Clicking these small groups of squares at the bottom of the window allows you to change between image “banks.”
A WORD ABOUT DATA
Multicam editing REQUIRES really fast hard disks. One optimized HD video angle is about 18 MB per second. So, a four-angle multiclip will require about 72 MB/second. This approaches the maximum speed of a FireWire 800 drive.
Editing more than 4-5 angles requires a fast RAID attached via Thunderbolt, or, if you have a MacPro, you can use eSATA or mini-SAS connections. Editing 64 angles of optimized HD media would require about 1.1 GB/second – which is about the maximum data transfer rate of a top-quality Thunderbolt RAID.
Serious multicam editing requires seriously fast storage. [ Here’s an article that talks more about RAIDs and Thunderbolt.]

See these three icons in the top left corner of the Angle Viewer? These determine whether you are editing (from left to right): audio & video, video only, or audio only. Generally, we edit multiple video clips to match a single audio track – either a mix from the audio board for a live event or a CD track for a music video.
So, for a performance video where audio is from a mixer, to configure the starting audio and video sources:
It is important to select the audio source before selecting the video source. Whichever of these you select last is the one you’ll edit. In this case, we will lay down an unedited audio track and edit just the video on top of it.
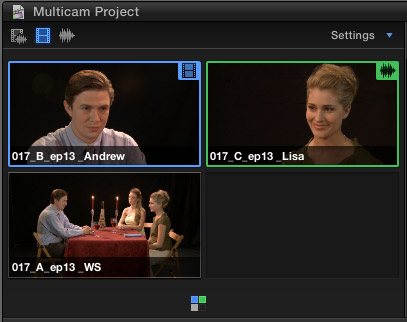
Here, the blue video icon is lit in the top left corner. This means we are editing video and leaving the audio untouched. The video will start with the blue-boxed clip and will change whenever you change shots. The audio will come from the green-boxed clip and won’t be edited.
Or, if you want to switch both audio and video at the same time, click the far left icon at the top, then click the clip you want to start with. Now, when you change shots, both the audio and video will change at the same time.
You can either edit shots in real-time, or by precisely positioning the playhead where you want the shot to change. The procedure is exactly the same.
To switch shots in real-time using the Viewer, start playback then click the image in the Viewer to which you want to switch. As soon as you click, an edit point is inserted in the Timeline and the downstream shot changes to the clip you click. Or, simply put the Playhead where you want to switch shots and click the clip you want to switch to in the Viewer.
To switch shots using the keyboard, start playback (or position your playhead) then type a number on either the keyboard or keypad that corresponds to the shot you want to use. (Unlike FCP 7, you do not need to hold down any modifier keys; just type a number.) Keyboard shortcuts allow you to edit up to ten angles at a time.
A WORD ON THE SKIMMER
If the skimmer is active, and you are using keyboard shortcuts to edit, the edit point is inserted at the position of the skimmer. If the skimmer is not active, the edit point is inserted at the position of the playhead. I find using the Playhead faster and simpler.
This is one of the reasons that I love using the Skimmer in the Event Browser, but turn it off for editing in the Timeline. (Keyboard shortcut: S)
TRIMMING A MULTICAM CLIP
To replace a shot with a different angle, hold the Option key and either click the new image in the Angle Viewer that you want to replace the image in the Timeline, or hold the Option key and type a number corresponding to the new angle you want to use. This is like a fast “Replace Edit.”
Trimming a multiclip is the same as trimming any other clip – except that you can’t use a Ripple trim as it would knock the multicam clip out of sync. To adjust the timing of an edit point, select the trim tool (press T) and roll the edit point to the position you want.
If audio is slightly out of sync – which happens with cameras located in the back of a large hall – select the Trim tool, hold the Option key down and drag the middle of the clip you want to slip left or right. This is the same slip technique you use when slipping normal clips. (For every 37 feet a camera is distant from a sound source, the audio arrives 1 frame later than video when shooting at 30 fps.)
THE ANGLE EDITOR
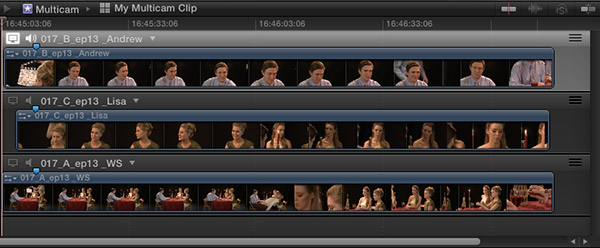
Sometimes we need to adjust the contents of the multiclip master. We can do this in the Angle Editor; which is new to FCP X. To open a multiclip in the Angle Editor, double-click it in the Event Browser.
The Angle Editor opens the master file of the multiclip from the Event Browser, not the clip we edited into the Timeline. This means that any changes we make to the multiclip displayed in the Angle Editor are reflected in every version of that multiclip.
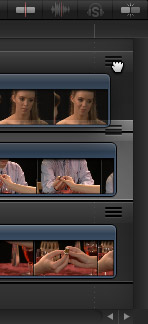
For instance, to change the display order of clips in the Angle Viewer, drag the “thumb” — the three horizontal lines in the top right corner of each track — up or down.
Or, you could apply a filter — say color correction — to a master clip in the Angle Editor. That filter is then applied to every iteration of that angle from that multicam clip in every Project. Think of the time savings in making color adjustments!
You can also trim clips in the Angle Editor, or use the Position tool to drag them into sync, in case your sync points were not set perfectly. (You can also make an individual angle invisible, or visible, by typing V.)
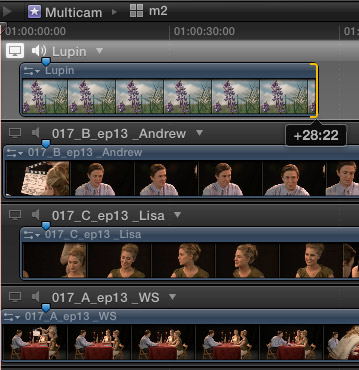
If you are including a still image in your multicam clip, you’ll need to adjust the duration of the image in the Angle Editor so that it lasts long enough to edit into your project. Include the still image as one of the selected clips when you build the multicam clip. Then, open the Angle Editor and adjust the duration of the still image by dragging an edge of the clip to the length you need.
You can use this technique to add a number of stills to your multicam clip, say, for creating a stills montage.
NOTE: If you are trying to lengthen a PSD file, you’ll need to change the duration of every layer of the PSD file, first.
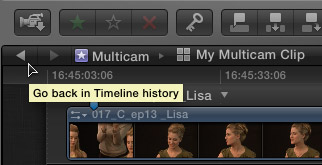
To exit the Angle Editor and return to editing your multiclip, click the left-pointing arrow in the top left corner of the Timeline (this section is called the “Timeline History”). This takes you back to the last Project you were editing. To return to the Angle Editor, simply double-click the source multiclip in the Event Browser.
SUMMARY
When it comes to editing multiple cameras, multicam is amazing! The two essential points to remember are to properly set your sync point and make sure your storage is really fast.
2,000 Video Training Titles
Edit smarter with Larry Jordan. Available in our store.
Access over 2,000 on-demand video editing courses. Become a member of our Video Training Library today!
Subscribe to Larry's FREE weekly newsletter and
save 10%
on your first purchase.
32 Responses to FCP X: Multicam
Newer Comments →-
 Braden Storrs says:
August 30, 2012 at 3:19 pm
-
 rodinei nunes says:
January 16, 2013 at 5:00 am
-
 Jerry Cobb says:
July 1, 2013 at 9:41 am
-
 Gary Greenwood says:
July 7, 2013 at 2:55 am
-
 deejo says:
September 18, 2013 at 10:08 pm
-
 Larry says:
September 19, 2013 at 8:44 am
-
 deejo says:
September 19, 2013 at 11:33 pm
-
 Larry says:
September 20, 2013 at 7:05 am
-
 jefbak says:
September 30, 2013 at 7:48 am
-
 Craig Moss says:
November 25, 2013 at 10:41 am
-
 Larry Jordan says:
November 25, 2013 at 2:34 pm
-
 Dialogdesigneren says:
March 16, 2014 at 12:32 pm
-
 Larry Jordan says:
March 16, 2014 at 12:55 pm
-
 Ryan Kavanagh says:
May 13, 2014 at 12:04 pm
-
 Larry Jordan says:
May 13, 2014 at 4:38 pm
-
 Ross says:
June 6, 2014 at 8:40 am
-
 LarryJ says:
June 6, 2014 at 8:56 am
-
 Ross says:
June 6, 2014 at 9:21 am
Newer Comments →Do you know if you can use Timecode, assisted by audio, to sync footage and audio? Many camera do not have Genlock but do have timecode (like the ones we will be getting). It’s hard to set the cameras all at the exact same time. We do long shoots with 3-4 cameras. Is that possible.
Hi Larry, any notice about the email I send for you?
Larry-
This is bad & I hope there’s a fix:
Client brought me a 3 cam shoot of a rock band performance to edit a promo from in FCP 7.
First I made a multiclip sequence but foolishly pre-mixed the audio, as he said he liked the balance between “live” and dry “board” audio. I made a zillion cuts & transitions, then cut the timeline up into individual songs and exported these so they could be easily reordered into a new timeline. Tweaked final timeline with more effects & audio, added titles & exported the final promo as a ProRes LT video to the client.
You can certainly guess what’s coming : client “loves” it, BUT want “a little more of the dry board mix and a little less of the wet room audio”.
Question: is there any way to conform the “dry audio” track with the ‘final’ video, conforming to all the crazy cuts & reordering of songs?
Plural eyes? Some kind of Larry magic?
I’ve got to move on to other clients & I’ve already put close to 100 hours into this one (yeah, client is an old friend who paid a whopping $400 up front for this…)
Help?
Hi Jerry
I’m very new to FCPX, coming from Eduis (which is amazing too).
Hate the fact that you can’t add extra audio tracks to a multicam edit so you can have more than one track going at the same time. If you have multiple cameras only common sense you may have more than one sound source going after all! For me its live sound from a theatre sound desk and stage mic to get tap dancing, audience atmosphere and applause etc.
To get around this, (I may find a better solution later) I edit the sound track in a new project to get it about right. Then i export a wave file to use in the Multicam project. If something isn’t right, I go back to the sound mix project, change it to how I want, then export the wave file “with the same name.” The sound file in the multi-cam project is updated!
As with Macs (‘m a PC person) everything is a workaround.
Hope this helps
Gary
sir,
how to multiclip the 2 clips in 2 different events in fcpx?
Deejo:
You need to move one of the clips so they are both in the same Event.
Larry
how to move the clip to another event? by import again or can we copy &paste?
Deejo:
Just drag it from one Event to the other. This will make a copy of the media in both Events.
Larry
Very helpful. Then only issue I have had is applying color correction to the master clips in the Angle editor. I can’t get them to render in the background or manually, and applying the effect slows my system down to much for editing (I use magic bullet looks plugin).
If I add color correction to the clips in the main timeline instead, it will render as usual, but as you note, it is much faster to apply to the master clips in many situations.
I know I could just apply color correction at the end of the process, but then I would have render a movie file each time I wanted to see the final result with smooth playback.
Is there something I am missing to get effects applied to the master clips to render?
First let me say that you were one of my go-to-gurus for FCP 5-6-7 and now you are for X. I teach video production at a HS and am working hard to create a prosumer level workflow for all my students.
We are currently working on a multicam music performance. I asked some audio pros about how to best sync the audio if recorded to two different mixers to two different cams. We do not yet have a 6/8 track mixer/recorder so I was trying to use a 2-3 Sound Devices 302s and 2-3 P2 camcorders as recorders.
They told me that the only way was to use a timecode generator and to genlock sync all the cams. Yes one of your options. Their reasoning was that unlike the visual, sound must be accurate to fractions of a frame, that not even a clapper lined up wave form would do the trick. One tech said that it would not be visually noticeable but the result would be a metallic like echo. They did add that dialog would be fine but not music. Any thoughts?
Craig:
They are basically correct – however, I THINK, but don’t know for sure, that timecode is only frame accurate.
The cost of renting cameras that support genlock, AND the cost of the timecode generator probably FAR exceed the cost of renting a multi-track audio recorder.
I would urge that second route – rent a good audio recorder, use a clapper slate for sync, and decrease your stress.
larry
I was impressed of the sync possibilities with multi cam editing in FCPX, but that does NOT count the time counter. I have an edit of two cams, each 1h 20m. Now both the time counter and the time dots right over the timeline tells me, my edit is 4h 53m.
I am aware FCPX needs to know the total clip-duration in a multi cam edit, but why must I? I played around to find a setting so I could have the timeline show the duration of the play, but no such number. As far as I could see. :-/
DialogDesigneren:
Hmmm… I’m not sure what is happening here. I just built a multicam clip and both the duration indicated in the Timeline and the duration indicated in the timecode display in the toolbar are accurate.
Two thoughts come to mind:
1. For whatever reason, your clips are not matched properly in the multicam master clip, causing the duration to be excessive.
2. If you double-click the multicam clip, the Timecode display shows the timecode of the clips, not the running time of the sequence.
Either way, I’ve not seen durations this far off, nor can I recreate them here.
Larry
Hey Larry,
I am having a little issue with multicam clips. So I brought a project over from FCP7, the project was mostly interview footage with two cameras. The multicam clips carried over from FCP7, and the edit looks fine. I also added keywords, rejections favorites and markers to mark transcript page numbers. When I’m in the timeline and I hit Shift-f, to show the clip in the browser, fcpx makes a new multiclip in the browser, and the new multclip doesn’t have any of the keywords or markers or anything like that. Is there a way to re-associate the multclip in the timeline with the multiclip in the browser so that when I hit “shift-f” it takes me to the multiclip with the keyword, favorite, and marker information?.
Thanks
Ryan:
I don’t know any way to do this. However, I’m surprised FCP is forcing you to link to a new clip.
What happens if you create a new project and edit the existing multicam clip into a new project. Do the links work properly then?
Larry
Hi Larry
Just had my first play at multi-cams in 10.1.1. I’m just an amateur making a class recording of a guest lecture, with one camera recording the lecturer and the other focussed on my students. One camera has a run time of 2:07 and the other 2:13. I guess i stopped the audience one a little sooner. Additionally while the dates are accurate on the cameras the time of day is about 5 hours difference. Both cameras are different makes and both recored audio through their internal mics. The audience camera consists of eight separate files and the lecturer one thirteen.
When I select all eighteen of them then create new multi-cam clip I leave angle assembly, clip ordering and sync all as automatic and audio as synchronisation ticked.
My expectation was that I would end up with two video streams but instead FCP has created 20 different angles and while groups of them are in sync other groups at the same time are from completely different parts. Also the longest part is only 26mins and there are other sequences ending after 16mins or so. Is there a simpler way to let FCP know there are only two streams and a simple audio sync? I didn’t use a clapperboard so audio sync is my best choice.
Many thanks for any tips or pointers
Ross
Ross:
Sigh… Well, let’s just say you’ve done everything you can to make this as difficult as possible.
Because you don’t have accurate timecode or time of day, FCP has no way of using either of those to figure out how to align clips. Because you stopped and started the audience camera, you lost the ability to create a single B-roll source. Because you didn’t use a clapper slate, you don’t have an easy way to sync the two cameras.
You MAY be able to use Pluraleyes, from Red Giant Software, to sync these. But, frankly, you’ll spend far more time creating a multicam clip than if you just edit the lecturer’s video into the Timeline, then manually add B-roll shots of students listening. Since you don’t see the same action on both cameras, syncing really isn’t necessary.
Larry
Thanks for the quick response Larry and it’s okay that it hasn’t worked out. This was my first time ever to try and nothing mission critical. Did do it for fun really, one camera would have been sufficient for all intents and purposes. Actually thought syncing was an easy thing but hadn’t read up before hand on any of this. A little bit surprised actually that the audio sync is not a straightforward approach. Perhaps you could share some thoughts on why the analysis of two audio recordings of the same source material is not a consistent given. Is it because the waveforms are from different camera brands and also they are not the most sophisticated?
Actually the audience camera includes everyone and the other one just the lecturer but I might still try the simple timeline approach and trying to sync the two there manually. And then cut and paste and splice what I need. Again perhaps I am naive that that is an easy task. Could also use only one audio source.
Best
Ross