 I always want to export my projects before compressing or transferring them, because I want to be sure there are no problems with the export. So, I always use Share > Master File. However, because I do this so much, I also don’t want to waste any time, so I tend to use the keyboard shortcut for this process: Command+E.
However, last week, in my newsletter, I wrote that the Command+E export shortcut had disappeared! Gasp!
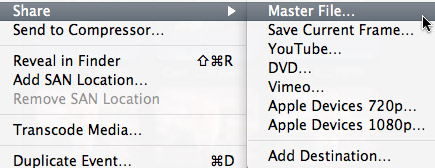
As you can see, here in this screen shot, there is no shortcut for Share > Master File. So, I went to create one using the Commands menu. Except….
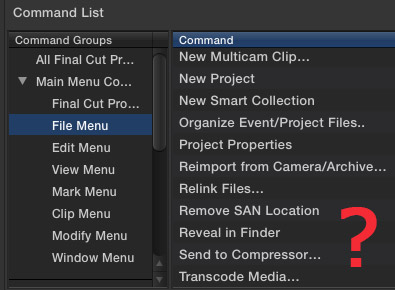
There is no way to create export keyboard shortcuts in the Command menu, because none of the Share menus are available.
This was a scandal!! No sooner had I published this astonishing fact, when several (OK, dozens) of readers wrote in to say that Apple moved this shortcut out of the Command menu and into Preferences. There was no scandal, just a new location.
In other words, I was not paying proper attention.
CREATING DESTINATIONS
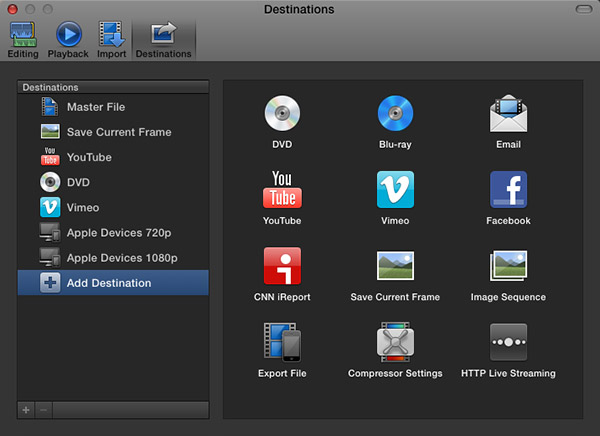
The Final Cut Pro > Preferences > Destinations pane now allows you to determine which export options appear in the Share menu, and to easily assign a keyboard shortcut to the default output option.

My recommendation, when exporting projects from Final Cut Pro X, is to always export a Master File. This is the highest quality and fastest export from FCP.
When you select Master File (or any other option from the list on the left), you are able to configure your default export settings on the right. My recommendation is to export using ProRes 422 (a good balance between high quality and smaller file size).
This screen shot above shows my default export settings.
NOTE: I am getting a LOT of reports of “bad frame” errors preventing exports when trying to burn DVDs or export to Vimeo. My recommendation is to export a Master File first, then compress/process/burn the file as a separate step, using different software.
SET THE DEFAULT KEYBOARD SHORTCUT
It is in this Preferences pane that you set the export keyboard shortcut. It can be to any of the options listed on the left, as these are the destinations that appear in the File > Share menu.
NOTE: The list on the right are potential destinations. To add a destination to the list on the left, simply drag the icon from the right to the left. You can change the stacking order by dragging up or down. You can configure the default export settings for any destination by selecting it on the left, and adjusting the settings on the right.
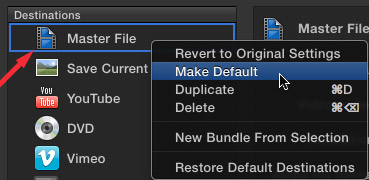
To create the Command+E keyboard shortcut, simply right-click the destination you want to use for the shortcut – in my case, that would be Master File – and select “Make Default.”
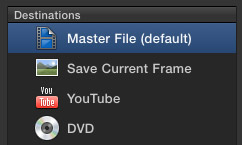
When the shortcut has been applied to a destination, Final Cut displays the words “(default)” after the destination.

To prove this for yourself, select File > Share > Master File and notice that the Command+E shortcut now appears where it belongs.
Thanks to everyone that wrote in pointing out this change. The next time my Command+E goes missing, I will know where to look!
2,000 Video Training Titles
Edit smarter with Larry Jordan. Available in our store.
Access over 2,000 on-demand video editing courses. Become a member of our Video Training Library today!
Subscribe to Larry's FREE weekly newsletter and
save 10%
on your first purchase.
141 Responses to FCP X: Export Master File
Newer Comments →-
 James Kohler says:
May 6, 2013 at 6:22 am
-
 Andrew Griffiths says:
May 6, 2013 at 1:42 pm
-
 Ian Tracy says:
August 11, 2013 at 12:10 pm
-
 g says:
August 18, 2013 at 3:31 pm
-
 Joe Dorr says:
September 2, 2013 at 12:35 pm
-
 jose angel says:
September 10, 2013 at 9:08 am
-
 Hans Douma says:
September 11, 2013 at 1:28 am
-
 Larry Jordan says:
September 11, 2013 at 11:07 am
-
 Bavi says:
October 4, 2013 at 12:41 pm
-
 Larry says:
October 4, 2013 at 12:51 pm
-
 Bavi says:
October 4, 2013 at 4:08 pm
-
 Larry says:
October 4, 2013 at 4:29 pm
-
 kitt says:
October 5, 2013 at 7:09 pm
-
 Larry Jordan says:
October 5, 2013 at 9:18 pm
-
 kitt says:
October 5, 2013 at 9:53 pm
-
 Hans Douma says:
October 6, 2013 at 1:17 am
-
 Kitt says:
October 6, 2013 at 1:34 am
-
 Larry Jordan says:
October 6, 2013 at 8:12 am
-
 Grant says:
October 25, 2013 at 2:00 pm
-
 Larry Jordan says:
October 25, 2013 at 2:12 pm
-
 Grant says:
October 25, 2013 at 3:39 pm
-
 Larry Jordan says:
October 25, 2013 at 3:49 pm
-
 Noah says:
November 16, 2013 at 3:26 pm
-
 Larry Jordan says:
November 16, 2013 at 4:03 pm
-
 Noah says:
November 16, 2013 at 5:31 pm
-
Design Competition 2013-14 | Digital Revolution says:
November 4, 2013 at 7:46 am
-
 robert says:
December 10, 2013 at 6:23 am
Newer Comments →Larry – excellent article as well advice. I had a situation where I imported a wedding VCR footage (to save 1986 wedding, the couple was afraid to even play the tape). The importing and editing went fine. When I tried to create a master file I got the same message you described – Bad Frame. I event went to the frame but couldn’t see what was causing the issue. At that point I sent the file to compressor. At that point I could create files for their DVD. Any idea about the “bad frame” when creating a master file? BTW, the entire edit was about 83 mins.
James
Larry – just tried your suggestion but it didn’t work for me. However I find I can save the shortcut (Cmd E) by editing the Command Set. I found “Export using the default share destination” in the Share > Master File in the Commands menu.
I’m using FCP X version 10.0.8.
Andrew Griffiths
I’m not sure what is going on. I just walked into a job that has a power house of a Mac with FCPX all ready installed. I have tried to follow a couple of your exporting tips and found to be missing items you mention. I cannot find any Master File option. I have no Destination’s tab in preferences. I am recently coming off FCP7 so it’s more than likely my lack of familiarity with the new program. But I can’t even see a way to export MPEG4 files. I could really use some help.
same here re: the master file option. i believe it’s because we’re running an older version of the program.
Larry,
Using FCP X on my early 2008 MBP has made exporting a slow process. But exporting 1080 ProRes project to a Master File 1080 ProRes 422 in 6 minutes and then Quicktime converting the resulting file to 480 H.264 in 5 minutes beat the socks off of exporting directly to 480 H.264 in 1 hour 49 minutes.
Question: 1. Is the quality of the end result likely to be poorer exporting and then converting than exporting directly to final size.
2. Does the answer to question 1 stay the same if final output is 1080 H.264?
Thank you so much for all of your contribution to the community.
Joe
Hi Larry, my workflow it´s similar than yours… but i export master file to XDCamHD422 since it´s lower file size instead a beatiful video and audio quality.
What do you think about it?
Regards.
Jose Angel.
Hi Larry,
Thanks for your article. Just a quick question: what codec to use best to process this master file into a generally viewable MOV or MP4 on YouTube or my desktop ? I tend to use H.264 but that will (sometimes) compress a lot. As an example: I have a couple of 8mm films digitalized and prepared one with FCPX into a master file of 1GB. Transcoding this using H.264 in e.g. Handbrake creates a file of 480MB. When I use FCPX to export to a file in H.264 the file size is only 67MB. In FCPX there is nothing customizable when choosing H.264 as codec. Can you tell me why there is such a huge difference between the two uses of H.264 (bit rate?) and what should I do to create the best possible output for local display ?
Hans:
File size is TOTALLY dependent upon bit rate. The higher the bit rate the larger the file and the higher the image quality. The lower the bit rate, the smaller the file and the poorer the quality.
I don’t use either Handbrake – a good program – or FCP X for compression. I use Compressor. And I create all my movies as MPEG-4 files with the H.264 codec. The bit rate I use varies depending upon the image size of the compressed file.
Larry
Hello Sir,
How are you doing?
I am having an issue while Exporting from Final Cut Pro 10.0.
I have taken the steps you show above, but when I open the window where it tells me how much percentage is exported under “Sharing”… It has been showing me 0% since last night. Everything is completely rendered… I see no red lines and this is wedding video project I am doing and it is about 1 hour 45 minutes long. I have done many projects before, and they take about 2-4 hours to export. But, this one won’t budge from 0%.
Please help (stressing out 🙁 …)
Thank you so much,
Bavi
Bavi:
If you are really running FCP X version 10.0.0, then I would suggest upgrading via the Mac App Store immediately. The current version is 10.0.9.
Otherwise, I’ve often found that trashing preferences and creating a Master File tend to fix this problem. Here are two links that can help explain this:
http://www.larryjordan.biz/improving-fcp-x-performance/
http://www.larryjordan.biz/fcp-x-export-master-file/
Larry
I’m sorry, I meant to put FCP X 10.0.8.
This is the version I have, but I will upgrade to the recent one and will let you know.
Thank you.
Bavi:
FCP X 10.0.8 has numerous reported export problems. Absolutely upgrade to 10.0.9 which should fix most of them.
Larry
Hi Larry,
Can you help me, am shooting events in full HD 1080, when exporting and mankind a DVD what is the best way to export that will give me the best image quality.
what codec do you recommend ?
Thanks
Kitt
Kitt:
DVDs are always and ONLY standard-definition video, so your image will look far worse compared to the 1080 HD you are shooting.
Also, DVDs always and ONLY use MPEG-2 compression, you don’t have a choice. (If you need HD video, you would create a Blu-ray Disc, which uses H.264.)
DVD compression settings in Compressor or Adobe Media Encoder are fine for a DVD, use the defaults.
Larry
Thank you so much for the reply Larry,
OK so I will use Blu-ray Disc from now on. Now when finalizing my edit do I export as master file using ProRes 422 or is there a better work flow that you advise to get the media to Compressor or Adobe Media Encoder. I have never done this before and I thank you for your time and effort in this mater.
Regards,
Kitt
As an alternative to Compressor you might use Toast. In my experience feeding an FCPX Master File into a Toast Bluray project generates fantastic results
Thats sounds great i have toast. My worry is the size of the master file, i have a two hour weeding tthat i will split into two parts,if i use the Pro Res 422 will toast handle it or will it even fit on to a Blu-Ray.
Thanks
Kitt
Kitt:
The size of the master file is irrelevant. The size of the compressed file is NOT determined by the size of the original file, but by the compression settings you apply to the master file.
Master files are ALWAYS huge, which is fine. Generally, the larger the file the greater the image quality. You always want to start compression with the greatest amount of quality possible.
Larry
Hi Larry – What settings would you recommend for longer projects? For example I have an hour long project but if I master file it in prores422 its approx 56gb whereas if i master it in h264 its only about 9gb?
Ultimately I need to compress it to upload it to youtube so thinking smaller file size for master would be better?
Any advice greatly appreciated.
Thanks
Grant
Grant:
The most important thing to keep in mind about video compression is that the size of the master file has NO!!! relevance to the size of the compressed file.
So, I always export a single, high-quality master file from FCP X as a ProRes 422 file. Then, I’ll compress that in Compressor using a YouTube preset. If I need other versions – and it ALWAYS seems that I do – I only need to go back to the master file, not FCP X, to create whatever other derivatives that I need.
Larry
Thanks for the reply, I guess my issue is that once I export my master file as prores422 its 64gb and the original camera files were only 12gb? I know disk is cheap but then I have a 64gb file that I need to compress for youtube which is surely going to make it a bigger file size?
Cheers
Grant
No. No. And No.
Master file size is totally irrelevant – weird but true. Once you have all the compressed files you need from it, you can trash the master file and get your 64 GB back.
Larry
Hey, just jumping on here because I have the same question. So, if a pro res master file is waay bigger than the original import, are you still saying that the export time would be shorter? I need to export my file as fast as possible, but its very large, and it seems counter-intuitive that a larger file would export more quickly. But if the files in events are transcoded to pro res 422, is this export in fact faster, despite the large increase in file size?
Noah:
In almost all cases, exporting the format you use for rendering – by default ProRes 422 – will be the fastest. Any other format would require re-rendering during the export. Larger files take longer to export, but not nearly as long as re-rendering media.
Larry
Hey, thanks again for responding. I can’t figure out how to reply under your latest reply. So I’m adding one last question here: Is there any way to make the export time even faster? I am unable to trash my preferences, because I am using a computer with prohibitions set by an administrator (university campus computer). Are there any other tips you know of, besides exporting in pro-res and transcoding the files into this same format, that would speed up my export time even more? Just wondering
thank you
[…] Exporting to QuickTime in Final Cut Pro […]
Hi! I think I found the problem: my CPU usage on Activity Monitor is/was in the sky because of a msd. My computer had less the 15% memory for the fcpx job. crazy