 [Updated: June 22, 2023. With the 10.6.6 update to Final Cut Pro, Apple removed the FatEQ effect. Channel EQ is a better and faster replacement. I updated this article to illustrate how to use Channel EQ in Final Cut.]
Just as we can shape specific colors in our images to create a specific look, we can “shape” specific sounds in our audio to create a specific sound. Most of the time, we use this shaping capability to create ear-catching sound effects.
However, I also use these techniques to warm up a voice or, more importantly, to improve the clarity of speech. This is especially important when creating projects for older audiences who’s hearing may not be as good as you would like. One of the sad facts of life is that as we get older, we lose the ability to hear high-frequency sounds, which means that it becomes harder to understand what people are saying.
In this article, I’ll show you how to improve the sound of a voice using FCP X, Premiere Pro and Adobe Audition. Once you understand how this technique works in one application you can use it anywhere, because all that changes is the interface.
NOTE: Since this article was released, I added two companion articles on boosting and smoothing audio levels. The first article covers Final Cut Pro X and the second article covers Adobe Premier Pro CC.
AUDIO BACKGROUND
Whether we are listening to music, speech or noise, all human hearing is based on frequencies – the variations in the pitch of a sound – and volume.
Normal human hearing is defined as a range of frequencies from 20 cycles (Hz) to 20,000 Hz. This range is typical for an 18-year-old adult. Children can hear frequencies beyond this range, while older folks hear less. (Sigh…)
While our hearing encompasses this range, which we call “20 to 20K,” most of the sounds we hear only use a portion of it. For example, an adult male voice is roughly 200 – 6,000 Hz, while an adult female voice is roughly 400 – 8,000 Hz. (And, yes, there is LOTS of variation between individuals. You only need to compare the voices of James Earl Jones to Chris Colfer.)
Audio frequencies are logarithmic. What this means is that each time the frequencies double, the pitch goes up an octave (for you music majors out there). So, while human hearing spans ten octaves, human speech only covers about five octaves.
When it comes to speech, vowels are low-frequency sounds – they lend the voice its richness, sexiness, and identity. Consonants, in contrast, are generally higher frequency sounds – they provide clarity to speech. For example, the difference between the letter “S” – which has a hissing sound – and “F” – which lacks that hissing sound – is roughly 6,000 Hz in men and 8,000 Hz in women. While both sounds are formed the same way, air squeezing between the tip of tongue and the roof of the mouth, if you can hear the hiss, the letter is an “S.” If you can’t, it’s an “F.”
As we age, our ability to hear high-frequency sounds decreases. This means that, while we can hear that someone is talking, when we can’t clearly hear high frequencies, it becomes difficult to understand the dialog. A good analogy is listening to two people talk on the other side of a wall. You can hear them talking, but you can’t understand what they are saying. That’s because the low-frequency sounds pass through the wall, but the high-frequency sounds do not. By boosting specific frequencies, we can make sure that our audience is better able to understand what’s being said. Which gets me to the purpose of this article.
EXECUTIVE SUMMARY
To “warm up” a voice, we boost a range of bass frequencies. To improve clarity, we boost a range of higher frequencies. And the tool we use to accomplish both these tasks is called an EQ filter (EQ is shorthand for “equalization”).
AUDITION: APPLY THE PARAMETRIC EQ FILTER
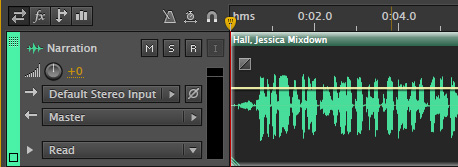
Here I’ve added a female narrator to my mix. To apply an EQ filter, select the track, then choose Effects > Filter and EQ > Parametric Equalizer.
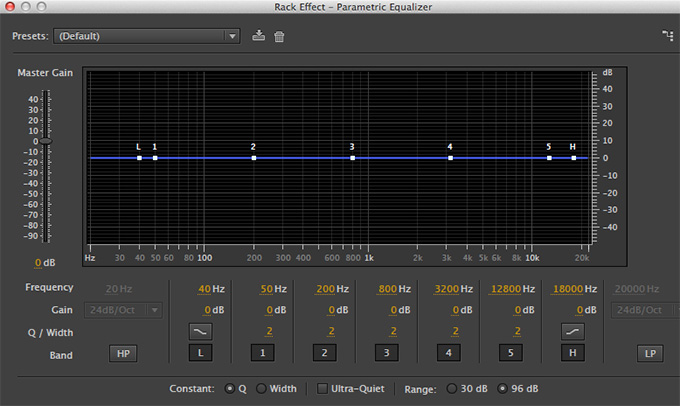
This displays the filter. The blue line represents the range of human hearing from 20 – 20,000 Hz (bass is ALWAYS on the left). The seven white dots represent control points:
The two control points we are most interested in for this article are #2 and #4 which control frequencies at the bottom and top of human speech. (In fact, as you’ll see in all three examples, the control ranges are all numbered the same and we consistently use #2 and #4.)
ADJUST THE FILTER

What an EQ filter does is boost the gain (audio level) of a range of frequencies. When we adjust the volume of clip, we adjust all frequencies equally. An EQ filter allows us to boost some frequencies without boosting others.
The key point you need to keep in mind is that, like gray-scale values, we can’t boost a single frequency. We are always adjusting a range. Sometimes a wide range, sometimes a narrow range, but ALWAYS a range.

The numbers at the bottom of the filter window represent the adjustments we can make.

The easiest way to change a setting is grab the white dot in the frequency display and drag it.

To warm a voice, here are the settings I recommend you start with:
Don’t add too much. The more low-frequency emphasis you add tends to make the voice sound “rumbly” and muffled.

To improve clarity, we need to boost the higher frequencies in the voice. For me, improving clarity is much more important than boosting bass. Here are the settings I recommend you start with:
In both these cases, we are making small adjustments. Think of this as adding seasoning to a soup. You aren’t going to change the flavor of the soup by adding salt, just as you won’t change the composition of a shot by removing a blue cast. However, you can make it better than it was.

To compare your results, click the green Power button to enable (green) or disable (gray) the filter. Adjust the filter to best suit the voice and what you want it to sound like.
FINAL CUT PRO: ADD THE CHANNEL EQ FILTER
FCP has a similar filter, with similar settings. To use it:


This displays the full interface for the Channel EQ filter. Again, the 20 – 20K range of frequencies is displayed – this time as a pale blue line (bass is on the left) – divided into eight frequency ranges. It also includes both high- and low-cut filters.
While this effect provides a wide variety of EQ shaping and control tools, for this tutorial we want to enhance the sound of male or female speaking voices.


To warm a voice, boost the bass. To add clarity, boost the treble. There are three settings for each frequency range that you can adjust:
Here are the settings I use for a man’s voice:
Here are the settings I use for a woman’s voice:
Adjust these until the voice sounds good to your ear. Remember to watch the meters. Adding too many dBs will cause the voice to distort.
NOTE: This is a very powerful and flexible effect. Read Apple’s Help pages to learn more about how this works.
PREMIERE PRO: ADD THE EQ FILTER
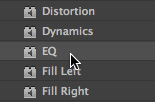
In Adobe Premiere Pro CC, select the clip, or clips, to which you want to apply the filter. Then, from the Effects panel drag the EQ filter on top of the selected clip(s).
NOTE: There are two other EQ filters in Premiere that can be used: Parametric EQ and AUEQ. However, the interface on the Parametric EQ would scare anyone and the AUEQ filter is, as far as I know, Mac-only. I prefer to use the EQ filter.
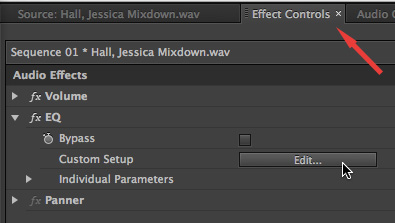
To display the filter, select the clip (if it isn’t already selected) and choose the Effect Controls panel. The filter is displayed in the list. Click the Edit button to display the interface.
ADJUST THE FILTER
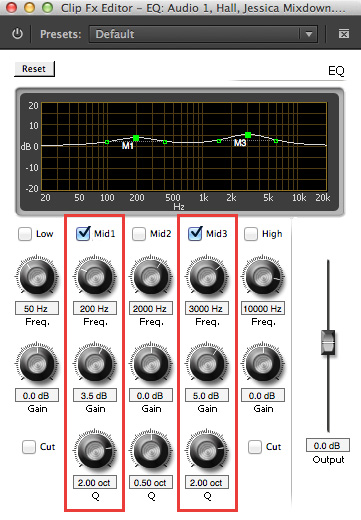
First, check the Mid1 and Mid3 checkboxes to turn these filter controls on. Then, here are the settings I would use for a male voice:
And the settings for a woman are the one’s we used earlier:
To disable to filter so you can compare what you are doing with the source clip, click the italic fX to the left the EQ filter name in the Effect Controls panel.
SUMMARY
There is no rule that says you have to use any of these settings. Often, I’ll boost the highs to improve clarity and leave the low frequencies alone. As with all things in audio, listen to the results and decide for yourself whether you like it or not. I also make a point to listen to final audio on speakers, not headsets. Often, headsets are too good and you hear things that can’t be heard when using speakers.
Feel free to shift frequencies or adjust the gain to get the results you want. My numbers are starting points, not locked in stone.
I manipulate the EQ in virtually everything I create. For my live podcasts and webinars, I take time to pick the best mic and preamp to get the sound I want because I can’t adjust the sound later.
For post-production, I shape the sound using an EQ filter because I don’t always get the chance to specify what mic the talent will use.
In all cases, though, consider the needs of your audience and what they need to hear. While I don’t do a lot of EQ adjustment for sound effects, and almost never for music, I always take the time to make sure my talent and narrators sound as good and clear and understanable as possible.
2,000 Video Training Titles
Edit smarter with Larry Jordan. Available in our store.
Access over 2,000 on-demand video editing courses. Become a member of our Video Training Library today!
Subscribe to Larry's FREE weekly newsletter and
save 10%
on your first purchase.
76 Responses to EQ: Warm a Voice and Improve Clarity [u]
Newer Comments →-
 Mark Suszko says:
May 26, 2014 at 6:56 am
-
 LarryJ says:
May 26, 2014 at 9:35 am
-
 Janette Miller says:
May 26, 2014 at 2:13 pm
-
 David Arbor says:
June 3, 2014 at 8:06 am
-
 LarryJ says:
June 3, 2014 at 9:22 am
-
 Tom says:
June 19, 2015 at 7:47 am
-
 Larry says:
June 19, 2015 at 8:23 am
-
How to Warm a Voice and Improve Diction via FCP and Premiere | Cavus Media Daily Blog says:
June 23, 2014 at 9:04 am
-
Premiere Pro CC: Boost and Smooth Audio Levels | Larry Store says:
July 29, 2014 at 11:33 am
-
 Ugo says:
June 23, 2015 at 3:46 am
-
 Larry says:
June 23, 2015 at 9:12 am
-
 R David Stephens says:
August 22, 2015 at 3:57 pm
-
 Larry says:
August 22, 2015 at 6:55 pm
-
 R David Stephens says:
August 22, 2015 at 4:08 pm
-
 R David Stephens says:
August 23, 2015 at 5:30 pm
-
 Larry says:
August 23, 2015 at 6:28 pm
-
 R David Stephens says:
August 24, 2015 at 4:04 am
Newer Comments →Nice summary. I’d like to see your “recipes” for adding compression effect settings to the audio, to make reads sound punchier on-air.
Mark:
Thanks! I’ve written about compression before, but I like the idea of a summary article. I’ll add this to next week’s list.
Larry
You can do all this in Garageband too. Extremely well. It has this filter in the Edit section and you can watch and play. I usually start with a preset. Garageband is a great midi application. One of the best and overlooked. I still miss the old iMovie with its uncompressed sound. Great article.
Great article, Larry. You mentioned that you almost never EQ music, but one tip I picked up a couple years ago is to EQ the music a little to add a ‘hole’ or a ‘well’ and drop the levels on the same frequencies that you’re boosting your voice. So if you have a relatively standard promo piece with VO or interview audio and a music bed, and the music is dominant in the mid frequencies, making that small well (-1 to -2 dB) in the 3000Hz to 4000Hz range can really help avoid having your VO fight with the music.
-David
David:
You are absolutely correct. There are specific filters that do this “dipping,” called Channel EQ filters. And I use these a lot to separate voice over from music.
I should have more accurately written that I don’t EQ music to change its “shape,” as this article describes for voice. But I will “notch” the music track to make room for a voice. I generally reduced from 300 cycles to about 3000 cycles by about 4-5 dB.
Larry
For Final Cut Pro X, Fat EQ for voices, and Channel EQ for music notching?
In the end, is there really that much difference between the 2 besides the UI?
Thanks!
Tom:
yes and no. They both manipulate the same range of frequencies, so in that regard they are the same. However, because of the differences in the interface, HOW they manipulate frequencies allows each plug-in to do different things with your sound.
Larry
[…] by Larry Jordan […]
[…] Here’s a companion article I wrote that is the second half of the “good audio” equation: using EQ to shape your […]
Great article, but, from a musician point of view, be aware that more often than not the 300/400Hz range is where “mud” is located.
Usually a small cut in those ranges make everything more clear and intelligible.
Don’t forget to consider harmonics too: a low frequency sound generates harmonics, sounds that are multiplies of the root frequency.
Sometimes I use the trick to attenuate the root sound just a bit and leave the harmonics in the final mix: the human hearing tends to rebuild the whole sound using those harmonics.
Ugo:
Great comments. Thanks!
Larry
Hi: I found your website very interesting, especially since I’m a novice voice recorder.
I am just getting started with a Samson G Track USB mic and Sonar LE software. I’m trying to put together a proper demo for ACX who is telling me that I need to to reduce my noise floor…probably coming from the fan on my computer.
Sonar has an EQ program…but I’m not sure what levels to set up in order to meet the ACX standards: no higher than -60db RMS and still retain a nice warm narrative voice.
The Sonitusfx EQ allows for 6 settings and is pre-set at
the following frequency Q and Gain
1. 40 1.0 0
2. 60 .08 0
3. 200 .08 0
4. 800 .06 0
5. 4600 .06 0
6 15000 .05 0
With following filter selections:
1. Shelving Low
2. Peak Dip
3. Peak Dip
4. Peak Dip
5. Shelving High
6. Shelving High
It also settings for High Pass and Low Pass…so I’m assuming I would set #1 with the HPF…but am unsure about the frequency Q and Gain settings for it or which settings to use for the other numbers.
I would greatly appreciate receiving your suggestions.
Thanks…David Stephens
David:
If its a rumble, we can fix that. If it is a fan, with higher frequency whooshing, that is going to be VERY hard and Sonar LE won’t touch it. You’ll need to consider something like Isotope RX.
That being said, adjust your two low frequency settings:
Setting 1: 40 — Q of .8 Gain of -15 dB
Setting 2: 50 — Q of .8 Gain of -10 dB
You want to use a Low Cut or High Shelf setting.
Don’t adjust any higher frequencies.
See if that helps.
Larry
Ooops…I made a mistake about the Q settings:
2. .8
3. .8
4. .6
5. .6
6. .5
Sorry…David
Thanks for the suggestion, Larry. I tried it using the High Shelf setting and it did cut the noise out. But it also seemed to dampen the playback…even when I boosted the volume control on my mic. Boosting the mic dial…was a disaster. So I left it at a medium setting and went full volume on the mic. The voice tones seemed to lack what I would call “brightness” or a “crisp” sound. It was more of a flat tone. I experimented with boosting the gain on the other settings and that seemed to help a bit.
Any other thoughts would be appreciated. Thanks so much. This is very kind of you.
David:
“Brightness” or “crispness” are high-frequency sounds which, if you are using my settings, you are not adjusting. If the sound goes flat, it is either because the filter is poorly programmed, or you are adjusting other frequencies besides the deep bass needed to remove the hum.
Larry
Thanks for your thoughts, Larry.
Since I haven’t adjusted the other frequencies, maybe the issue is with the initial mic and volume settings on the Samson. Also, maybe I’m just not describing the issue properly.
If I set the mic and volume dials at the mid-point using your EQ settings for recording…on playback I have to turn the volume all the way up in order to hear my voice.
So maybe it isn’t a question of “brightness”…it’s that if I record with no EQ filter adjustments, and use the same mic and volume settings…I don’t have to boost volume at all on playback to hear my voice…though, of course, I have the noise problem back.
And that seems to be problematic.
Any thoughts about that?
Thanks…David