
 [This article covers both Adobe Premiere Pro CC and Apple Final Cut Pro X.]
If you are creating videos exclusively for the web, you don’t need to worry about illegal luma or chroma levels.
But… if you are creating programs for broadcast, cable, DVD, DCP or HDR, then video levels are critically important. This is because the technology involved in each of these distribution platforms has limits; and excessive luma levels, especially with highlights, will get your program rejected by QA (Quality Assurance) at the distributor.
NOTE: While there are also limits on chroma saturation, most of the time chroma levels will be fine. The only exception is when you create images on the computer, which makes it easy to create images with excessive levels.
BASIC RULES
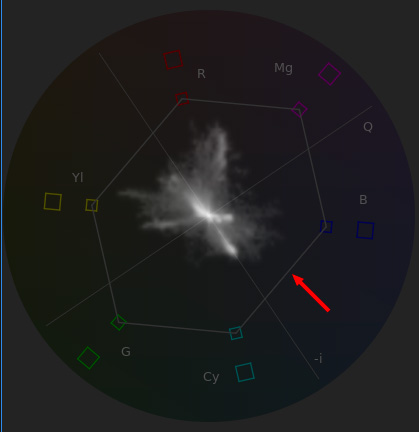
What the Video Limiter/Broadcast Safe effect does is clamp – or lock – luma and chroma levels so that they don’t exceed a specific level. (100% in the case of Luma levels.) This clamping means that any texture or detail associated with those levels will be lost.
You would use the Broadcast Safe effect to clamp, say, video levels coming from street or ceiling lights, where you don’t care about retaining texture detail about the light. But you would NOT use the Broadcast Safe effect to protect white levels on a close-up of a bride wearing a white wedding dress. The effect would mush all the lovely white texture of the white lace into an amorphous blob, resulting in life-long animosity from the bride.
There are several basic rules about levels that apply in both applications:
NOTE: Acceptable saturation levels vary by luma levels. Video supports the greatest amount of saturation at 50% gray. Saturation levels decrease the closer a pixel gets to luma levels of 100% or 0%. Pure white or pure black do not allow any saturation.
Generally, you apply the Broadcast Safe effect to a completed project after all color grading work is complete. This catches any excessive levels that may have slipped through the cracks. Here’s how.
ADOBE PREMIERE PRO CC

The Clamp Signal checkbox at the bottom of the Lumetri Scopes affects the scope display only and does not change the video levels in your clips.
The Video Limiter, which is what Adobe calls this effect, works best when it is applied to an Adjustment layer placed above all the clips in your project.
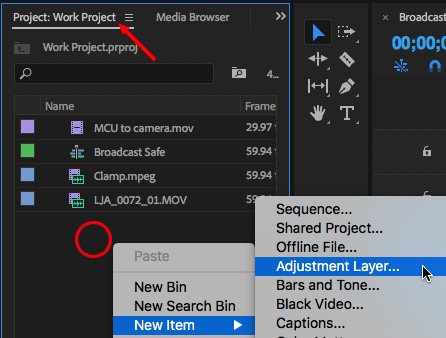
In the Project panel, right-click in the gray area and select New Item > Adjustment Layer.
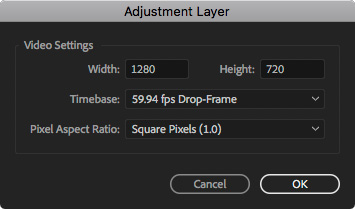
Accept the settings displayed in the Adjustment Layer panel, these will match your project settings.
Then, drag that Adjustment layer so it is above all the clips in your timeline.
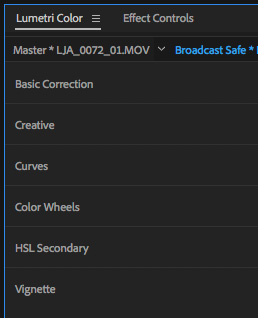
The Lumetri Color Panel does not have a Broadcast Safe filter built into it.
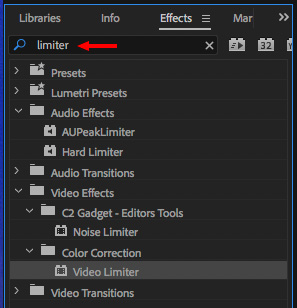
Instead, search for Limiter in the Effects panel. Then, drag the Video Limiter on top of the Adjustment Layer.
NOTE: Adding the Limiter to the Adjustment Layer means that it is processed after all color effects applied to the clips themselves.
(Click to see a larger image.)
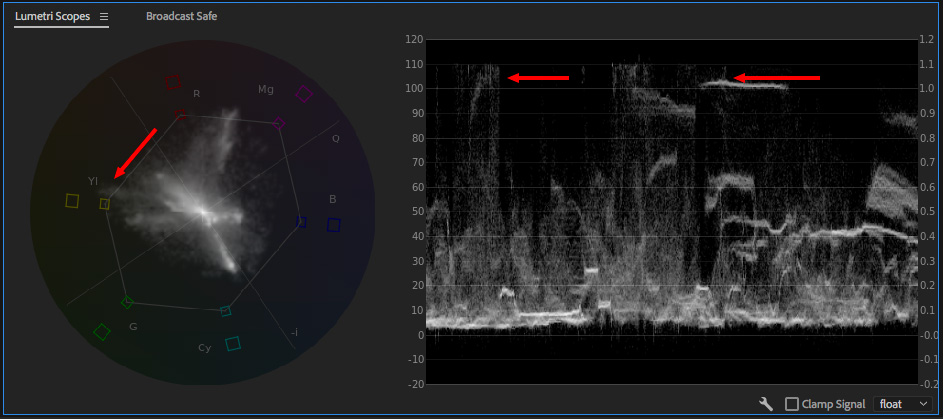
Here’s the “Before” image. Luma levels are pushing 110% and chroma saturation is exceeding the inner boundary.
NOTE: These chroma levels are not, in themselves, illegal. I am using the thin gray line as an easy way to illustrate the change the Video Limiter is about to make.
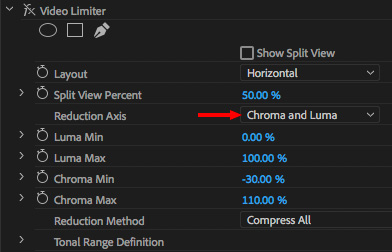
Change one setting in the Video Limiter:
(Click to see a larger image.)
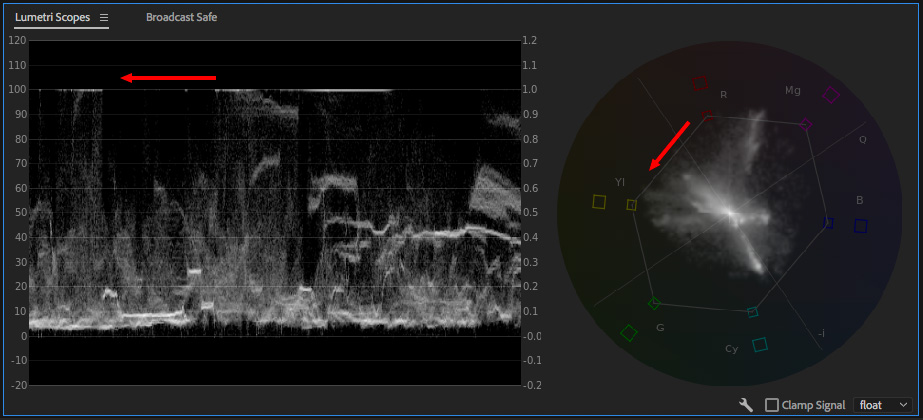
Here’s the “After.” Note that both chroma saturation and luma highlights are clamped within safe boundaries. (Again, safe levels of chroma saturation vary by luminance level.)
FINAL CUT PRO X
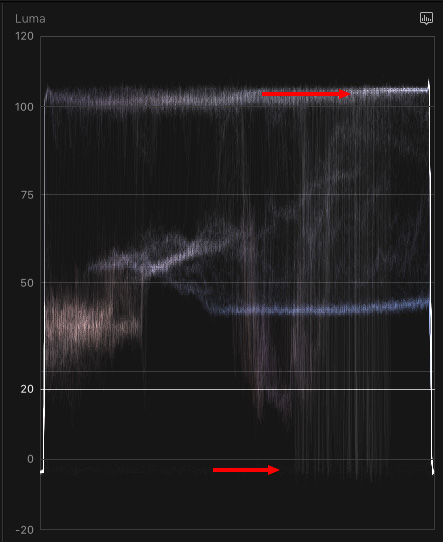
In this image, white levels are close to 110%, while black levels are in negative territory. Both levels are illegal.
NOTE: While FCP X does not have an adjustment layer, it is possible to create one in Motion. I strongly recommend you create or download one. It will simplify your life.
Here’s an article that explains how. This technique works with all versions of Motion 5.
If you have an adjustment layer, apply the Broadcast Safe effect to the adjustment layer. If not, you will need to apply it to all the clips in your Timeline.
Select all the clips in your Timeline.
Go to Effects Browser > Color > Broadcast Safe and double-click it to apply to all selected clips.
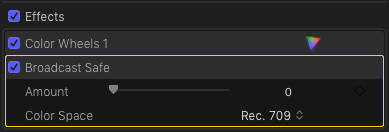
NOTE: BE SURE that you apply the Broadcast Safe filter AFTER all other effects are applied. It must be at the bottom of the Effects stack in the Video Browser; just before any Inspector effects.

Within the effect, you can select the color space of your Project, as the limits vary depending upon color space. As with the Video Limiter, the Broadcast Safe effect will clamp excessive chroma levels as well as luma.
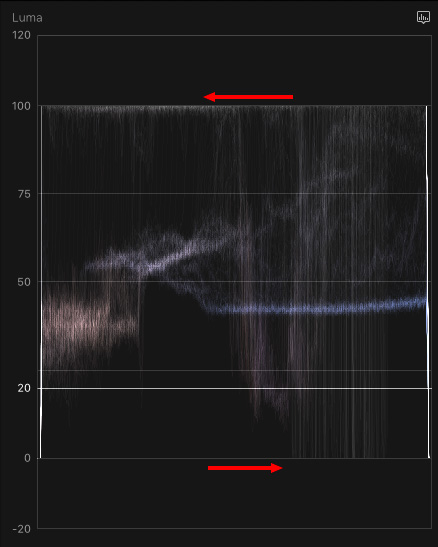
Here are the final results. Note that both white and black levels are successfully clamped.
SUMMARY
The Broadcast Safe effect is the last stage in prepping a program. It prevents shows being rejected for technical reasons. Remember, this effect is always applied last and, ideally, to an adjustment layer.
2,000 Video Training Titles
Edit smarter with Larry Jordan. Available in our store.
Access over 2,000 on-demand video editing courses. Become a member of our Video Training Library today!
Subscribe to Larry's FREE weekly newsletter and
save 10%
on your first purchase.
29 Responses to Broadcast Safe: Keep Video Levels Legal
← Older Comments-
 Nathan says:
February 4, 2020 at 12:05 pm
-
 Larry Jordan says:
February 4, 2020 at 3:10 pm
-
 Jack says:
January 8, 2021 at 9:58 pm
-
 Larry says:
January 9, 2021 at 10:47 am
-
 Danny says:
May 19, 2022 at 8:57 am
-
 Larry says:
May 19, 2022 at 9:24 am
-
Moon says:
December 25, 2022 at 2:53 am
← Older CommentsHi Larry,
A bit confused by the following:
– “ What the Video Limiter/Broadcast Safe effect does is clamp – or lock – luma and chroma levels so that they don’t exceed a specific level. (100% in the case of Luma levels.) This clamping means that any texture or detail associated with those levels will be lost.”
But surely in the case of Luma levels the detail is already lost if it goes above 100? Therefore clamping any Luma levels which are above 100 will just make them less white and of course legal.
Also this:
– “You would use the Broadcast Safe effect to clamp, say, video levels coming from street or ceiling lights, where you don’t care about retaining texture detail about the light. But you would NOT use the Broadcast Safe effect to protect white levels on a close-up of a bride wearing a white wedding dress. The effect would mush all the lovely white texture of the white lace into an amorphous blob, resulting in life-long animosity from the bride.”
Again, I don’t see how the video limiter would cause the white wedding dress to lose any detail… Surely the loss of detail can only be caused by manually increasing the white levels above 100 via the grade. If the white levels are not above 100 then a video limiter set to luma 100 max would not make any difference to it.
Thanks,
Nathan
Nathan:
Thanks for your questions. You would be correct, EXCEPT, digital cameras including smart phones, create images where the white levels are set at 120%. For the web, these levels are fine, for broadcast they are not.
This is why the Video Limiter/Broadcast Safe filters exist. We need to lower levels either to keep detail, such as the white wedding dress, or lose detail, such as the glow from a distant street light.
You are correct, though, that if all images had white levels set at 100%, there’s be no particular use for this filter.
Larry
Thanks for this information. I’m editing a short film, which is much larger than anything I’ve done before, and this is the first time I’ve done colour correction. I’m finding it difficult and tedious. This text and several of your clips have been a big help.
Jack:
Color correction is part art and part technology. Here are two webinars that can help you better understand what you are doing – one for Premiere and the other for Final Cut.
https://larryjordan.com/store/279-color-tools-effects-in-adobe-premiere-pro/
https://larryjordan.com/store/278-color-tools-in-apple-final-cut-pro-x/
Larry
Hey larry!
You’re a lifesaver over and over again for me, so thank you for all you do.
I’ve been doing the adjustment layer, and broadcast safety filter combination for a while now and I just had a QC report come back with low black levels and was curious what might be able to slip past the clamping of levels on the filter? only the broadcast safe filter is on the adjustment layer.
Also is there a way to make a broadcast safe chroma level filter? Something that won’t de-saturate until something is peaking close to broadcast limits? Or does this exist already and I just don’t know where to find it?
Thanks!
Danny:
Thanks for the kind words.
The broadcast safe filter should trap both illegal white and black levels. I just did a quick test and it traps both.
Be sure the filter is set to Rec. 709. Then, to be extra safe, set the Amount to 1.0.
As for excess chroma levels, I don’t know whether the filter traps that or not. If it doesn’t, I don’t know a way to trap them.
Larry
[…] https://larryjordan.com/articles/broadcast-safe-keep-video-levels-legal/ […]