FCP X: Preference Settings That Matter
 In my training videos, I talk a lot about preference settings in Final Cut Pro X, but I haven’t written a lot about them. So, in this article, I want to explain which preference settings I change and why I change them.
NOTE: If you need more information about what each preference option means, please refer to the Help files in Final Cut Pro X.
GENERAL TAB
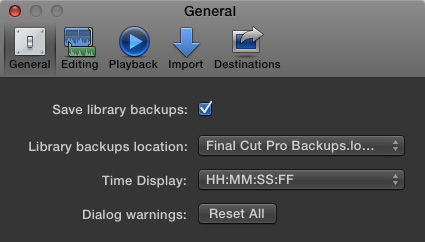
The General tab defaults are good as they are. I like that Final Cut automatically makes backups of the library database (but not the media contained in the library). I always leave this checked.
While we can store library backups anywhere, the files are small and I generally leave them in their default location in the Home directory.
And the default setting for timecode – Hours:Minutes:Seconds:Frames – works just fine for me.
EDITING TAB
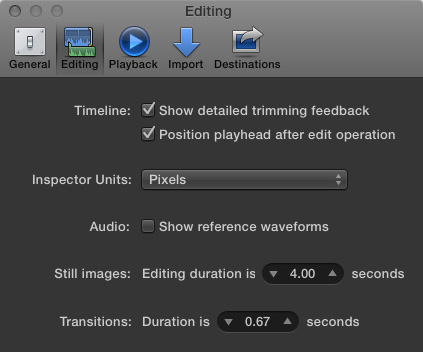
Here are the settings I use for the Editing tab.
- Show detailed trimming feedback. This displays two monitor windows when you ripple or roll trim a clip. This allows you to easily compare the end of the first shot with the start of the second shot.
- Position playhead after edit operation. This jumps the playhead to the end of a clip whenever you add or remove a clip. Personally, I don’t care one way or the other, so I leave this on.
- Inspector units. After many years of working with bitmap images, my brain thinks in pixels. However, if you are more comfortable dealing in percentages so you don’t have to remember the screen dimensions of every different video format, feel free to change this.
- Show reference waveforms. This displays faint audio waveforms that are sized as if your audio levels were set to 100%. This makes it easier to see peaks and valleys for audio that was recorded very quietly. While I don’t use this very often, it can help less experienced editors find edit points in the audio.
- Still images. This sets the default duration – the distance between the In and the Out – for imported still images. This can easily be overridden when you review a clip in the Browser. Since all my stills have different lengths, I generally leave this alone.
- Transitions. This setting I ALWAYS change. For me, a one-second duration on a cross-dissolve is too long. It lingers objectionably. I much prefer a 20-frame transition when shooting at 30 fps. Since not all video is shot at this frame rate, Apple now displays transitions not by frames but by time. 0.67 is the time that is the equivalent to a 20 frame dissolve in 30 fps video. And, for those transitions that need to be different, I alter the transition manually.
PLAYBACK TAB
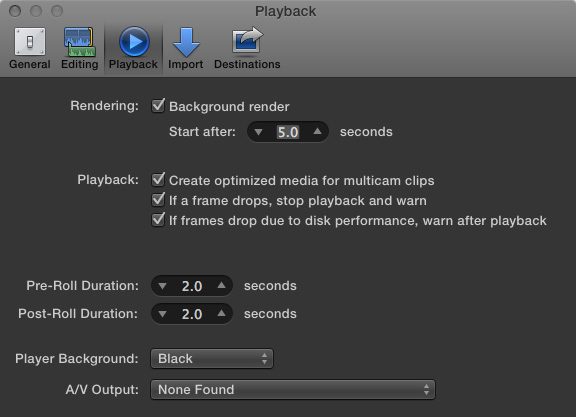
- Rendering. When I am webcasting a live webinar, or if I am editing camera native media on a slower computer, I always turn background rendering off because it is too taxing on the computer. The rest of the time, I leave background rendering on. The default setting of 5 seconds is fine. Turning rendering off can improve performance if you have a slower, or older, computer. If you forget to render a portion of a project, Final Cut will render it before final export.
- Optimized media. I strongly recommend creating either optimized media or proxy media when editing multicam clips. The performance improvement is startling. Optimized media is fine for 2-5 cameras. More than six cameras, though, and I recommend editing using proxy files. Proxy files provide much better performance with less need for storage space. Then, switch to original/native/optimized files just before final export.
- Frame drops. I strongly recommend turning both of these check boxes on. Dropping frames is most often caused by a hard disk that is too slow, or a camera format that is too complex, for your computer to play media successfully. Either way, you have a problem. It is better to discover this problem early in the editing process, rather than scrambling to resolve it under deadline at the end.
The rest of the settings on this screen are fine and I leave them alone.
IMPORT TAB
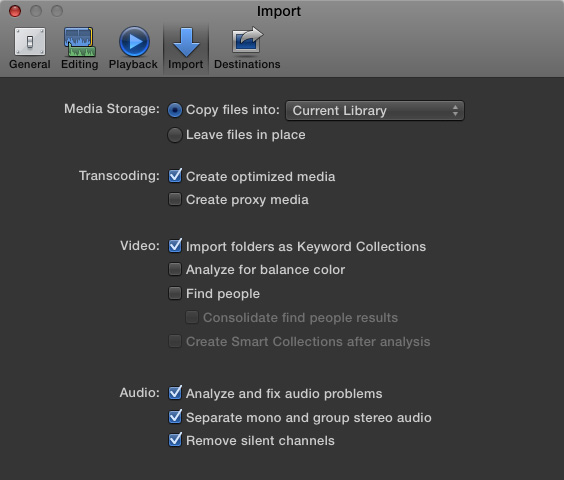
This is the most important, and complex, preference screen. Everyone’s situation is a bit different, so your needs may be different from mine. But, here are the settings I use:
- Media Storage. Copy files into the library makes media management easy. It’s all stored in the library; just backup the library to backup your media. However, sharing that media between projects is harder when media is stored in the library. And relinking media stored in a library is very difficult. For media that I share between different editors or libraries, I always leave the media in place. (When I’m doing a demo and creating libraries or projects that I don’t intend to keep, I always use “Leave files in place.”)
- Transcoding. I always optimize media; which means FCP will transcode it into ProRes 422. And, if I am editing multicam clips, I will always create proxy files. Yes, file storage is bigger, but performance and color grading are better as well.
- Video. I generally organize my media before importing; at least, when I can. Importing the folder names is a very fast way to create keywords that keep my media organized in Final Cut after importing. The other video options take FOREVER and can be performed after importing. I always leave all other video options off.
- Audio. I check all three of these. Audio analysis is fast and can always be turned off later. (Though, to be honest, I’ve never figured out what “Remove silent channels” does, because I’ve never seen it work.)
DESTINATIONS TAB
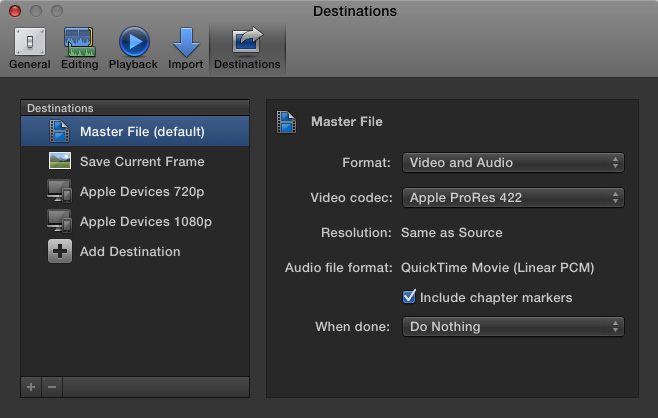
Here, again, everyone is different; which is why I’m glad Apple gave us so many choices.
I output virtually everything I create as a master file, review that export, then, after I know that everything exported OK, I’ll move it to Compressor – or Adobe Media Encoder if I’m creating MP4 files – for final compression. I would rather spend a bit of extra time making sure the export is OK before compressing it. Others may be on tighter deadlines and want to do everything at once.
I’ve discovered it is less painful to catch and fix mistakes when you are the only person who knows they are there.
A NOTE ON OUTPUT FORMATS
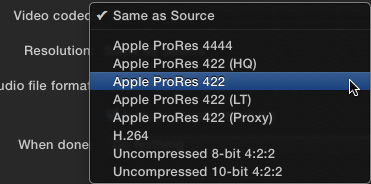
I always output my projects to match my project render settings which, by default, are ProRes 422.
NOTE: If you did not optimize your media, then choose “Same as Source,” to output your camera native files.
Almost all video formats use a form of color compression called “Chroma-subsampling.” This is the term that describes 4:2:2, or 4:2:0 color. For this reason, there’s not a lot of reason to output a higher color format than your render files.
For most video, you won’t be able to tell the difference between ProRes 422 and ProRes 422 HQ; except that ProRes 422 HQ files are about 20% bigger.
The only exception to this is when I am editing files that were created on the computer, for example, screen captures when I am demonstrating software. Here, I’ve discovered that changing rendering settings to ProRes 4444 and outputting ProRes 4444 files makes a big different in image quality.
So, all my camera video is output at ProRes 422, while all my screen capture videos are output at ProRes 4444.
SUMMARY
Most of the preference settings in Final Cut Pro X are fine. And, if you haven’t spent time optimizing yours, don’t worry. The default settings will keep you mostly out of trouble. But, if you want to tune the performance of your system, now you know the settings that I use.
Bookmark the
permalink.
2,000 Video Training Titles
- Apple Final Cut Pro
- Adobe Premiere Pro
- DaVinci Resolve
Edit smarter with Larry Jordan. Available in our store.
Access over 2,000 on-demand video editing courses. Become a member of our Video Training Library today!
JOIN NOW
Subscribe to Larry's FREE weekly newsletter and
save 10%
on your first purchase.



16 Responses to FCP X: Preference Settings That Matter
← Older Comments-
 noel says:
April 25, 2017 at 8:42 am
-
 Larry says:
April 25, 2017 at 5:20 pm
-
 Micheal Martinez says:
March 22, 2020 at 7:40 am
-
 Larry Jordan says:
March 22, 2020 at 7:52 am
-
 VIKAS says:
September 14, 2022 at 9:14 am
-
 Larry says:
September 14, 2022 at 9:19 am
← Older CommentsHello Larry!
I have always enjoyed reading you and listening to you.
Why would you send to compressor or encoder after your final export. Isn’t it enough to have and deliver the file right out of fcpx/
Thanks and cheers
Noel:
Well, that depends. You need one format for broadcast, another for cable, another for YouTube, another for streaming, another for your website, another for Vimeo… you get the idea.
There’s no single format that works perfectly everywhere – you are always creating derivatives.
Larry
Good Post. I am always confused about the proxies, optimized…I normally just want to use settings that speed up the editing process and not get slowed down by rendering. I have the all background functions shut off until the end of my project. Plus I want to keep my hd space at optimal. I would say about 95% of my cients these days do everything on the internet so I just export H.264 all the time. It creates a smaller video size and looks good full screen or not. My clients, normally video neophytes, don’t care. Like all your stuff.
Micheal:
Thanks for your comment. My only thought is that background rendering won’t slow you down.
Apple has designed it so that when you move the mouse, or play a project, rendering stops. While you are thinking, rendering starts.
The benefit to you is that when background rendering is turned on, your editing won’t slow down, but your exports will speed up.
Larry
I have always enjoyed reading you and listening to you.
Why would you send to compressor or encoder after your final export. Isn’t it enough to have and deliver the file right out of fcpx/
Thanks and cheers
Vikas:
This is a good question. The answer is that, in most cases, you need different versions of the same file:
* High-quality for archiving
* Compressed for social media
* Different aspect ratio for Instagram
* High-quality for broadcast…
The list is endless. If all you need is a single version, Compressor is not necessary. But, even for my webinar, I need to create four different versions for all the different distribution outlets I use.
larry