
 [ Updated Sept. 6, 2019, with steps covering the Recovery disk.
Updated Dec. 13, 2020 to emphasize recovery mode.]
When trouble-shooting problems with your editing system, there are several steps you should do before contacting Apple tech support. I suggest doing them in this order, and testing your application after each step to see if it is working properly.
NOTE: I’ve written extensively about trouble-shooting; for detailed trouble-shooting suggestions, read this article.
0. RESTART YOUR MAC
Before you do anything major, quit all your apps and restart your Mac. Sometimes, the simple process of restarting removes whatever gremlins were running around inside your system.
1. RESET APPLICATION PREFERENCES
This resets application preferences to their factory-default settings. I only recommend doing this for editing applications. I don’t have enough experience with all other apps to recommend this as a general procedure.
RESET ADOBE APPLICATIONS
To trash preference files for any Adobe application, quit the app, then relaunch it from the Dock while pressing both Shift and Option keys until the application finishes booting.
This resets all preferences to their default settings and erases the list of recently accessed files.
NOTE: This does NOT affect any of your data, media, or sequences. This simply resets the program to its original, default settings.
RESET FINAL CUT PRO
Resetting Final Cut Pro is a bit trickier, depending upon the version you are running.
Final Cut Pro X. Click here and refer to the section on Trashing Preferences.
Final Cut Pro 7 and earlier. Click here and refer to the section on Trashing Preferences.
NOTE: This does NOT affect any of your data, media, or sequences. This simply resets the program to its original, default settings.
Restart the application and see if your problems have gone away. If so, great. If not, go to the next step.
2. RUN DISK UTILITY
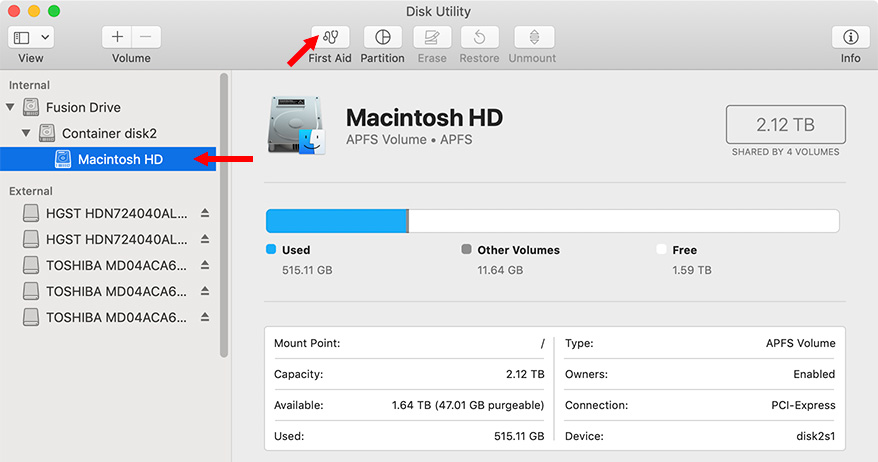
(Click to see a larger image.)
From the Utilities folder, start Disk Utility.
Select Macintosh HD from the left sidebar, then click First Aid.
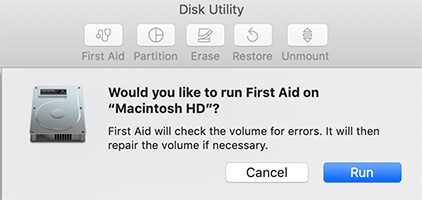
This examines your boot disk and fixes a number of problems that occur from time to time. This is both fast and easy to do, I recommend running it once every couple of weeks.
However, it doesn’t fix everything. If you are still having problems, go to the next section.
3. BOOT INTO RECOVERY MODE
The good news about Disk Utility is that it fixes a lot of problems. The bad news is that it has a hard time fixing the boot disk because we need the boot disk to, um, run our computer, which means we can’t fix those applications that are running.
To get around this conundrum, Apple has hidden a trouble-shooting utility which we can only access when we start our computer.
Here’s how: Press and hold Cmd + R while either starting or restarting your computer. After a longer boot time than normal, a screen will appear asking whether you want to:
We want to run Disk Utility. This is exactly the same as running Disk Utility in Step 3, except, this time, we are running off a special version of the macOS that bypasses the version installed on the main boot disk. Fix both Macintosh HD and Macintosh HD – Data.
This allows the utility to look for and repair problems that can’t be fixed when you are running on the system you are trying to repair.
I try to run this every month or two, to keep my system running smoothly. It takes longer than running it from the boot disk, but does a much better job.
NOTE: Here’s an article with more detail.
4. DO A SAFE BOOT
UPDATE: In the past, I recommended we do Safe Boot first. Now, with our ability to access Recovery Mode, I don’t use Safe Boot much at all. Still, I list it here so you can use it on older systems.
I recommend this technique for older systems because it tends to fix problems with the Spinning Beach-ball of Death.
What Safe Boot does is turn off many of the extensions and background processes that run automatically on your system, along with performing some basic repairs on your boot disk. This allows you to disable an errant program that is misbehaving. Many times, this will be all you need to get back to work.
Because these background processes were turned off by Safe Boot, we need to restart our computer to turn them back on. Otherwise, things will appear VERY flakey.
Restart the application and see if your problems have gone away. If so, great. If not, go to the next step.
NOTE: It is a good practice to do this Safe Boot procedure once a week.
5. CREATE A NEW USER ACCOUNT
Just as preference files configure your editing application, they also affect the operating system. Sometimes, trashing preferences for an application isn’t enough, you may need to reset the entire OS.
The easiest way to test whether this is necessary or not is to create a new user account. Since preference files are stored in the Home directory of each user, creating a new user account creates all new preference files for every application. This is essentially the same as resetting all your programs, without a lot of work.
Here’s how.
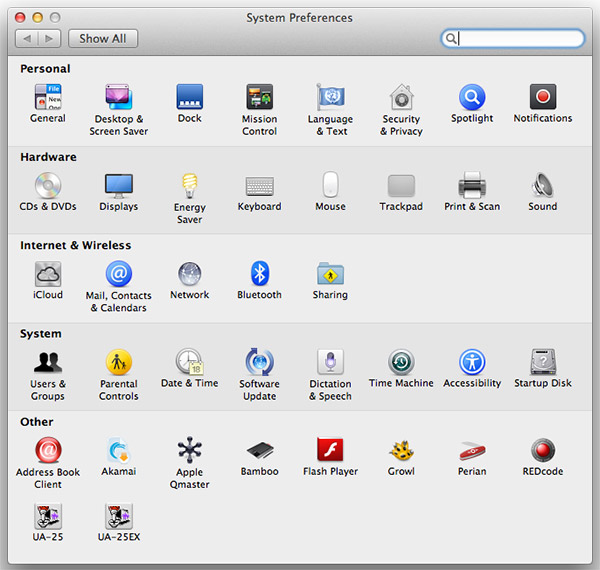
Open System Preferences from the Apple menu. (Your screen may look different from mine, that’s OK.)

In the System section, open the Users & Groups icon to open that window.
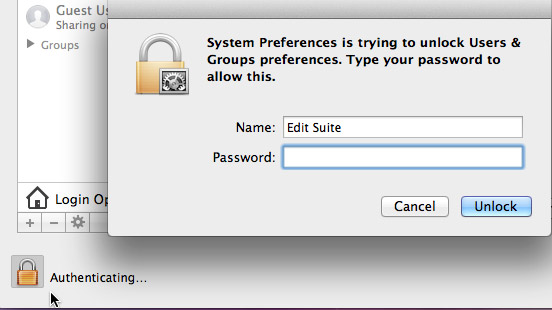
Click the lock in the lower left corner and enter a administrator’s user name and password. This allows you to modify the settings in this window.
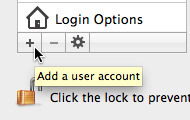
Click the Plus button to create a new user.
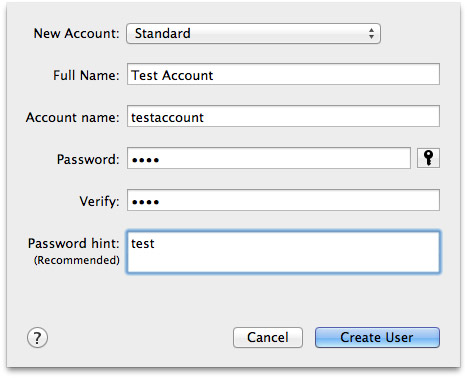
Create a test account with a user name and password. (Feel free to use the settings you see here, you can use any User name you like.) Then click Create User.
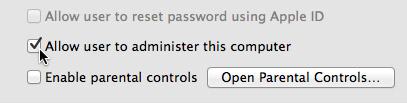
Back in the Users & Groups window, be SURE to check: “Allow user to administer this computer“.
Close System Preferences to save your changes.
Restart your computer and log into the new user account you just created.
IMPORTANT NOTE: Any files stored in your old Home directory are NOT available to you when you log in as this new user. This is one of the key reasons I strongly recommend never storing projects or media in the Home directory.
Open your application and project and see if things are working better. If so, great. If not, go to the next section.
6. REINSTALL THE APPLICATION
If all these procedures don’t fix the problem, then its time to reinstall the application. How that is done varies by software and version. However, reinstalling the application does not reset preference files, which is why we did that first in an earlier step.
Open your application and project and see if things are working better. If so, great. If not, go to the next section.
7. CONTACT APPLE
After you’ve done these basic steps, if you are still having problems, it is time to contact Apple Support for more sophisticated help. To save you time at the start of your support call, be sure to tell them what you’ve done.
Having system problems is a HUGE frustration. I hope these steps will get you up and running in no time.

2,000 Video Training Titles
Edit smarter with Larry Jordan. Available in our store.
Access over 2,000 on-demand video editing courses. Become a member of our Video Training Library today!
Subscribe to Larry's FREE weekly newsletter and
save 10%
on your first purchase.

14 Responses to Troubleshoot Your Mac System in Seven Steps
← Older Comments-
 Rodney Rastall says:
November 16, 2018 at 10:27 am
-
 Larry says:
November 16, 2018 at 10:49 am
-
 Bruce Macbryde says:
September 9, 2019 at 1:43 pm
-
 Larry says:
September 9, 2019 at 2:09 pm
← Older CommentsLarry,
Your articles and videos have saved me so much time and frustration. This article among them. I was wondering whether my faithful Mac Pro of 8 years was on its last legs, but with your advice, reborn! Well written, and produced advice. Thank you for sharing the trove of knowledge you have.
Rodney:
Thanks for writing! I’m happy to help.
Larry
Thanks again Larry for reminding me of these procedures.
Just a question about FCP preferences deletion. Is there any way of recording the preference settings so that I can store them to reset when I start again. I always forget what I have changed from the defaults and have to test my memory on restart. Particularly all the settings in Saved workspaces.
I have found that the customized keyboard commands are retained, and can be re-established under the Commands submenu under the Final Cut Pro menu.
Bruce:
No. The best option is to take screen shots.
Larry.