[Updated 1/21/20 with additional comments from Adobe.]
BIG NOTE: Last week, I wrote about problems editing multicam clips in Premiere. What I learned from Adobe after the article was published is that the problems were caused by an incorrectly set preference. I’ve pulled the earlier article and have updated the process here.
Norlaine brought this to my attention.
She is editing a three-camera multicam sequence where two cameras are 1920 x 1080 and the third is 3840 x 2160. All are shooting 29.97 fps. How can she create a multicam clip with video of different frame sizes, yet edit them into a 1080 timeline?
I did a video that showed how to work with different frame sizes in a multicam clip here.
When I recorded the video, everything worked great. However last week, when I went back to test this, it didn’t. What went wrong? The answer is a preference setting. Let me explain.
A multicam edit is where you are playing and editing multiple clips at the same time. (Think of switching a live show.) If all your clips have the same frame size, frame rate and codec, multicam editing works great. I’ve used it a lot and enjoy the process.
The challenge is when you are building and editing multicam clips with different frame sizes. (I should stress, though, that it is really helpful to have all clips use the same codec and frame rate. It often makes sense to transcode them into the same codec and frame rate – though not necessarily the same frame size – if your editing gets too sluggish.)
CHANGE YOUR PREFERENCES
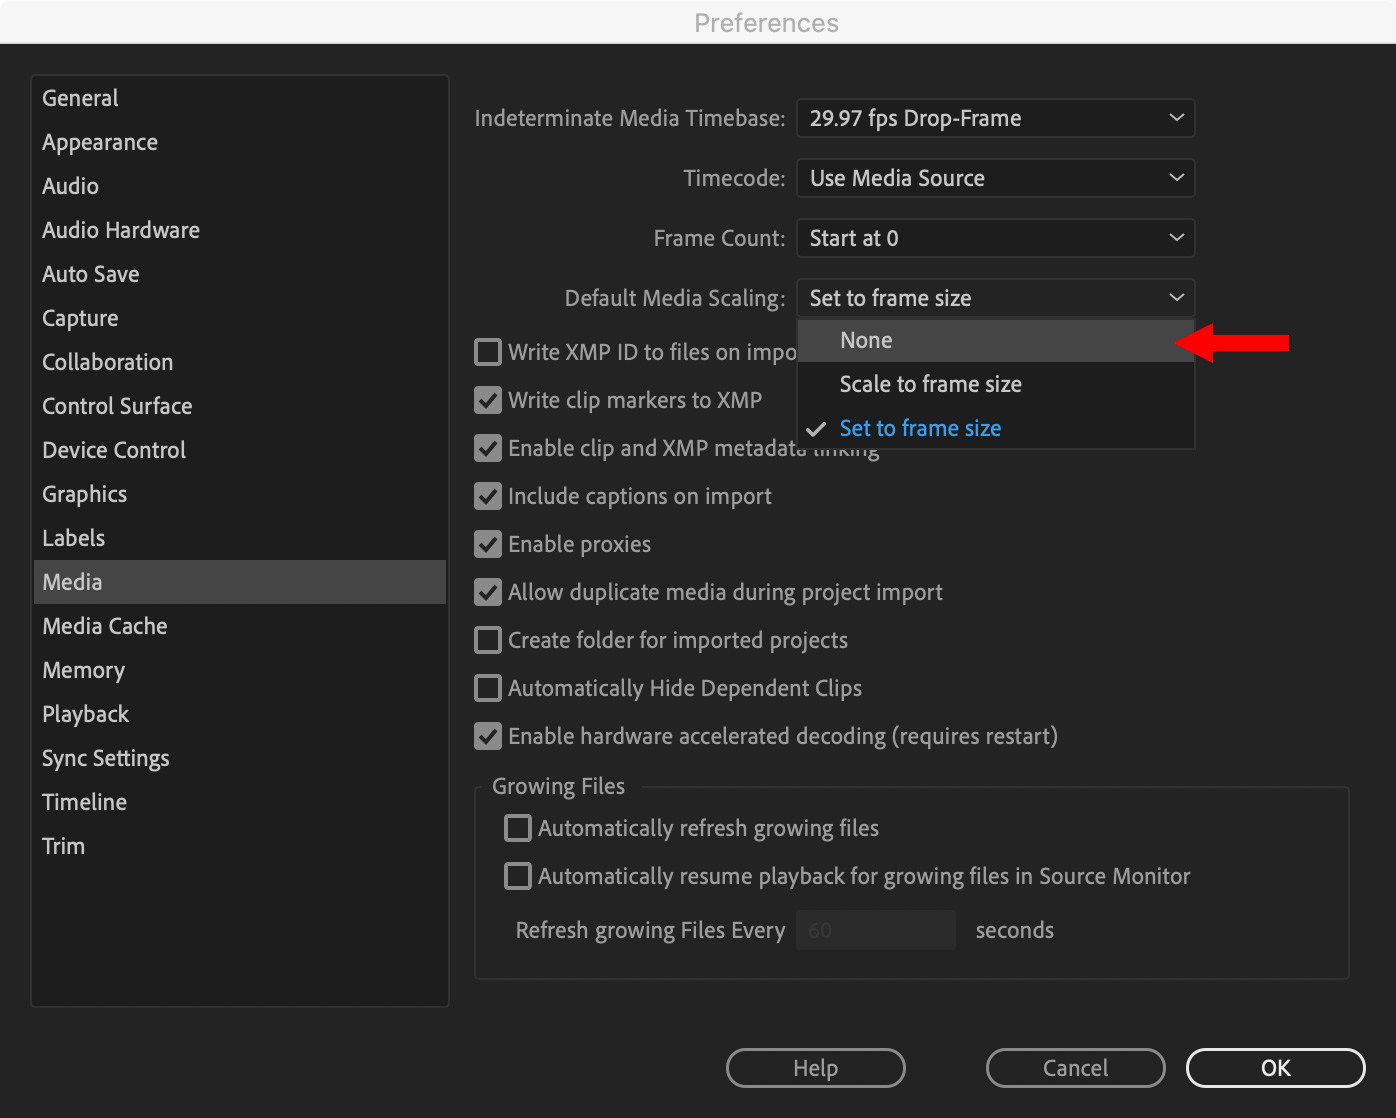
Here’s the first key step. Go to Preferences > Media and change Default Media Scaling to None.
For normal editing, I recommend setting this to Set to Frame Size. However, this totally screws up a multicam edit. So, for multicam editing, set this to None. (Preferences can be changed at any time, and are retained between projects.)
BUILD THE MULTICAM CLIP
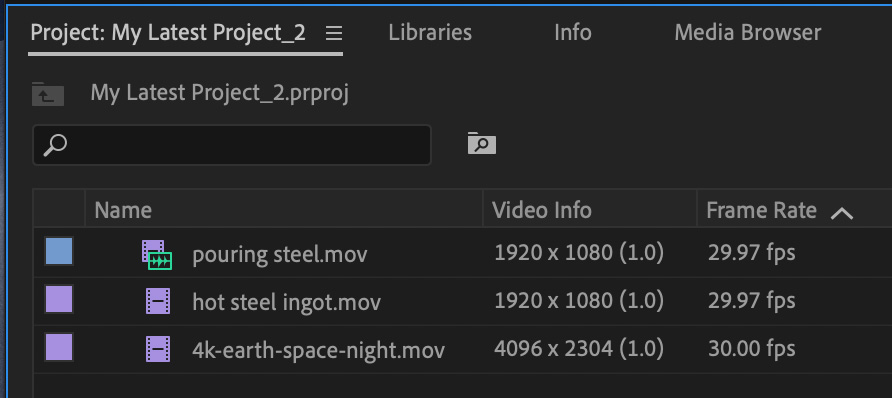
Here are my three clips: two are 1080 and one is 4096 x 2304. (The differences in frame rate won’t matter for this example, because I’m not actually editing for this tutorial.)
Here’s the second KEY TIP: Go to the Project panel and select the clip with the largest frame size FIRST! Then select the rest of your clips. Next, choose Clip > Create Multicam Source Sequence.
What this does is create a multicam sequence that exactly matches the settings of first clip, then places all the other clips, centered in the frame, at their native frame size. This is exactly what you want to happen.
NOTE: You can also put all your multicam clips in a folder, select the folder, then choose Clip > Create Multicam Source Sequence. Premiere selects clips in alpha-numeric order to build in the list and all is good. (Remember, you can rename clips in Premiere.)
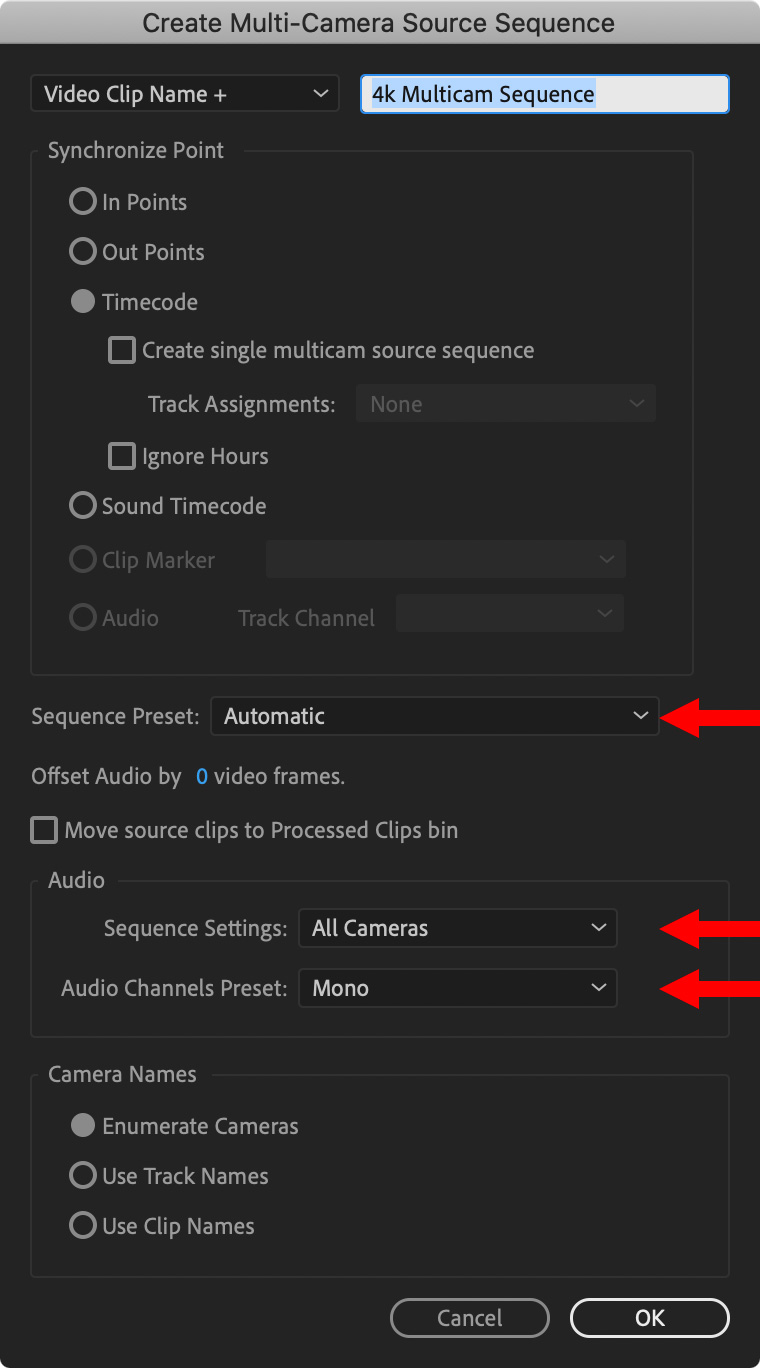
This dialog allows you to specify the parameters of the multicam clip. Always build the multicam clip to match the frame size of the largest clip inside it. This prevents any image cropping.
IMPORTANT NOTE: When working with clips of different frame sizes, set Sequence Preset to Automatic. This matches the multicam settings to the first selected clip.
Sequence settings:
If you are working with multichannel audio recorded to each camera, most of the time, change the Audio Channels Preset to Mono. By changing this setting, you can see and hear all audio tracks in each clip. Up to 32 audio channels can be stored in each audio track.
Leaving the setting to Auto will set the mapping to mono if the first clip is multi-mono. If the first clip is stereo, then you will get stereo mapping (which is sub-optimal for multi-mono sources) but you will still see and hear all source audio tracks (just not mapped the way you would want).
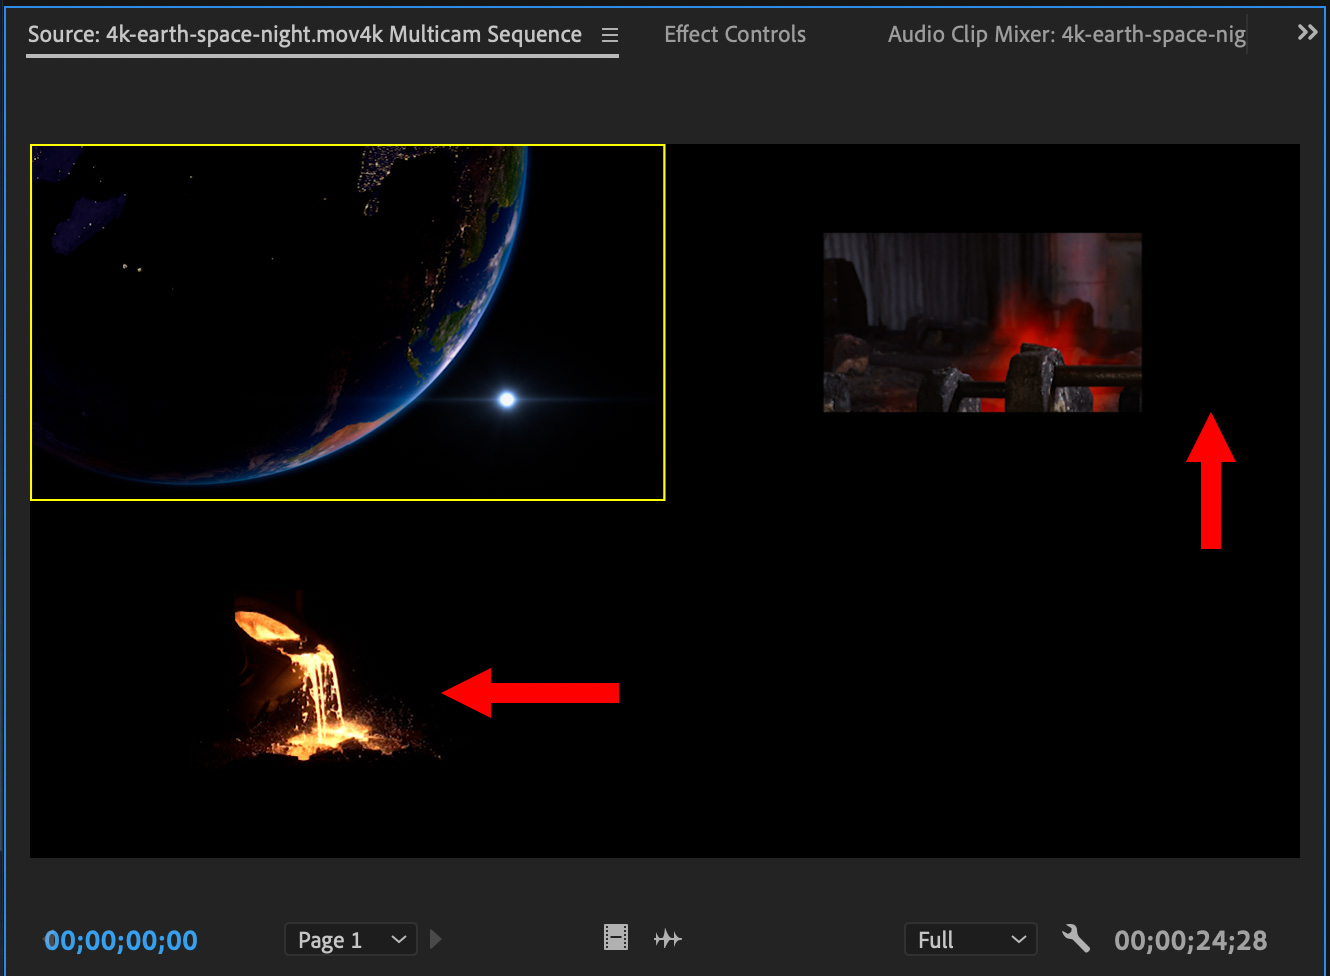
Once the clip is built, here’s what the clips look like in the Source monitor. (Double-click the multicam clip in the Project panel or timeline to display it in the Source monitor.) As expected, the 4K clip fills the frame, while the two 1080 clips do not. (As a note, I’m using screen shots from two different multicam clips. Sorry for the confusion.)
EDIT THE CLIP
Create a new sequence at the size you need; don’t create it by selecting New Sequence from Clip, that simply matches the size of the multicam clip. In this example, I’m creating a 1920 x 1080 ProRes 422 clip. The choice of codec and frame size is up to you. The important point is that the sequence need not be the same size as the multicam clip.
NOTE: Remember that scaling clips larger than 100% will make them soft and blurry.

When you edit the multicam clip into the timeline, you’ll see this warning. Click Keep Sequence Settings, otherwise the sequence will scale to match the size of the multicam clip.
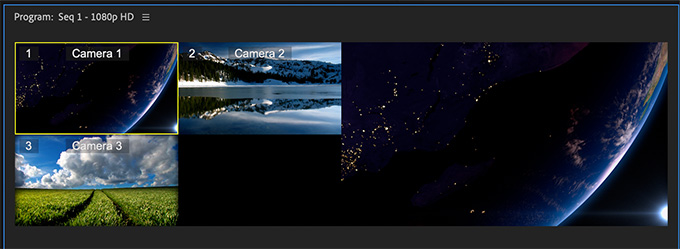
Put the playhead in the multicam clip in the timeline. Click the Wrench icon in the lower right corner of the Program monitor and choose Multi-Camera. Notice, now, that the 1080 clips fill the frame, while the 4K clip is zoomed in. Don’t worry about this, yet.
Edit the multicam clip as usual.
NOTE: Here’s an article that describes multicam editing in more detail.
After editing is complete, look at each edit.
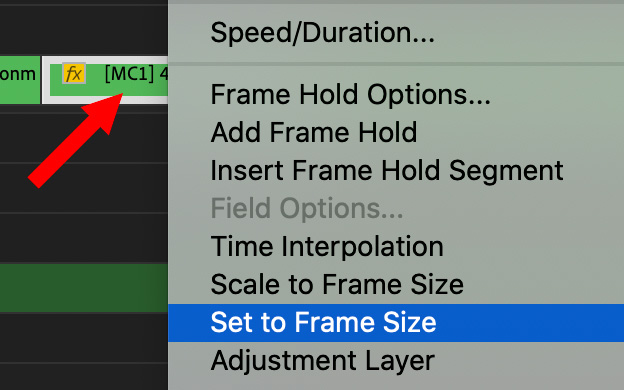
While the 1080 clips fill the frame, the 4K clip is zoomed in. To fix this, right-click the 4K clip in the timeline that you want to scale in and choose Set to Frame Size. (“Set,” not “Scale.”)
NOTE: This scales the multicam clip container, not the clips inside. This means that you need to perform this adjustment for each edit, not the master clips inside the multicam clip.
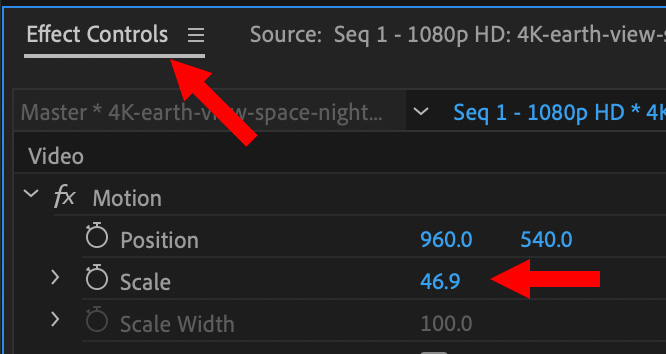
This scales the clip to perfectly fit your sequence, and shows the amount of scaling in the Effect Controls panel, allowing you to adjust the scaling as necessary.
SUMMARY
The key is to change the scaling preference setting before you create the multicam clip, then create a sequence that matches the format you need to deliver.
At which point, multicam editing works perfectly.
2,000 Video Training Titles
Edit smarter with Larry Jordan. Available in our store.
Access over 2,000 on-demand video editing courses. Become a member of our Video Training Library today!
Subscribe to Larry's FREE weekly newsletter and
save 10%
on your first purchase.
13 Responses to Premiere Pro CC: Edit Multicam Clips with Different Frame Sizes [u]
Hi Larry. Great article! We do a lot of Multicam work in Premiere. Two small tips that can also help.
1. We map “Set to Frame Size” to a keyboard shortcut to speed up that process.
2. Proxy workflows are a life saver with multicam, especially when you start dealing with cameras shooting 4K or UHD. We shoot a mixture of 4K and 2K across 3 cameras and generate proxies using the ProRes Proxy preset. It makes for smooth multicam editing even on our laptop systems. Larry has several great options on proxy editing workflows on this website if anyone isn’t familiar with the process.
Thanks again.
Hey Larry,
This has been extremely helpful. There is one part that I cannot get to work to save my life though! For reference, I have 3 clips + external audio file from Lav mics. 2 clips are 1920×1080 and 1 is 3840×2160
Once the multi-cam clip is built w/ UHD file selected first and I’ve created a new sequence to match the 1920×1080 clips I have, I cannot get the multi-cam clip into the timeline while maintaining the multi-cam setup, instead it inserts 3 video files on 3 video tracks, meaning I cannot edit as a multi-cam. Nor does it ask me if I want to “keep existing settings.”
The only work around I’ve found is to select the multi-cam clip in the Project Folder, right-click, select “New Sequence from Clip” (which has the UHD dimensions) and then go to “Sequence Settings” and manually change the dimensions from 3840×2160 to 1920×1080. It seems to work, the HD clips fill the frame and the UHD is zoomed in and will set to frame size after an edit is made.
But I’m so confused on why I can’t it to work the way you described and worried that maybe I’m losing quality doing it the way I did.
Any help would be GREATLY appreciated. Thank you!!
Tommy:
Hmm… this works for me, I just did a quick test.
After you create the multicam clip, double-click it to load into the Source Monitor. While you are there, verify that the multicam sequence has the frame size you need by checking Sequence > Settings.
Then, to edit it into the timeline as a multicam clip, set any necessary In or Out, put the playhead where you want it to go in the timeline, then type a period [.] .
It will edit as a multicam clip, ready for further editing.
Larry
I think this may be an issue with a switch on the timeline. The switch all the way to the left, next to the magnet-shaped snap switch, decided whether to bring nested sequences (like multicam clips) into your timeline as nests, or as the individual clips from inside the nest. Try switching it to the other way, and see what happens. Good luck.
Matt:
Good catch. Thanks for suggesting this.
Larry
Larry & Matt,
This is LONG overdue but… Your responses to my comment have saved me so much time and frustration, thank you VERY much!!
All the best,
Tommy
Tommy:
Aw, gosh. It wasn’t THAT long ago. Only, um, 16 months…
Smile. You are most welcome. Thanks for your kind words!
Larry
I’m with this guy above Larry. What you’re saying actually doesn’t make sense. To edit a multicam clip you HAVE to create a new sequence from that multi-cam clip in some way to get it in there in the “single clip” looking multi-cam way that is the point of this feature. All you say in the article about it is NOT to do that but instead to “when you edit the multicam clip into the timeline”. You can’t edit a multicam clip into a timeline, you must create a timeline from a multicam clip. It really doesn’t make sense. When you do it this way it does what Tommy says above and just brings it all in as multiple clips or the ‘raw’ form of the multicam clip. Anyway I get what you’re trying to say to do but you don’t explain at all HOW one would work around that you MUST create your multicam sequence from that multicam clip in order to do normal multicam editing.
Ren:
Ah.. You are confused about terms.
When you create a multi-camera sequence, which is what Premiere calls a multicam clip, you are creating a separate, stand-alone sequence which can contain one or more clips.
Just as you can edit clips into the Premiere timeline, you can also edit sequences. This is essential for multicam editing, but useful for a wide variety of other repeating elements. Premiere supports an unlimited number of sequences edited into other sequences – a process called “nesting.”
So, what this article discusses, is how to create a multicam sequence that is sized for the largest clip – say, 4K – while still allowing smaller frame sizes. Since multicam sequences take their format from the first clip you select as you group clips for the sequence, simply select your largest clip first.
I have a webinar on multicam editing in Premiere this Wednesday, where I’ll cover this in more detail.
Larry
Hi, great article! Helped me a lot! I have one question. When I “Set to Frame Size” a zoomed-in-4K-clip it’s still zoomed-in in a multicam preview (with the thumbnails of Camera 1, Camera 2, Camera 3). How to fix it? Thank you.
Kinga:
You don’t zoom the multicam clip – you zoom the clips INSIDE it.
To do this, create the multicam clip with all source clips at their normal size. Then, right-mouse-click the multicam clip in the Project panel and choose Open in Timeline – it’s near the bottom.
This opens all the elements of the multicam clip into the timeline, where you can adjust size, timing, apply effects or color grade before you start editing the multicam clip itself.
Larry
Thank you for the article LArry. Very helpful indeed. BUT :)…this still didn’t solve my problem.
As Kinga said above, the multicam preview shows a zoomed in clip if said clip is UHD and I am editing in a 1080p sequence.
I have about 90 multicam clips, going into each of them and manually scaling them to 50 isn’t a solution for me.
I could be working in an 2160p sequence and that would be great but I want to be able to zoom into the UHD clip when needed and doing this in a UHD sequence will make me zoom above 100 which defeats the purpose.
So, I don’t think there is a quick solution right now, which is too bad. There should be a setting to be able to modify how the Multicam Preview shows the clips when the sequences don’t match in terms of resolution.
Mihai:
Thanks for your comment. Be sure to pass it into adobe support so they can get it to the programmers to fix.
Larry