
![]()
![]()
[If learning the basics of video compression is of interest to you, check out this FREE short video tutorial from my recent webinar on video compression, which explains the basics in more detail.]
We compress video for the web because the bandwidth (the speed of the Internet) is too slow to reliably play uncompressed video. If the Internet had unlimited speed, we would never compress anything.
But it doesn’t, and we do.
There are two key rules you need to know about video compression:
Rule #1: File size is totally dependent upon bit rate. The smaller the bit rate, the smaller the file.
Bit rate is measured in bits per second (bps). To keep the numbers from getting ridiculously big, we often substitute kbps (thousands of bits per second) or mbps (millions of bits per second).
NOTE: When communication speeds are measured in bits, we use a lower-case “b,” as in Mbps (millions of bits per second). When speeds are measured in Bytes, we use an upper-case “B,” as in MBps. (It’s the capital “B” that indicates “bytes.”) For those who want to do the math, there are 8 bits in a Byte. (Internet speeds are measured in bits, hard disk speeds are measured in bytes. I’m convinced the person who dreamed up this weird system of capitalization hated people.)
Rule #2: Image quality is dependent upon the interaction of four factors:
ARTIFACTING
When the compression bit rate is too low for the frame size, frame rate and/or motion in the video, you get artifacting.

Here’s a detail from a clip about a Chinese Dragon dance. This is taken directly from the video itself, fully uncompressed.

Here’s the same detail after compressing with a bit rate that was too low to support the frame size, frame rate, and, most importantly, the amount of movement between frames.
See all the weird rectangles, ragged edges, and blurry detail? Those are artifacts. The reason these exist is that, as a fall-back, codecs compress pixels in blocks when the bandwidth is too low to support compressing individual pixels. These “superblocks,” as they are called, can be compressed to fit very small bit rates, but with a significant loss of detail.

Here’s the same image, but compressed with a higher bit rate. Now, all the artifacting has disappeared because the bit rate is high enough to support individual pixel detail.
SO WHY DO WE CARE?
We care because every movie is different. There is no single bit rate that consistently yields the smallest file size with the highest possible quality. Compression settings always need tweaking. For instance, I’m able to compress my online webinars to about 400 kbps. But, my video podcast “2 Reel Guys,” which has the same frame size and frame rate, but MUCH more movement, can’t be compressed much lower than about 2,000 kbps.
If video compression was instantaneous – like saving a PDF of a word processing document – when we saw artifacts, we’d just tweak the bit rate and save it again. But video compression can take hours; only to discover that everything we compressed is wrong.
Sigh…
CREATE A TEST MOVIE
To save time, before compressing an entire movie, select a short – 5 to 10 second – section of your movie that has the most movement for which you want to retain detail. That last phrase is important. You may have a swish-pan for which detail is not important. Don’t use that for your test. Use the part where your actors and/or camera are moving and you want to make sure all the detail in the image is retained.
If you can compress movement without artifacts, you can successfully compress the entire movie. (Still frames and locked-down landscape shots compress to virtually nothing and are not a good test for compression.)
The problem is that neither Apple Compressor nor Adobe Media Encoder has a: “Create Test Movie” button. This article shows you how to do this yourself.
CREATE TEST MOVIES IN APPLE COMPRESSOR
NOTE: This process is the same for both Compressor 3 and Compressor 4.
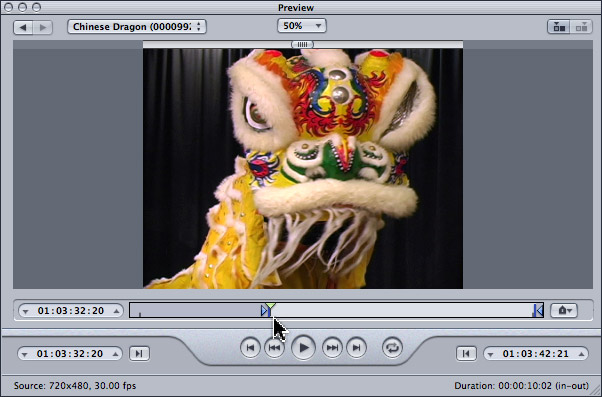
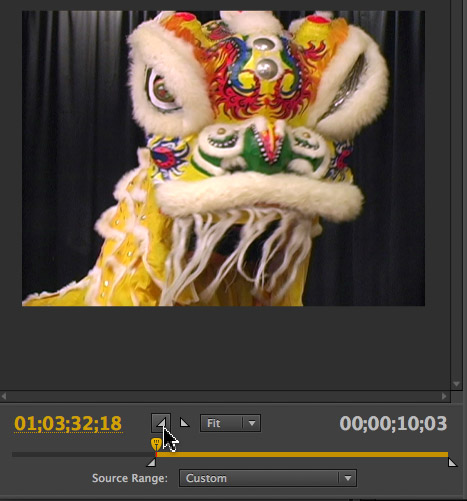
To create a short test movie in Apple Compressor, import the file you want to compress into Compressor. Position the playhead in the Preview window where a section of typical movement starts and either drag the In marker from the left edge of the mini-timeline, or type “I“.
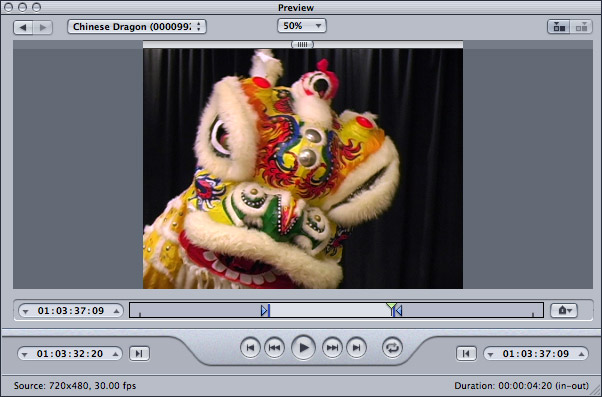
Then, move the playhead to the end of the movement section. A good test is to compress 5 to 10 seconds of the video. The compression won’t take a long, and this provides a long enough playback that you can study it for artifacts.
NOTE: The general rule is that if you don’t see blocky artifacts when the video is enlarged 2x, then the artifacts aren’t there.
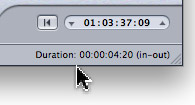
Compressor displays the total duration between the In and the Out in the lower right corner of the Preview window.
When I create a test compression, if the compressed movie looks bad, I raise the bit rate 100 kbps. If it looks good, I lower the bit rate 100 kbps. Then, I keep repeating this until I find the point where artifacts show up, then raise the bit rate 100 kbps and you should be good to go.
CREATE TEST MOVIES IN ADOBE MEDIA ENCODER
NOTE: This process is the same for AME 5,5, 6 and CC, though the window layout is a bit different for the CC release.
When compressing a portion of a movie using Adobe Media Encoder the process is the same, but the interface is different.
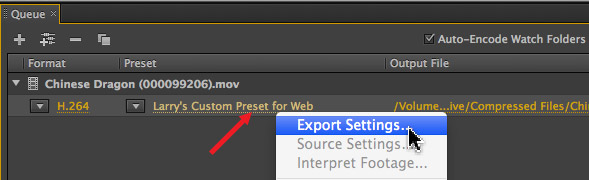
Import the file you want to compress into Adobe Media Encoder. Apply the compression setting you want to test. Then, right-click the compression setting attached to the clip and select Export Settings.
In the Export Settings window, click the Source tab. At the bottom, move the playhead to the start of the portion you want to test and either:
Then, do the same for the Out:
Compress and tweak settings as discussed in the section above on Apple Compressor. Again, the general rule is that if you don’t see blocky artifacts when the video is enlarged 2x, then the artifacts aren’t there.
SOME STARTING BIT RATES FOR YOUR TESTS
With the caveat that all movies are different, here are three bit rate settings you can use as the starting point for your own test compressions.
|
COMPRESSED IMAGE SIZE
|
BIT RATE
|
|---|---|
|
480 x 270 pixels
|
700 kbps
|
|
640 x 360 pixels
|
1,200 kbps
|
|
1280 x 720 pixels
|
2,000 kpbs
|
Screen capture movies will be far lower than these values. Dance recitals using hand-held cameras will be far higher.
NOTE: Never worry about the frame size or file size of the source movie. Both are irrelevant when compressing. Worry only about what frame size you want to create, then figure out the best bit rate to make that frame size look great.
SPECIAL NOTE ON YOUTUBE AND VIMEO
When compressing files for YouTube, use the default YouTube settings available in both Compressor or AME. YouTube and Vimeo always recompress video, so you need to provide a higher bit rate than necessary to give them room to recompress your media.
The default settings in both applications take this properly into account.
IMPORTANT NOTE
Brian Gary, in his book on Apple Compressor, makes the point that we should never compare compressed file quality against other compressed files. Always compare your compressed test files against the original master file. Your goal is to have the compressed version look virtually identical to the original – at a fraction of the file size.
SUMMARY
Testing compression bit rates on a small sample of your movie can save hours of wasted effort. For instance, on my weekly webinars, I have those settings pretty well dialed in and I simply reuse them.
But, when we launched the second season of “2 Reel Guys,” I needed to test all my compression settings to make sure our images looked great. Creating short test movies took about an hour’s effort to figure out the right settings; rather than wasting days compressing videos that looked awful.
Tweaking your settings using test movies is fast, easy and, when you spend the time to do it right, makes your images sparkle.

2,000 Video Training Titles
Edit smarter with Larry Jordan. Available in our store.
Access over 2,000 on-demand video editing courses. Become a member of our Video Training Library today!
Subscribe to Larry's FREE weekly newsletter and
save 10%
on your first purchase.
9 Responses to Video Compression: Test Your Settings
Thx, Larry. Very helpful. Some more questions…
– Is using the Compressor option in FCP X the same as creating a Master file then exporting to Compressor?
– Any general recommendations on how to create a test file to send a client to preview (perhaps this is another article)?
Jeff:
1. Yes, except when you export directly to Compressor you don’t end up with a master file you can use for future compression tasks.
2. The test movie should be small enough to email. Email supports files up to 10 MB in size, and, even a 5 second movie should be well less than 3 MB.
Larry
In Compressor 3.5.3 I can’t find any way to change the bit rate.
In the Inspector, select the Encoder tab and then click Settings that is next to Video.
Michael:
Select the compression setting you want to adjust, then go to the Encode tab. Bit rates are set there.
Larry
That doesn’t seem to be the case in 3.5.3. Clicking Settings takes you to the Compression selection pane. There is no place there to input Bitrate. Going back to the Encode tab in the Inspector still provides no place for inputting Bitrate.
Michael:
I’m running 3.5.3 as I write this.
Select your compression setting so that it loads into the Inspector.
Click the encode tab.
If you are compressing using MPEG-2 or MPEG-4, the bit rate setting will be in the encode tab.
If you are compressing a QuickTime movie, click the Video Settings button and the bit rate will be inside that window.
Let me know if you are still having problems.
Larry
Thanks, Larry.
It’s a very helpful article. but i have one more question.
Can you tell why its important to compress a video before uploading?
Elan:
We compress video because uncompressed videos are HUGE! They would take forever to download and watch. They would choke a wireless access point. And they would overwhelm the storage capacity of smaller hard drives.
Larry