
 [ UPDATE 12/1/2020: James Mathers, cinematographer and co-founder of the Digital Cinema Society, provided a collection of free LUTs that work with most NLEs. You’ll find the link at the end of this article.]
Separate from, but essential to, high dynamic range (HDR) media are raw and log files, along with LUTs. In this tutorial, I want to explain what these are.
NOTE: Here’s an article I wrote that explains the basics of high dynamic range media.
RAW FILES
A raw file is a direct capture of the sensor data generated by the camera. Technopedia describes it as: “the crude output of a video or still camera recording. It is the unprocessed data from a camera’s image sensor. Most photographers prefer shooting raw footage due to the high quality of images that the camera sensor could possibly produce.” (Technopedia)
“Raw image files are sometimes described as ‘digital negatives’; though they are not negative images, they fulfill the same role as negatives in film photography: that is, the negative is not directly usable as an image, but has all of the information needed to create an image.” (Wikipedia)
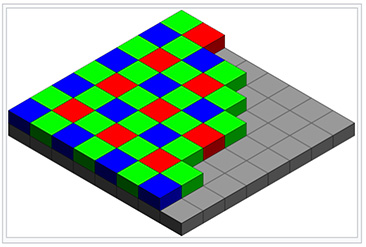
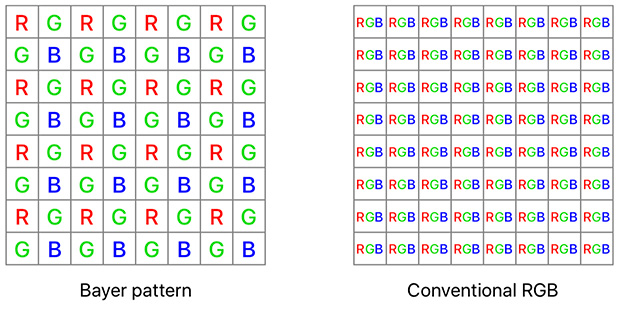
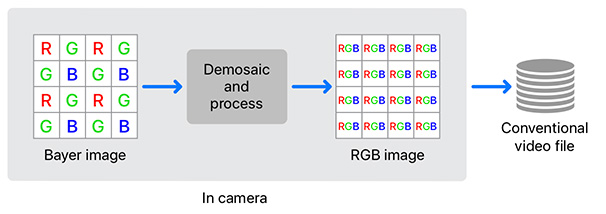
At the heart of raw data is the Bayer filter, which was invented by Bryce Bayer in 1976. “A Bayer filter mosaic is a color filter array (CFA) for arranging RGB color filters on a square grid of photosensors. Its particular arrangement of color filters is used in most single-chip digital image sensors used in digital cameras, camcorders, and scanners to create a color image. The filter pattern is 50% green, 25% red and 25% blue…. The raw output of Bayer-filter cameras is referred to as a Bayer pattern image.” (Wikipedia)
(Click to see a larger image. Image courtesy: Wikipedia.)
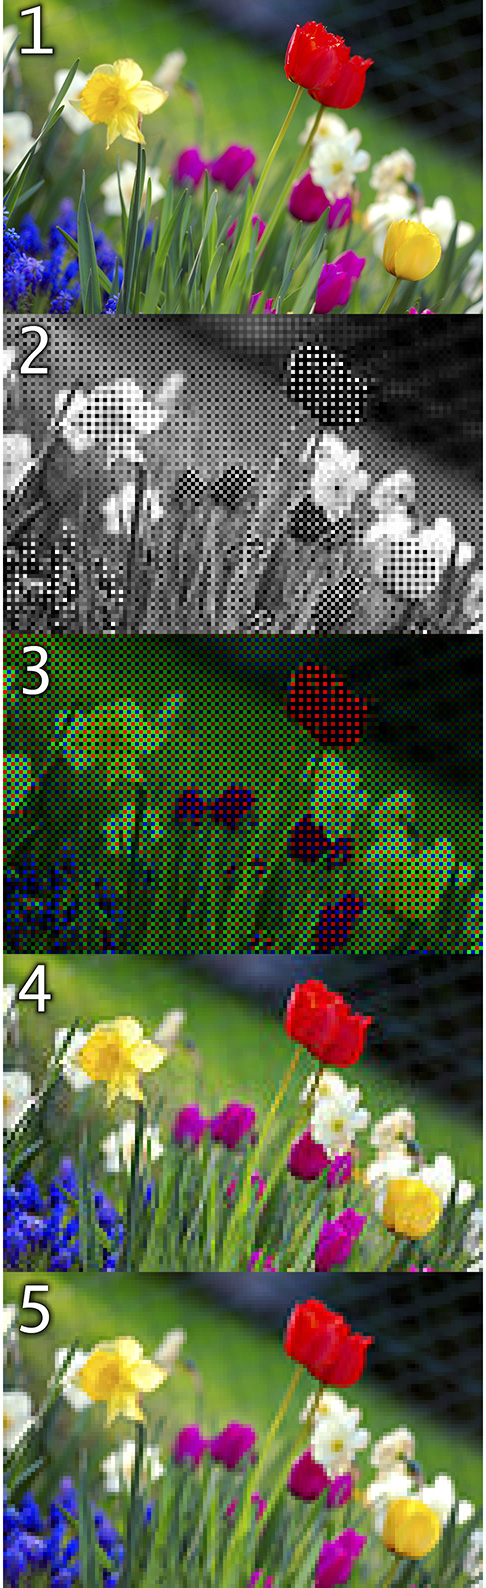
Here’s an example of the stages of a raw image, provided by Wikipedia.
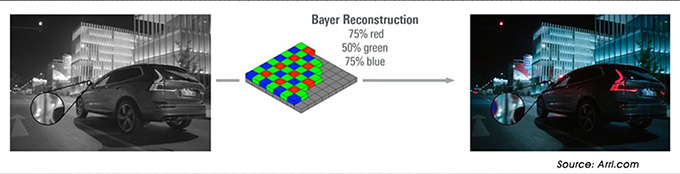
(Image courtesy of Arri)
Here’s an illustration of this process from Arri. The source image is captured in gray-scale, then converted to RGB pixels in the camera using a Bayer pattern.
What makes this sensor data so interesting is that the light coming in from the lens is captured as luma (gray-scale) values. Then, “Since each pixel is filtered to record only one of three colors, the data from each pixel cannot fully specify each of the red, green, and blue values on its own. To obtain a full-color image, various demosaicing algorithms can be used to interpolate a set of complete red, green, and blue values for each pixel. These algorithms make use of the surrounding pixels of the corresponding colors to estimate the values for a particular pixel.” (Wikipedia)
Since each four-pixel block only has one red, one blue and two green sensors, part of the challenge of “de-Bayering” is figuring out the best way to estimate what the colors of the missing pixels are. This means that we are creating three new blue pixel values, three new red pixel values and two new green pixel values for each block of four pixels. As you can imagine this process is both processor-intensive and time-consuming.
(Image courtesy of Apple Inc.)
Also, there’s no perfect way to create these estimated pixels, and, in fact, there are differing ideas on how best to create a Bayer filter, which is why there are a variety of de-Bayering algorithms in use today, each delivering slightly different results.
It is important to note that raw data can only be captured from the camera sensor. Full RGB pixels can not be converted into raw files.
I should also mention that raw files are really large, because they contain a lot of data in a, generally, uncompressed state.
PRORES RAW
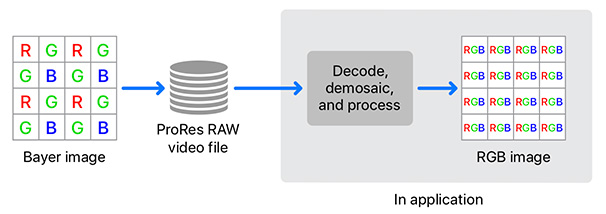
Like other raw formats, ProRes RAW captures the sensor data using a Bayer filter. It’s what happens next that’s different.
NOTE: “Raw” is not an acronym, it simply describes an image state, the same way we would say “black and white,” not “BLACK AND WHITE” or “COLOR.” A “raw” file is spelled lower case. ProRes RAW, on the other hand, is the name of a product where the word RAW is all-caps.
In a traditional Bayer filter, the sensor data is processed in camera to create the full RGB image.
(Images courtesy of Apple, Inc.)
What Apple decided to do is defer the processing until the raw file is loaded into an NLE. This means that the sensor data is not interpreted until you are ready to edit. There are two big benefits to this approach and one big limitation.
The first big benefit is that the ProRes RAW file is much smaller because all the individual pixels have not yet been generated. The second benefit is that waiting to de-Bayer the file means that you can apply better algorithms and faster processors to the task.
The big disadvantage to this approach is that de-Bayering becomes VERY processor-intensive. Editing ProRes RAW really benefits when using very fast CPUs and GPUs.
“[ProRes RAW] requires more computation during playback but [also] allows for greater flexibility. Just as different image and video codecs must make tradeoffs between compression rate, quality, and complexity, demosaicing algorithms must make tradeoffs between speed, quality, and other factors. Using ProRes RAW lets you defer the choice of demosaicing algorithm until post-production and allows you to take advantage of raw processing enhancements and demosaicing algorithm improvements in future software.” (Apple)
In all cases, the reason we work with raw files is that we want to get as close to the camera source data as possible to give us the greatest flexibility in how those images will ultimately look.
LOG FILES
Raw files define how the image is captured by the sensor, then converted into pixels. What’s missing in this description, though, is brightness. Most raw files capture data with a wide dynamic range; 10 to 14 stops.
The problem is that this dynamic range exceeds the display capability of a Rec. 709 image.
NOTE: Raw and log files require media files that support at least 10-bit color depth.
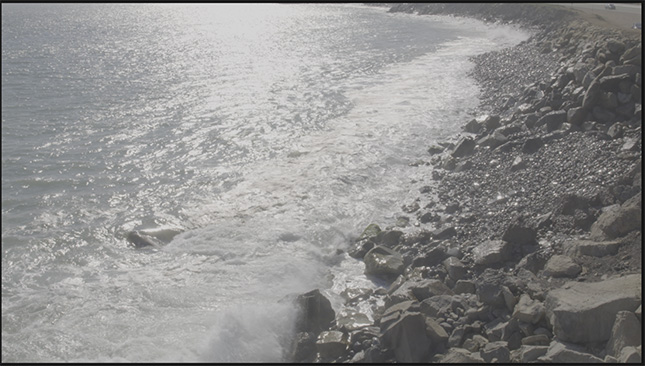
Here’s an example. This image was captured using vlog, a high dynamic range format, which preserves the highlight detail in the file, but when you look at it on the display, it looks, um, awful.
(Click to see a larger image.)
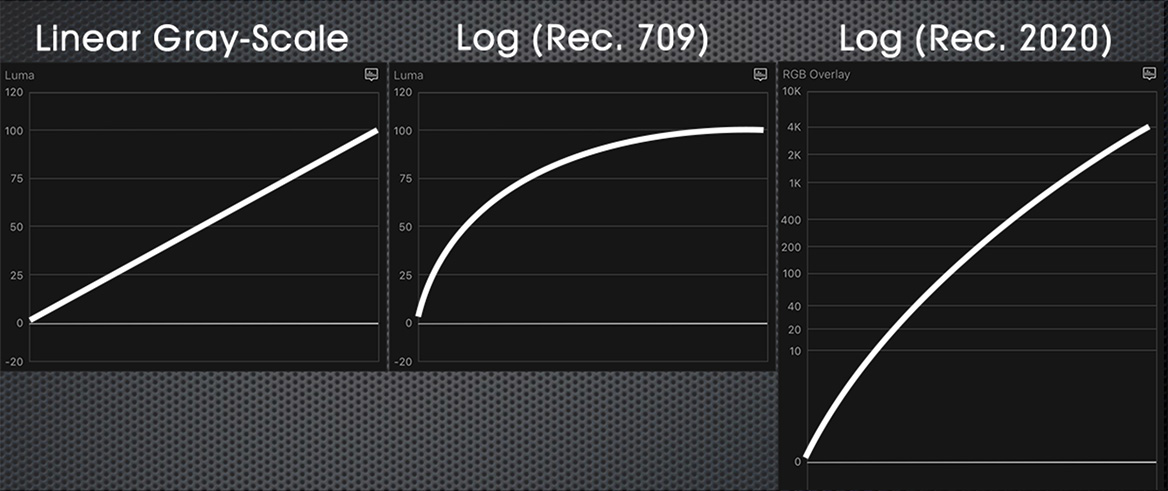
What a camera does to preserve highlights is to record them in a logarithmic or “log” format. In this example, a typical Rec. 709 image records all gray-scale values as a linear range from black to white. This works perfectly fine for HD images, but limits what we can do with excessive highlights. Most of the time, when highlights are too bright, they look “blown-out” or over-exposed. In any case, all the detail in at the highlights is lost.
To fix this, a log file records the highlights so that when the file is adjusted during the final color grade, we can either extend those highlights into the brighter ranges of HDR (the right image) or pull them down to fit into a Rec. 709 image.
As always, there are trade-offs. Great potential image quality, requiring more time to create.
It is important to note that log files can be used in any project – SD, HD, HDR – which is why they are increasingly popular for any project requiring a non-standard “look,” albeit at the expense of a color grade.
Tone-mapping. Converting HDR media to “fit” in a Rec. 709 project.
LUTS
This brings us to LUTs (Look-Up Tables). These, I have discovered, are magical. A LUT converts the pixel values in an image; both color and gray-scale. They are most often used to convert images from sensor or log values into something that looks more pleasing to the eye.
The reason I consider them “magical,” is:
There are two types of LUTs:
Camera LUTs mirror the way a camera converts light into a log format. The LUT re-converts that log format into something that closely resembles the original image.
Design LUTs convert an image into a specific look, for example: romance, horror, historical… you get the idea.
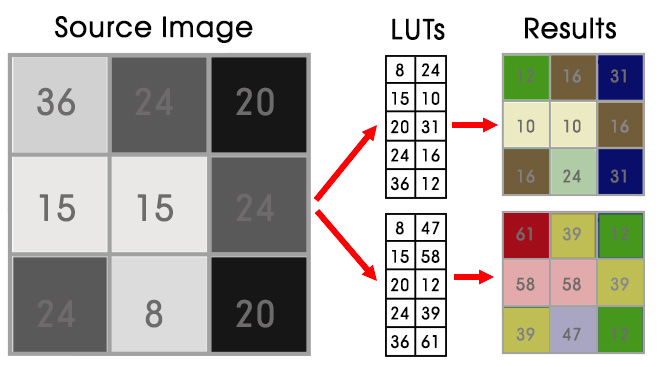
For example, the source image is on the left. When we apply the top LUT, we get an image composed mostly of shades of brown and green. When we apply the bottom LUT, we get an image composed mostly of shades of pink and yellow.
Yet, in both cases, the source image is not changed! The LUT is simply “remapping” the original pixel values to create new color and gray-scale values.

(Click to see a larger image)
Here’s an example. The image on the left is the original log image in a Rec. 709 project. The middle image has a Panasonic camera LUT applied. The right image has the Folger design LUT from RocketStock applied. The same source image, totally different looks. And, changing LUTs does not require rendering.
The nice thing about using LUTs is that there is no “right” or “wrong.” As long as your video stays within technical specs, any look you like is the right look. And any look you don’t, isn’t.
NOTE: There are different formats of LUT files. DaVinci Resolve, Adobe Premiere and Apple Final Cut Pro X all use the .CUBE format.
SUMMARY
The good news is that all these different formats can be used in any video project – SD, HD, HDR. How we edit these files is the same. The only difference is in the size and quality of the image.
Raw files give us the most control over the color and gray-scale values in our image, but they create massively large files and require significant time spent color grading. Log files allow us to retain highlight detail. And LUTs allow us to quickly convert an image or clip from one look to another.
However, using these files requires that we shift our thinking from “which format creates the smallest files,” to “which format provides the greatest flexibility in crafting the image that best tells my story.”
As we move into the new worlds of HDR, raw and log files, we are also moving into an environment which requires massive amounts of storage, much faster storage bandwidth and thinking about color grading and media management before we start our next project.
As always, there are trade-offs.
EXTRA RESOURCES
Here’s an article explaining The Basics of HDR Media.
Here’s an article that explains how to create custom LUTs for Final Cut Pro X, Premiere, and/or Resolve.
PremiumBeat: A Brief History of RAW footage in Video Production.
An excellent white paper from Apple on ProRes RAW.
Adorama explains Dynamic Range Photography.
Free LUTS from RocketStock.
https://www.rocketstock.com/free-after-effects-templates/35-free-luts-for-color-grading-videos/
Bounce Color, founded by James Mathers, is offering 20 free LUTs for converting Log footage to Rec.709 so they can be used with any camera. Crafted by a team of filmmakers for professional and beginner filmmakers, these are compatible with Premiere Pro, Final Cut Pro, DaVinci Resolve and more.
https://www.bouncecolor.com/blogs/news/free-luts/
The easiest way to obtain Blackmagic Design camera LUTs is to install the free version of Davinci Resolve. These LUTs can be used in Premiere, Final Cut, Resolve and others. You’ll find them in:
Library > Application Support > Blackmagic Design > DaVinci Resolve > LUT > Blackmagic Design
mLUTs is a utility that makes applying custom LUTs easy. It supports Avid, Premiere, Final Cut, Resolve and others. The utility is free and available from MotionVFX.com: https://www.motionvfx.com/store,mlut-plugin,p1949.html

2,000 Video Training Titles
Edit smarter with Larry Jordan. Available in our store.
Access over 2,000 on-demand video editing courses. Become a member of our Video Training Library today!
Subscribe to Larry's FREE weekly newsletter and
save 10%
on your first purchase.
11 Responses to Understanding Raw, Log and LUT Files [u]
Extremely valuable info!!! Thanks a lot.. i’m learning a lot and so happy
to have been introduced to this website!
Thank you for this. I am much less ignotnat as a result of your article.
Jason:
Happy to help. I’m glad you liked it.
Larry
Just a quick question… in the year since this original post, might the latest version of FCPx (10.4.8) now include Blackmagic Cam LUTs? (Before I do the whole download / install Resolve routine). Another post of yours (Working with LUTs), shows Blackmagic Cams in the “Built-In” Cam LUTs pulldown menu. If downloading the free version of Resolve IS the only way to get the BM Cam LUT(s), how do I get it installed into FCPx? As an added “Custom” LUT?
Alan:
FCP X supports Blackmagic cameras but NOT Blackmagic RAW. Downloading the free version of DaVinci Resolve is the easiest way to get the LUTs.
There may be other ways, but I don’t know what they are – perhaps a Google search can help.
Larry
Yeah, won’t need BMagic RAW… I’m editing a project that the shooter is using a BM Cam (new Blackmagic Pocket Cinema Camera 6K) but shooting / delivering in 4K Prores 422 HQ (log). Will FCPx have built-in LUTs that will work for that?
SiriusOne:
Before you shoot, read this article – especially the comparison between codecs about halfway through:
https://larryjordan.com/articles/editing-issues-blackmagic-pocket-cinema-camera-4k/
Especially, I recommend against shooting the Video format.
FCP X ships with several BMD LUTs, however I don’t think you’ll like them. Instead, do a Google search and you’ll find dozens to choose from. I recommend you not use the built-in LUTs.
Larry
Super helpful… thanks. This project is a locally produced indy film and I’ve not worked with the shooter before (won’t start filming for some months so yes, wanting to make sure we get technical stuff sorted well in advance of edit). Guessing the conclusions and recommendations in your BMD 4K Cam hold the same for the newer Blackmagic Pocket Cinema Camera 6K?
Alan
Alan:
I haven’t worked with the latest BMD 6K camera, but, based upon past experience, I would say my suggestions are a good place to start your testing.
Larry
I’m trying to find a workflow to turn a timelapse of 14-bit RAW (in DNG format) still images into an exported HDR (10-bit format like HLG, HDR10,HDR10+, Dolby Vision, etc) video format. Is there a workflow for turning a string of RAW still images into a RAW video format? I’m shocked to say I can’t even find a way to turn DNG stills into a CinemaDNG video. Research on this is difficult as there are hundreds of tutorials on how to merge multiple still images into a single tone-mapped HDR still image, which is not what I’m looking to do.
I ask here because you seem to be one of the most knowledge sources in my hours of research. “Help me Larry Jordan. You’re my only hope!”
Andrew:
I’m not sure, because DNG is not a format I work with. Also, you didn’t specify which video editing software you are working with.
However, both Premiere and Final Cut – assuming they support DNG – allow you to specify an imported still duration. Set this to one frame, then, select all your DNG image and edit them into the timeline.
This builds your timelapse.
From there, you can export an HDR clip. FCP supports HDR better than Premiere, so I would recommend using that – or, perhaps, DaVinci Resolve, but I don’t know that software as well.
Larry