
![]()
One of the newer features in Adobe Premiere Pro CC is how it handles multi-channel audio. In the past, we first needed to specify what type of audio we were editing into each track. Or, editing a stereo audio clip in the the Timeline would result in the two audio channels occupying two separate audio tracks.
With the CC release, things have changed. Let me explain.
ASSIGN AUDIO TYPES IN A NEW PROJECT

Audio types allow you to define which audio can be edited into what tracks. Making editing life even easier is a new default setting called “Standard.” We can access these new choices when we create a new sequence, but they are easy to overlook unless you navigate to the Tracks tab.
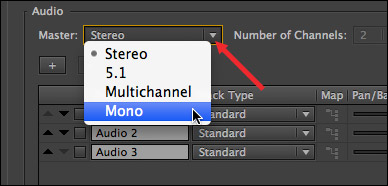
The Master drop-down menu sets the audio output format for the entire sequence. By default, this is Stereo. Other choices allow you to select 5.1 surround, Mono, or multi-channel audio output.
NOTE: Once a sequence is created, the Master Track output setting can’t be changed.
Setting the Master track to multi-channel means the sequence will export the final mix as up to 32 separate channels of mono audio. You can specify the number of output channels in the menu to the right. Multichannel is a good choice, for example, when you need stems exported as discrete audio channels.
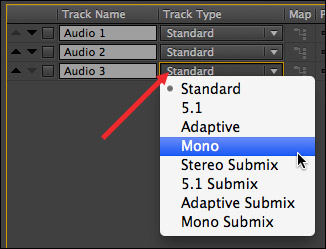
While the Master track is important, the Track Type menu, associated with each track, is the key to this new system. Audio tracks in Premiere can contain mono, stereo, and 5.1 surround audio.
NOTE: Once a sequence is created, these track settings can’t be changed.
There are two categories here:
Tracks contain audio files. Submixes only contain signals routed to them from tracks or other submixes.
There are four track types:
Keep in mind that once a track is created, you can’t change its type; though you can add and delete audio tracks as necessary to support your edit.
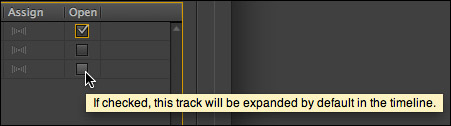
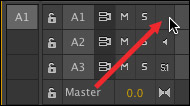
While we are in the Track panel, see these Open checkboxes? When these are checked, the audio tracks are expanded to full-height in the Timeline when you open the sequence, or until you change them.
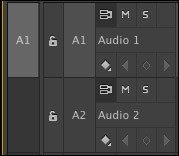
Full height audio tracks look like this, with all controls available.
Collapsed tracks take less room and look like this.
To expand or collapse a track, double-click the gray box to the right of the “S” (Solo) button.
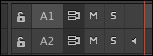
NOTE: By the way, Premiere uses secret indicators to tell you about the track type.
WHY THIS IS IMPORTANT
If all you do is shoot, edit, and output stereo files, you don’t need to worry. All of Premiere’s default settings are perfect for you. However, to simplify a complex edit, you may want to group similar clips into the same track. In which case, these settings can help.
NOTE: Also, this system allows Premiere Pro CC to be compatible with earlier version Premiere projects.
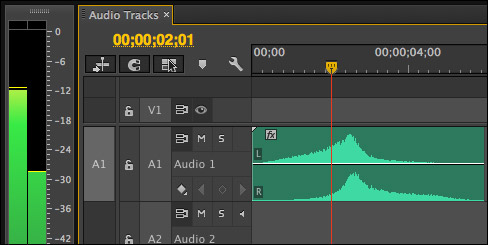
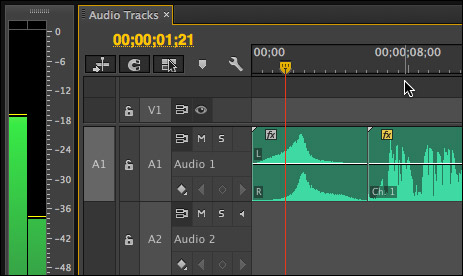
In this example, track A1 is a Standard track, into which a stereo clip is edited. Notice that both channels of the stereo clip are displayed in a single track.
Though, when we play the clip, the audio meters show a clear difference in levels between the two channels.
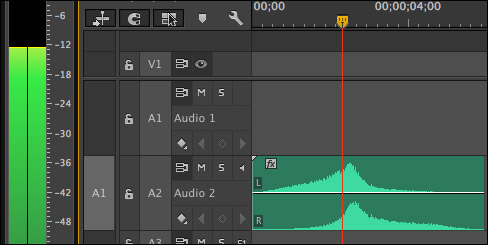
Now, let’s assign that same audio clip to track A2, which is a Mono track. We still see the two audio channels, but, as the audio meters indicate, this stereo clip outputs as a mono track.
This is a fast and easy way to convert a stereo clip to mono, without wasting time transcoding the clip or deleting channels.
Just to show the flexibility of a Standard track type, track A1 has both a mono and stereo clip in it. Both clips will output as stereo, as displayed by the audio meters, however the mono clip, since it has only one track, will output panned center.
EXTRA CREDIT
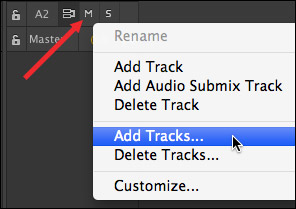
When you right-click an audio track header, if you select Add Track (at the top), Premiere will add a single Standard track.
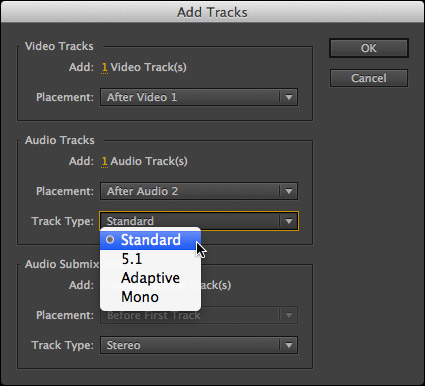
However, if you select Add Tracks… (at the bottom), Premiere opens an expanded dialog allowing you to select which Track types you want to create.
SUMMARY
These new track types make working with audio in Premiere Pro CC much easier than it was in earlier versions when we needed to specify the track type before editing a clip into a track.
Understanding what track types are, where they are set and what they do can help you make sense of even the most complex audio project.
NOTE: Here’s an article I wrote that explains how to separate a stereo audio clip into two dual-channel mono tracks.

2,000 Video Training Titles
Edit smarter with Larry Jordan. Available in our store.
Access over 2,000 on-demand video editing courses. Become a member of our Video Training Library today!
Subscribe to Larry's FREE weekly newsletter and
save 10%
on your first purchase.
36 Responses to Adobe Premiere Pro: Audio Track Types
Newer Comments →-
Three Things You Need To Know About Premiere Pro CC | Premiumbeat.com says:
April 21, 2014 at 8:15 am
-
 Brian says:
June 17, 2014 at 1:44 am
-
 Larry Jordan says:
June 17, 2014 at 5:57 pm
-
 Brian says:
June 19, 2014 at 2:10 am
-
 James says:
September 30, 2015 at 7:36 am
-
Audio in Premiere Pro CC | Plywood Pictures says:
July 22, 2014 at 10:33 am
-
 Jon says:
July 22, 2014 at 1:23 pm
-
 Chet says:
September 6, 2014 at 5:19 pm
-
 LarryJ says:
September 6, 2014 at 10:07 pm
-
 Chet says:
September 7, 2014 at 8:12 am
-
 LarryJ says:
September 7, 2014 at 8:27 am
-
 Evan says:
April 6, 2015 at 5:45 pm
-
 Larry says:
April 7, 2015 at 4:21 pm
-
 Sean Dahlberg says:
July 21, 2015 at 9:02 am
-
 Larry says:
July 21, 2015 at 10:25 am
-
 Sean Dahlberg says:
July 21, 2015 at 11:01 am
-
 Ley says:
January 11, 2016 at 5:34 pm
-
 Larry says:
January 11, 2016 at 5:39 pm
-
 Glenn says:
February 19, 2016 at 3:13 pm
-
 Larry says:
February 19, 2016 at 3:43 pm
-
 Glenn says:
February 20, 2016 at 9:30 am
-
 Steve Marce says:
April 7, 2016 at 5:13 am
-
 Larry says:
April 7, 2016 at 7:34 am
-
 Steve Marce says:
April 7, 2016 at 9:55 am
Newer Comments →[…] this first article Larry describes the different audio track types and how they operate and in the second article he walks through how to modify the audio channels of a clip to get it to […]
I’m pulling my hair out over the fact that in CS5.5 I can’t change stereo into mono once a clip is in the sequence. I have about 25 clips of an interview (Ch 1 shotgun mic, Ch 2 lav) laid into several timelines where I would like to do just that. I merrily went along getting my ins and outs set in the sequence and planned to decide between the channels later. Being a FCP user, I thought this would not be a problem. Imagine my emotions when I found out how Premiere handles this and the thought of doing all of this work over again. Compound that with the fact my interviewee is speaking in his native tongue, Hungarian (top 5 crazy hard language) and my knowledge of that language is pretty small.
So before I start paying Adobe to be in the cloud, I’d like to make absolutely sure that Premiere CC would solve my problem more easily. Can I open my 5.5 project in CC, create new sequences with mono tracks I need specified under the tracks tab, open the old sequences, and then drop and drag clips from old 5.5 stereo sequences to CC mono sequences?
Thanks
Brian:
I have not found any way to do this EXCEPT when clips are in the Project panel. Once they are in the Timeline, they can’t be changed.
Larry
Thanks for your reply and information. Going back to FCP.
Hey Larry, I believe I’ve found a workaround for this problem. I also recently made the switch from FCP and just had this same issue as Brian- I had a rough cut of interviews with stereo tracks instead of separate mono ones like I wanted. The way I dealt with it was to: 1) Create a new sequence with the correct mono tracks. 2) Copy and paste over just the video portion of the interviews from the old sequence to the new one. 3) Modify all the affected clips in the browser to the mono designation. 4) Go to the new timeline, and select a clip. I hit my shortcut key “f” to reveal the original clip in my source monitor, and then drag just the audio down to my timeline. This saved me a ton of time, as I would have had to redo the whole edit!
[…] was figuring out how to deal with audio. I found these two very useful posts from Larry Jordan: Audio Track Types and Separate Audio. […]
Go with Sony Vagas Pro. It is so easy and you will be amazed by the results. I’m using both premiere and Vegas. Premiere mainly for other plugin applications and final creations, editing…i’ll go with Sony!
Larry, thanks for the informative post.
My question is in regards to editing in Premiere Pro CC with 5.1 audio. I understand the part about setting up the Master Track as 5.1 and all of the Sequence Audio Tracks to 5.1. I even understand mixing 5.1 tracks in Audition, exporting them out as 5.1 wav files and importing them into PP.
However, I can’t, for the life of me, get my laptop to output 5.1 for real-time preview.
– I have my editor hooked up to my surround sound unit via HDMI.
– In the Windows Audio settings, I can play preview sounds (little bell sounds) that discretely play from each speaker of the 5.1 surround sound system.
I have even gone into Premiere Pro’s Audio Preferences and made sure that…
– “5.1 Mixdown Type” is set to “Front + Rear + LFE”.
– In the “Audio Hardware” preferences, when I click on the “ASIO Settings” button
– I am selecting the proper Audio Hardware for the HDMI output.
– The “Map Output for:” drop-down menu only has one option: “Adobe Desktop Audio”
– I only have the option for 2 output channels. <– This is the one I don't understand.
Any other thoughts as to why I can't preview 5.1 in real time via HDMI from Premiere Pro?
Chet:
Yup. HDMI assumes that your audio is encoded into an AC3 stream. Which is not what you are doing. You are feeding discrete audio channels, which the internal HDMI does not support.
Instead, you need to connect an audio interface that provides discrete audio channels. When I was demoing surround sound, I was using a Presonus unit. While the unit I was using is discontinued, here’s something similar that would work:
http://www.presonus.com/products/FireStudio-Project
You need a device that supports at least six discrete audio channels out that is compatible with your Mac.
Larry
Larry,
Thanks for the response. Not a Mac guy. Using a Windows laptop, but it does have HDMI and Thunderbolt ports.
I was really worried about this when I purchased the laptop (just got it from UPS on Friday). For video editing, it’s amazing, but Audio, not so much.
But to address your comment, you said, “HDMI assumes that your audio is encoded into an AC3 stream. Which is not what you are doing. You are feeding discrete audio channels, which the internal HDMI does not support.” Now that I think about it, I am not sure that it jives with my other tests. When I go to my Windows Audio settings and play the 7.1 test tones, each speaker is playing its respective tone. All via HDMI. Even the receiver states “Multichannel 7.1”. This leads me to believe that it’s more of a “Adobe-doesn’t-support-that” kind of a thing.
Thoughts?
Chet:
No thoughts – I have zero knowledge of how Windows systems work.
Thanks for telling me about the test tones, though.
Larry
Hello,
I am trying to output a feature film for delivery. The PR422HQ quicktime should have 5.1+2 audio in the following configuration:
Ch 1-6 L, R, C, LFE, Ls, Rs
Ch 7-8 Stereo Lt/Rt
For the life of me, I cannot figure out how to set up Premiere Pro CC (2014) to spit out a quicktime exactly like this configuration. The closest I can get is to have ch 1 mixed w/ ch 2, ch 3 mixed w/ ch 4, etc- obviously not what I need. I want discrete mono channels to be exported- Center (ch 3) should be playing without having LFE (Ch 4) mixed in, and vice versa. In terms of audio files I’m using, I have 6 mono .wav files (for the 5.1) and one stereo .wav file.
Any clarification you can provide here would be a massive help.
Thanks!!
Evan
Evan:
I tracked down an article that can answer your question:
http://strypesinpost.com/2013/06/exporting-mulitchannel-quicktimes-in-premiere-pro-part-2/
Larry
Hi!
I am on Premiere Pro CC 2014 8.1. Mac OS 10.10.3. Maybe you can help?
I designated my audio channels as follows:
Ch1 & 2 Stereo Mix
Ch 3 VO
Ch 4 Dial LR
Ch 5 & 6 Music
Ch 7 & 8 SFX
I used this guide to help me lay everything out: http://strypesinpost.com/2012/11/exporting-multichannel-quicktimes-in-premiere-pro/
How do I go about mixing down channels 3-8 into a 2 channel stereo mix for channels 1 & 2? I tried to export AIFF files but when I bring them back in they are silent. Sorry, I’m used to Avid, where I can just do a simple mix down and place it into the appropriate channels.
Thanks for any and all help,
Sean
Sean:
Generally, you would do this mix in the audio application that is creating the rest of your stems. In other words, the mixdown is created at the same time as the stems and exported as a stand-alone file.
Larry
Hi Larry,
Thanks for the response. I totally understand. I am only using Premiere Pro CC. Not too familiar with the rest of the creative cloud, is there an adobe audio app that works best with Premiere?
Thanks again!
Sean
Hi Larry,
Thanks for trying to make the complicated simple… I’ still having trouble but its getting clearer.
I was wondering “This is a fast and easy way to convert a stereo clip to mono, without wasting time transcoding the clip or deleting channels.”
But how is it mixing them? Will you end up with phase cancellation of sorts?
Thanks for your constant help,
Ley
Ley:
Ley:
All this is doing is splitting the channels into separate files. If you had phase cancellation before, you’ll have it now.If you didn’t have it before, you won’t have it now.
Mixing is exactly the same as if they were/are two separate clips.
Larry
Hi, Larry.
Great article!
I have one question, though. Can I mix in multichannel mode and output to stereo for a DVD? Or does it make more sense to do it as a stereo mix if the final output will be stereo?
Glenn
Glenn:
You can mix any audio formats within Premiere, but you can only output a single format – Mono, Stereo, or Surround.
Larry
Thanks, Larry.
Glenn
Hello Larry,
I am facing a challenge and got no solution for this anywhere… The problem is:
A clip in a sequence with stereo master track sound louder than the same clip in the sequence with 5.1 master track…
I’m using premiere pro cs6 for a project. Initially when I created a new project in cs6 I knew very less about audio mixing and so I created a sequence for my project using the default dslr 1080p preset coz this preset had all that I needed and by default the master track in this preset is stereo. :'(
Later I needed to do a 5.1 mix for the project and the master track in my sequence was stereo. I tried to change the master track type to 5.1 but couldn’t do it. I did some research and found that i can’t change the master track type of a sequence later once the sequence is created.
So i created a new sequence in the same project and this time I changed the master track to 5.1 in the dslr 1080p preset and saved it as a custom preset. But now comes my big problem… When I copied the clips from the sequence with stereo master track and pasted them into my new sequence with 5.1 master track, the clips sound low in volume in my new sequence with 5.1 master track and when i play the same clips in the stereo master sequence they sound normal, loud enough. Its just that I copy pasted the clips to the new 5.1 master track sequence and when I play the clips there they sound low in volume than in the sequence with stereo master track… I play the same clips first in my old stereo master track sequence and then the same copy/pasted clips in 5.1 master track sequence and the clips now sound low in volume.
I’ve checked all the parameters of the clips and they are same in both the sequences. When I play the clips with the audio mixer opened, the bar rises to the same level, shows the same readings of dBs but I can’t understand why they sound low in 5.1 master track sequence.
I’m greatly stuck here…done all the editing, just the audio is left… Help would be greatly appreciated…
And yes the clips sounding low are the dialogue clips, the actual raw footage from the camera. Music and dubbed dialogues are not yet done so haven’t copy pasted them, just the raw camera footage.
I’m using headphones…is that the reason why I’m hearing less sound..? Will the final product after editing and mixing, when heard in 5.1 sound normal?
Best,
Steve
Steve:
You are correct that you can’t change Project audio settings once a project is created. And you are also correct that the mixing levels are different for mono, stereo and surround clips.
However, rather than try and diagnose this via email, I suggest you transfer your audio to Adobe Audition for mixing or contact an audio post-production house to create your mix. You’ll be much better off.
Larry
Thanx a lot Larry. This is exactly what I was looking for!? Appreciate it.