

You’ve seen these rectangles in your video, but what are they and why are they there?
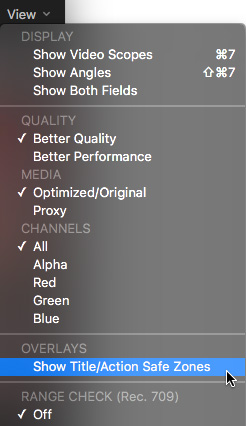
Final Cut Pro X calls them “Title/Action Safe Zones” and you enable them from the View menu in the Viewer.
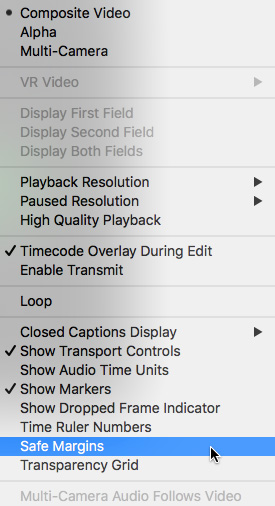
Premiere calls them “Safe Margins” and you enable them from the Wrench icon in the Program or Source Monitors.
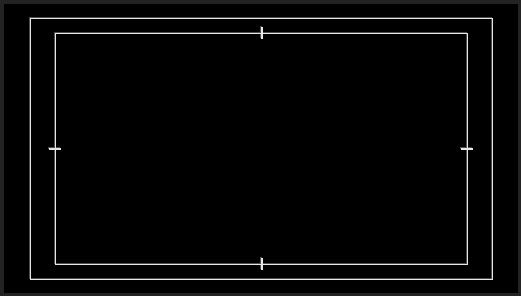
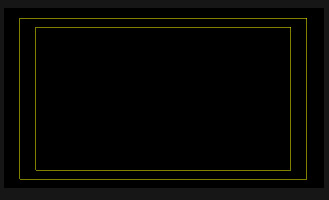
Here’s what they look like, by default, in Premiere: two rectangles with small hash marks that indicate the horizontal and vertical center of the image.

Premiere also has additional settings, at the bottom of the Wrench menu, called Overlay > Settings, that allows you to change the size of the rectangles, measured as a percentage of the total image subtracted from the edge of the frame.
NOTE: While you can vary these percentages, my recommendation is to leave them as is. They are set to industry standards. Changing them won’t get you anything extra and runs the risk your audience won’t see your text or composites completely in the frame.
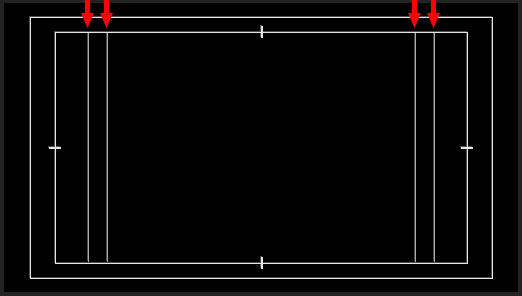
And, if Include 4:3 Safe Margin is checked, the Monitor displays a 4:3 center-cut frame with additional safe zones indicated inside it for those shows that need to create both a 4:3 and 16:9 version of their program.
WHY DO THESE EXIST?
The origin of these indicators dates back to the earliest days of television. In those days, images were “painted” on the back of a phosphor-coated glass picture tube energized by a high-voltage beam of electrons causing the phosphors to glow. The higher the voltage, the brighter the phosphor would glow.
The problem was that, in those days, televisions were really, REALLY expensive. Since this was before the days of credit cards, people needed to pay cash for a TV. It would take the average family two years to save enough money to purchase a black-and-white set; and up to eight years to purchase a color television. (This delay between saving and purchasing consumer goods was one of the driving factors in the creation of credit cards in the early 1960’s.)
After saving for that length of time, consumers wanted the biggest picture they could afford. They did not want to see any black edges around their image. (Viewers did not realize that the resolution of a video image was fixed, even if the monitor size increased.)
So, manufacturers would slightly zoom in the image so that it would fill the frame. In fact, the image was purposefully over-scanned to be sure no black edges would exist. But, this over-scanning caused visual information around the edges of the image to be lost. Worse, due to the imprecise nature of magnets, electron beams and the manufacturing process, it was impossible to precisely center the frame in the picture tube, which meant that every picture tube lost data – but in differing amounts on different edges.
From a production point of view, not being able to count on the entire image being seen wrecked havoc on framing, composites, graphics and titles. So, to compensate for these manufacturing variations cutting off varying amounts of the image, the industry standardized on two “warning indicators:
These framing rules are still followed by every network, broadcaster and cable system today.
EXAMPLES
(Images courtesy Amy Campion and Antics – www.anticsperformance.com )
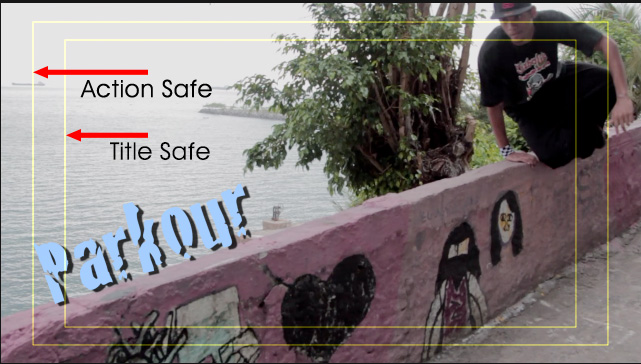
Here’s an example where the action – the dancer – is outside Action Safe, while the title is outside Title Safe, though inside Action Safe.
NOTE: While some of the dancer is inside Action Safe, because the eyes and arm are outside the safe zone, this would be considered poor framing. (This is not Amy’s fault, I picked a frame in the middle of a movement to illustrate this concept.)
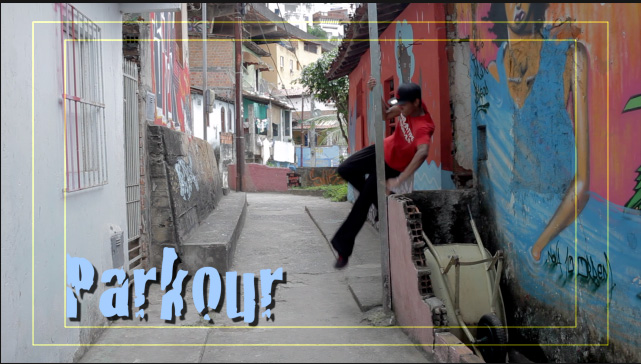
Here’s an example where both the action and the title are safely inside their appropriate zones.
WHY THIS IS STILL IMPORTANT
Action Safe and Title Safe were invented to solve the problem of images getting cropped due to how electron beam picture tubes worked. You would think that today, in an all-digital world, we could ignore these.
But, we can’t.
First, because many digital front and rear-screen projectors overscan the image as part of aligning it with the screen. Second, because we’ve all grown up seeing graphics design and camera framing that take these safe zones into account, putting text or actors too close to the edge makes the audience feel uncomfortable.
So, if you are creating projects for broadcast or cable, keep all essential action – this includes composites and picture-in-picture – inside Action Safe (the outer rectangle) and all essential text and graphics inside Title Safe (the inner rectangle.)
If you are creating projects for the web or feature film, keep all elements – actors, effects and titles – inside Action Safe, the outer rectangle.
Following these simple rules will mean that your audience will see everything you expect them to see without anything essential getting cut off.

2,000 Video Training Titles
Edit smarter with Larry Jordan. Available in our store.
Access over 2,000 on-demand video editing courses. Become a member of our Video Training Library today!
Subscribe to Larry's FREE weekly newsletter and
save 10%
on your first purchase.
6 Responses to Why Do Safe Zones Exist in Video?
solid valid stuff, and the culture and visual expectations of the audience is never to be under estimated. I have had to shoot with many a ground glass with these areas and aspects ratios, i love that they can now be switched on and off as required.
Hi Larry,
I needed to straighten a few clips—about 3% rotation—and I was able zoom in a little (scale up) to compensate. However, I am worried about the action safe. I can keep the image within the action safe, but just outside of it the top edge of the video is at an angle. How can I be sure that the image (I am creating a DVD) outside of the action safe will NOT be visible? Or, maybe I should ask, what should I expect?
Thanks in advance,
Debbie
Debbie:
You should assume that, if you post your video to the web, the ENTIRE image will be visible. It is only when media is viewed on TV sets, rear screen projectors or in theaters that portions of the image will be cut off.
Larry
Thanks, Larry. So, of course, DVDs cross lines because they can be played on computers and on TVs. Should I assume that they will be 100% if played on the computer, but 93% if said DVD is played on the TV?
Thanks so much,
Deb
Debbie:
Smile… It isn’t that easy. A better way to think of it is that videos played to the web – say social media – will show the entire frame. Videos played to DVD / TVs MAY lose one or more edges, which will vary by individual TV set.
Therefore, since you don’t know how much, if any, of the image will be lost, it is best to plan to put all essential graphics and text inside Action Safe, at a minimum.
If your video is going to broadcast, you will need to put all essential graphics and text inside Title Safe (the inner rectangle).
If you don’t know where your video will be played, assume the worst. That way, you can be pleasantly surprised.
Larry
Thank you so much. When making video, I always assume the worst; in fact, I pretty much use “assume the worst and be pleasantly surprised” as my life motto.
Thank you, as always. You’ve been a hero to my husband and me since the early days of FCP. Could not have done it without you—feel like we should be paying you royalties!
Debbie