
![]() All too often an interview gets captured as a stereo clip, even though the interviewer is on one channel and the guest is on the second channel. Normally, a stereo clip makes it darn difficult to edit just one channel, but Premiere has a variety of tools that can solve this problem.
All too often an interview gets captured as a stereo clip, even though the interviewer is on one channel and the guest is on the second channel. Normally, a stereo clip makes it darn difficult to edit just one channel, but Premiere has a variety of tools that can solve this problem.
I discovered these as I was doing research for my on-going video training series on Premiere Pro CS6. But these were just too cool to only share in the training, so here they are.
THE PROBLEM
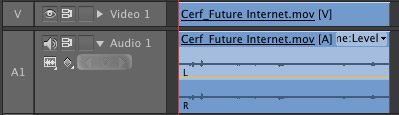
Here’s an audio interview recorded with my voice on channel 1, and the guest’s voice is on channel 2, but it was captured as a stereo clip.
I need to be able to make changes to one channel without affecting the other. And a stereo clip makes this impossible.
OPTION 1: BRUTE FORCE
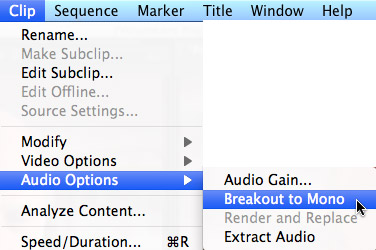
In the Project panel, select the clip and choose Clip > Audio Options > Breakout to Mono.
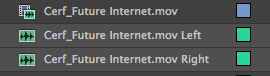
This creates a separate audio clip for each channel in the source clip. The good news is that this works, I now have two totally separate audio clips. (In this screen shot, the top clip is the source clip, while the two lower clips are the extracted channels.)
The bad news is that they are SO totally separate, they are no longer synced with the video clip. Essentially there is no longer any relationship between the source video and the two new audio files.
Hmmm… we used a bit too much force, it would seem.
OPTION 2: SUPPRESS A CHANNEL
(This is really quite neat!)
Once a clip is edited into the Timeline, select it and open the Effect Controls panel.
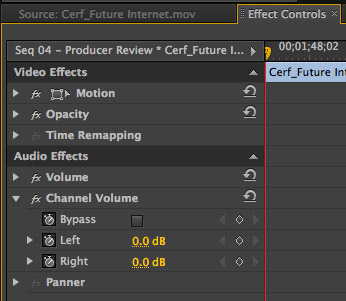
Twirl down the Channel Volume setting in Audio Effects.
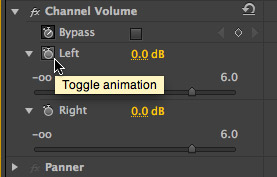
If you don’t want to set any keyframes when making changes to Premiere effects settings, click the “stopwatch” icon. When a stopwatch is enabled (dark) any change you make creates a keyframe. When a stopwatch is gray (as both the Left and Right channels are in this screen shot) changes affect the entire clip and don’t set a keyframe.
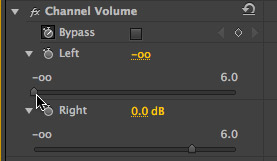
Slide the channel gain slider to adjust the volume of the channel you want to modify. For example, in this screen shot, I’ve turned off the left channel by moving the slider all the way to the left.
What I like about this feature is that I don’t have to disconnect any audio tracks, yet by judiciously using keyframes and adjusting the levels of each side of the clip, I am able to control which channel is audible.
This maintains sync and doesn’t require any separate steps. The only disadvantage, and it is a big one, is that you can’t pan an isolated channel. In other words, the right channel is locked to the right and can’t be panned center.
SETTING KEYFRAMES
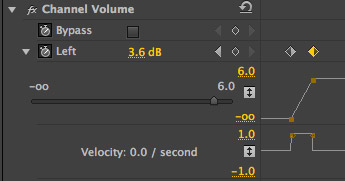
To set keyframes for channel levels, make sure the stopwatch icon is enabled (dark). Move the playhead where you want to create a keyframe and slide the channel gain slider. In this screen shot, I added two keyframes: the one on the left is to make the audio dead silent, the one on the right increases the gain for that channel to full volume. (The gold diamond keyframe indicates a selected keyframe.)
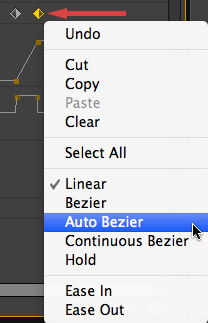
If you right-click a keyframe, as illustrated here in the Effect Controls panel, you get a variety of Bezier shape options. If you want to add a bit of smoothness to an audio keyframe transition, the best choice is “Auto Bezier.” The others are better suited to video animation.
OPTION 3: SEPARATE BUT ATTACHED
What we need is the ability to separate the two channels, without losing sync, yet able to adjust volume and pan separately on each clip.
We can do this by reassigning audio channels. Here’s how.

Select the clip in the Project panel that you want to modify. Choose Clip > Modify > Audio Channels (you can also right-click the clip itself to get to this menu.)
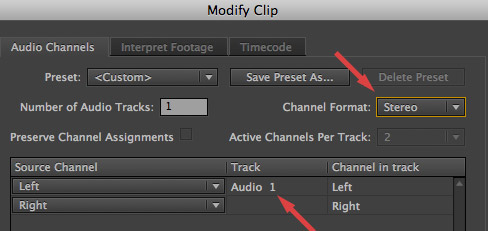
The Modify Clip dialog appears and, notice, in the gold box, the Channel Format was assigned to Stereo when the clip was first imported by Premiere Pro.
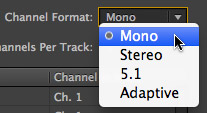
Change the Channel Format from Stereo (the default setting of the clip) to Mono. This separates every track into a separate mono track.
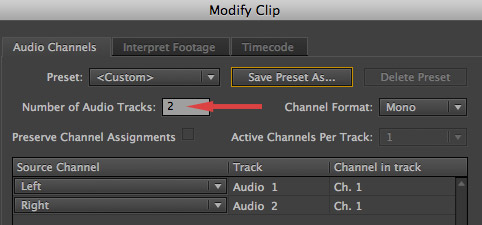
Next, set the number of audio tracks to 2. This tells Premiere how many separate audio tracks the clip contains. (For example, a surround clip, separated into mono tracks, would have six audio tracks.)
Notice that the left channel is assigned to Audio Track 1, while the right channel is assigned to Audio Track 2.
Click OK to save changes to the clip.
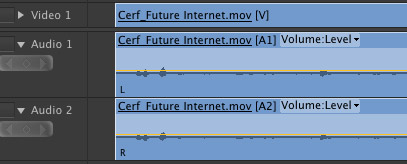
Now, when you edit the clip to the Timeline, each channel is assigned its own track and panned to the center. This allows you to edit and adjust each track independently, without losing sync with the video.
This is very cool.

2,000 Video Training Titles
Edit smarter with Larry Jordan. Available in our store.
Access over 2,000 on-demand video editing courses. Become a member of our Video Training Library today!
Subscribe to Larry's FREE weekly newsletter and
save 10%
on your first purchase.
6 Responses to Premiere Pro CS6: Isolate Audio Channels
Thanks Larry
Good to know
But as I can in FCP 7 and Avid MC I would like to have the ability to listen independently , adjust level and Pan BEFORE editing to the timeline
Seems that I can only look at effects panel once clip is in the timeline …. Is that right ?
So how can I adjust my audio in the source side
On FCP 7 I would use audio mixer set to auto so it would recognize that I was on the source side
Many thanks and keep up the good work
All the best
David
Thanks, Larry. You can also change your left channel to center-panned mono audio after the clip is in the timeline by going to Modify- Audio Channels and selecting Left for both Source Channels. But if you had two lavs on each channel and needed to control them independently, I don’t see a way to do this if you didn’t first modify the clip before it was moved to the timeline. Kinda disappointing. I miss the ease with which this was done in FCP7. Even FCPX seems to handle it better, unless I’m missing something. You just have to be diligent about modifying your audio clip before you cut it in.
Having got just one audio channel and no video, what is the best way to save it and make a CD with Nero?
The Channel Format is grayed out. Why can’t I use this feature?
I’m coming from FCP7 to Premiere (with a little step out to FCPX) and I’m looking for an EASY way to pan the audio to the centre. In FCP7 it was the shortcut ‘ctrl’ + ‘.’
Also adjusting the volume by pressing ‘shift’ + ‘cmd’ + ‘L’ is such a fast way for leveling audio. I miss it!!
Any alternatives for this?
-Dirk
Greyed out for me too.