
![]() One of the features that I really like about the Nov. 2015 update to Adobe Premiere Pro is that the Video Limiter can now be applied during an edit, during an export, or during compression using Adobe Media Encoder.
One of the features that I really like about the Nov. 2015 update to Adobe Premiere Pro is that the Video Limiter can now be applied during an edit, during an export, or during compression using Adobe Media Encoder.
Really, really cool.
But… if you don’t know what the Video Limiter does, you are probably not very impressed. So, let me explain what this filter does.
NOTE: The equivalent to the Video Limiter in Final Cut Pro X is called “Broadcast Safe” and works similarly to the Video Limiter.
BACKGROUND
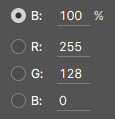
Video gray-scale and colors are defined based upon the bit-depth supported by the video codec. Most cameras record video using 8-bit video codecs, which uses 256 values to define a color or gray-scale. For example, black has a value of 0, mid-tone gray a value of 128 and white a value of 255.
NOTE: 10-bit codecs use 1,024 gray-scale/color value settings while 12-bit codecs can use up to 4,096. (Now you see why 12-bit codecs create such huge files.) The new HDR video standard uses 10-bit settings to improve the contrast in an image.
The problem is that while digital cameras can record, and the web can display, video using all 256 values, broadcast and cable can’t. The reasons are technical and deeply embedded in the video distribution chain. This won’t change in the near future.
NOTE: While the web can display all gray-scale values, I tend to use the Video Limiter on most projects to keep my white levels under control. I will probably change my opinion on this as I start to work with HDR later this year.
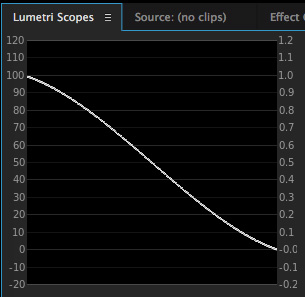
This white line represents all the legal, or “safe,” gray-scale video levels that are allowed in a program designed for broadcast or cable.
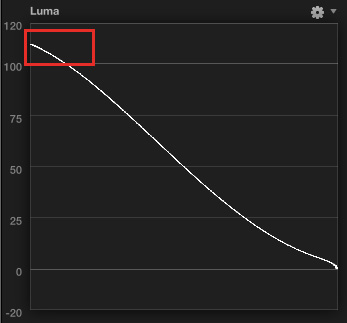
However, this line represents all the gray-scale video levels that could be recorded by a camera.
NOTE: The astute among you will say, “Hey, that scope isn’t in Premiere!” You are right. Premiere clamps imported graphics files at 100%, regardless of what the values were when they were created. This scope is from Final Cut Pro X, so I can illustrate this point.
If video exceeds 100%, or goes below 0%, it falls into a range of illegal values that will get your program bounced by Quality Control (QC) at the broadcast station and you’ll be forced to correct the bad video before the station will accept it.
NOTE: Broadcast stations can be fined by the FCC for excessive white levels, which can cause unintended frequency shifts in a transmitter. This is why they are so strict about it. Excessive white levels cause compression problems for cable companies at their head-end.
FIXING THE PROBLEM
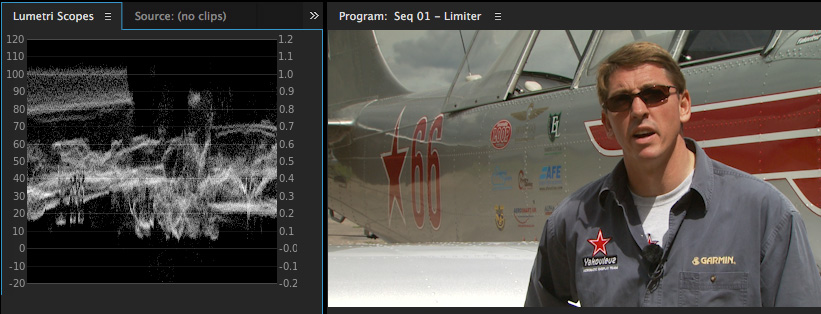
Here’s a typical example: an interview, where the white levels from the metal plane exceed 100% on the left side. (White levels go up to about 104%.) There are two ways we can fix these excessive white levels:
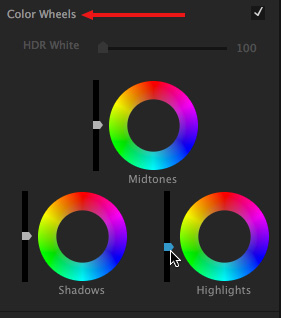
Using the Lumetri Color > Color Wheels > Highlights slider, we can lower the white levels to a legal value.
For example, here, the white levels are below 100% and perfectly safe.
NOTE: The rules state that white levels must not exceed 100%. However, nothing prevents you from making white levels as dark as you want to create a specific look. For example, I generally prefer to set white levels around 97% when I’m color grading a program for broadcast just to make sure nothing goes over the top.
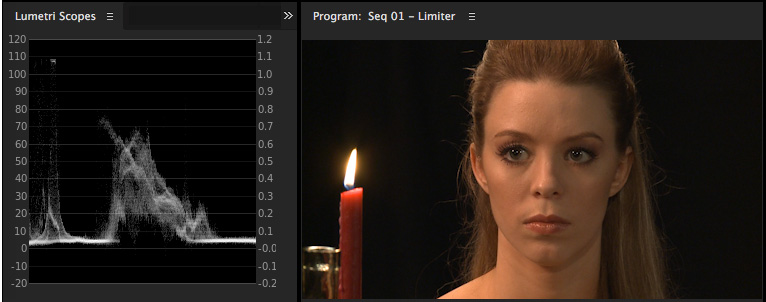
Adjusting white levels is a perfect way to fix excessive highlights, however, it lowers the overall brightness of your scene. What if those excessive levels are caused by something like a candle? In this case, you don’t want to lower the overall brightness of a scene just to keep the flame of a candle legal.
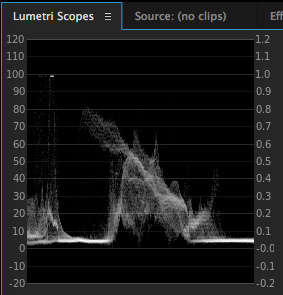
That’s where the Video Limiter comes to the rescue. It “clamps” all excessive white levels and prevents them from exceeding 100%.
NOTE: You’ll find the filter in: Effects panel > Video Effects > Color Correction > Video Limiter (or just search for limiter).
To apply the filter simply drag it on top of a clip, or, even better, add it to an adjustment layer to filter all your clips at once. (Adjustment layers are my preferred way to apply the Video Limiter.)
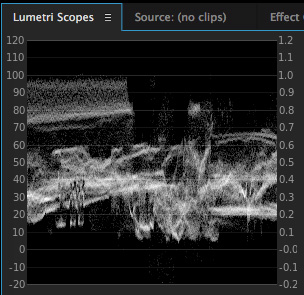
Instantly, that excessive white level is “limited to” 100% of gray-scale value.
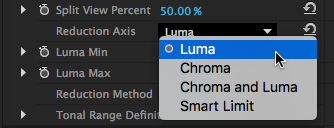
NOTE: If white levels don’t seem to be limited, go to Effect Controls and change the Reduction Axis from Smart Limit to Luma or Luma and Chroma. I don’t recommend using Smart Limit, because I don’t see any changes to white levels on the Waveform monitor after that setting is applied.
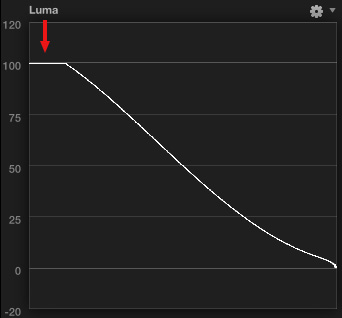
What the Limiter is doing is clamping, or reducing, all white levels over 100% to exactly 100%. (Again, this scope is from FCP X, so you can see the effect of the filter.)
The good news is that the filter works perfectly. The bad news is that when you clamp values, you lose any detail (texture) in the image. For the flame of a candle, that’s not a problem – unless you are doing a candle commercial. But, for the delicate white lace of a wedding dress, it turns the entire dress into mush – which would not win you any points with the bride.
So, to summarize:
AUTOMATING THIS PROCESS
So far, we’ve applied the Video Limiter on a clip-by-clip basis, or using an adjustment layer. Now, with the latest update to Premiere, we can also apply this filter automatically, during export.
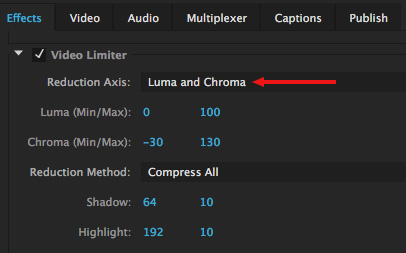
To do so, choose File > Export > Media, then, in the Export Settings panel, click the Effects tab and check Video Limiter. Set the Reduction Axis to either Luma or Luma and Chroma and leave the rest of the settings alone.
Then, when you export the file, any excessive white levels will be safely clamped.
SUMMARY
The Video Limiter allows you to control how excessive white levels are handled.
The big benefit to using the Video Limiter during export is that once you’ve adjusted all the white levels in scenes you care about, you can apply the Video Limiter during export as protection that anything you missed doesn’t get rejected by QC.
In other words, you can make your programs broadcast safe on export without doing any additional work. And, as an added benefit, this automated way to apply the Video Limiter works exactly the same in Adobe Media Encoder, so you can clean up files without having to first move them into Premiere.

2,000 Video Training Titles
Edit smarter with Larry Jordan. Available in our store.
Access over 2,000 on-demand video editing courses. Become a member of our Video Training Library today!
Subscribe to Larry's FREE weekly newsletter and
save 10%
on your first purchase.
5 Responses to Premiere Pro CC: What Does the Video Limiter Do?
what does one do when the video limiter on export doesn’t clamp black levels? I see this all the time in SD that’s been scaled up, and I even see it in HD video material that’s been stylized by our graphics department (end tags/closes). Before a problematic area is rendered, timeline shows yellow or red, there is no sign of illegal blacks. upon rendering, the illegal blacks present themselves. we’re using external Blackmagic Ultrascopes to monitor levels; illegal blacks also present themselves in the Premiere scopes. With Blackmagic, the illegal areas show as red below the 0 line. The video limiter on export never fails to clip any stray whites, but fails with the blacks. I have my Luma (Min/Max) set for 0 and 98 (ultra conservative on the whites).
Currently we’re still using CC 2015.4 on Mac (because of 3rd party integration issues with DAM system not being compatible above 2015.4 at the present… we’ll be switching to PCs and cc2018 in July).
Any ideas or suggestions?
Thanks!
Bryce:
No suggestions at the moment – let me check with Adobe and see if I can learn anything. This may be fixed in a more recent version.
Larry
Bryce:
My contacts at Adobe tell me: “I know there have been changes to the video limiter (and specifically, more coming soon!)… However, I don’t remember the issues from that previous version of PPRO, but it’s very possible it was a bug and/or something that was fixed in the later versions; I just don’t know for sure. ”
Given the changes made to the Video Limiter over time, I lean toward this being a bug.
Larry
Hello, as a new editor – I notice that when I export with a YouTube 1080p compression setting and upload to my YouTube channel as a test, faces that are set to 70% on the timeline look fine on a computer monitor but way too hot on a 4k smart TV. I am looking for a way to adjust the video levels across many clips because individual adjustment is way too inconsistent. Would an adjustment layer work for this? Maybe Any ideas? Thank you
Craig:
Be VERY careful here. How do you KNOW your Smart TV is color-accurate? You don’t. Have you verified that the colors on your computer monitor are accurate? They may not be. Never let one display device determine whether your color is accurate or not.
Color management is very, very difficult – it’s why Apple invented ColorSync. We have no control over end-user devices. So, your goal is to make sure your computer monitors are calibrated and accurate so that you know you are seeing the color colors during your edit.
Here’s an article that can help:
https://larryjordan.com/articles/review-datacolor-spyderx-elite/
Larry