
![]() Particles are a fascinating effect in Motion that are extremely flexible, but not easy to figure out. They’ve been around since the beginning of Motion, but I’ve never written about them before. Allow me to make an introduction.
Particles are a fascinating effect in Motion that are extremely flexible, but not easy to figure out. They’ve been around since the beginning of Motion, but I’ve never written about them before. Allow me to make an introduction.
NOTE: I’m using Motion 5.3 for this article. However, all the settings are exactly the same in any version of Motion 5, though the interface will look slightly different.
And, um, I’m writing this on Christmas Day, so there’s a bit more whimsy than usual. Brace yourself.
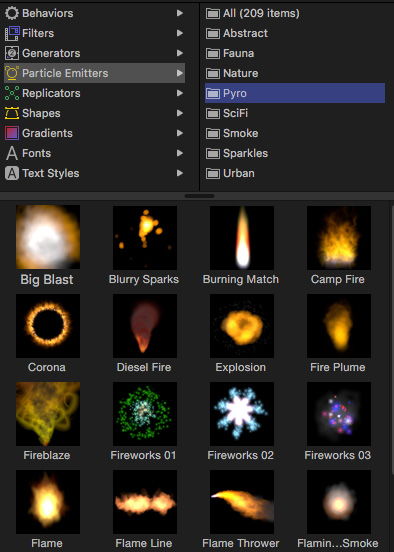
To get a sense of what’s possible, open the Library in Motion, click Particle Emitters and choose any category on the right. Each of these is a working particle system, from explosions to fog to falling leaves.
While you can easily modify any of these to create your own customized effects, instead, let’s create something simple from scratch so you can see how the different settings work.
GET STARTED
Particle effects, even the most complex, are built around a single image element. So, for this first example, let’s create steam pouring out of a smokestack and disappearing into the sky.
NOTE: This just creates the steam part. Adding it to an image – called “compositing” – would be a separate step and similar to adding effects in any video editor.
Create a new Motion project. Since we are just playing, leave the Project settings at their defaults; the effects process is the same regardless of video format or project duration.
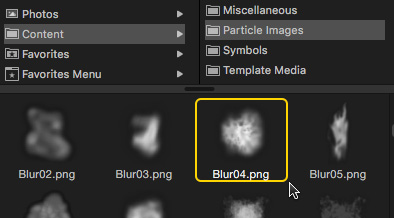
Go to Library > Content > Particle Images and drag Blur04.png into the center of the Viewer. (The exact location in the Viewer doesn’t matter, nor, for that fact, does the image itself. You can create particles from anything: accordions, butterflies, or pencils; though blurs work the best.)
It is always easiest to adjust particles in real-time, so press the Spacebar to start playing your project.
NOTE: This is one of the real strengths of Motion. It highly leverages the GPU in your computer so almost no effects require rendering before final export; though the frame rate may slow down when previewing complex effects.
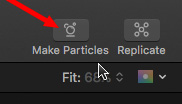
Converting this image into a particle is easy. Do one of the following:
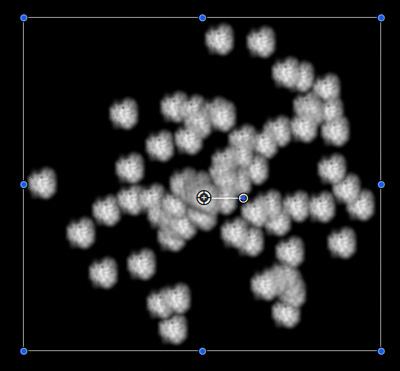
POOF!! Instant dust particles flying all over your screen.
Let’s get them organized so they are all flying in the same direction. Choose Window > Show HUD. (You can also press F7 or click the HUD icon in the interface.)
NOTE: With the latest interface changes between Motion 5.2 and 5.3, the fact that F-keys are disabled by the OS by default, and the introduction of the Touch Bar for MacBook Pro laptops, writing “where to click” instructions has gotten a LOT harder. This is why, for this article, I’m using menu choices.
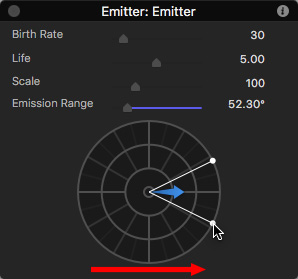
In the HUD, drag one of the white dots on the left around the edge of the circle to restrict the emission of particles into a small cone.
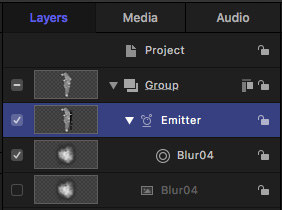
NOTE: If the HUD doesn’t display the particle system, or if you “lose” it somehow, go to the Layers menu and select Emitter. Motion supports multiple emitters and particle systems, but, for this introduction, we’ll just use one.
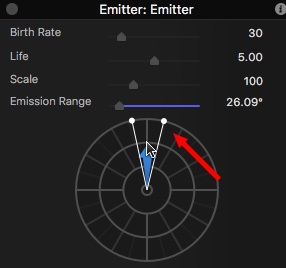
Click INSIDE the angle formed by the two white lines and drag around the circle to change the direction of the emissions. Dragging the blue arrow will increase or decrease the speed of the particles as they flow out of the center.
NOTE: In all these examples, the precise settings don’t matter. Give yourself permission to play. If it looks good/weird/wild/wonderful to you, then your settings are perfect.
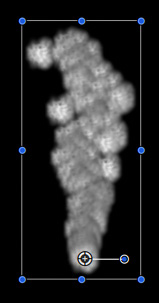
Your particles should now look something like this. Not bad. But there is a LOT we can do to truly, ah, mess this up.
EMITTER CONTROLS
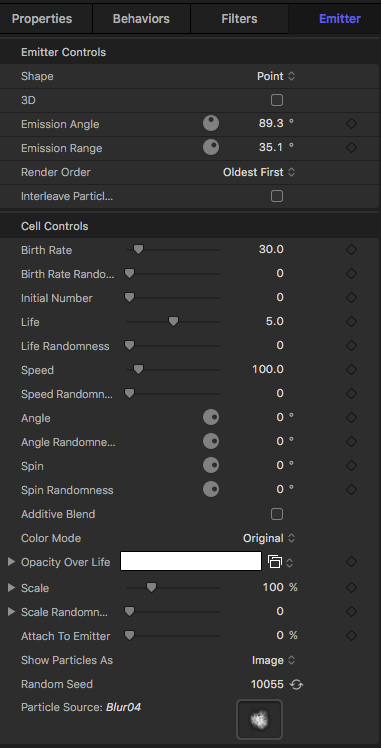
With the Emitter selected in the Layers tab, open the Inspector (shortcut: Cmd + 3) and click the Emitter tab.
DON’T PANIC!!
These are all the things we can tweak with a particle system, but you won’t need to use all of them all the time. (whew…) In fact, I’m going to ignore several of them for this introduction because they aren’t immediately essential.
NOTE: Like any other Motion effect, almost all of these can be keyframed, though most of the time you won’t need to keyframe anything.
The Emitter tab has two main sections:
Emitter Controls allow us to adjust the location from which the particles emerge. The Angle and Range settings mimic what the HUD was doing, except that the HUD makes it easier to visualize your changes, so most of the time I use the HUD to set these.
The two settings you’ll probably adjust the most are:
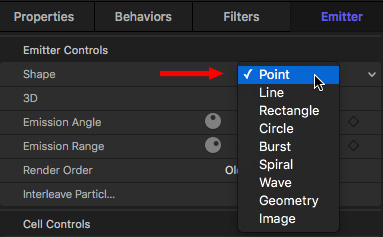
Shape alters the area from which particles emerge. The default is a point, but you can change this to a circle to create a ring of fire, or a line for a brush fire or a point for a smokestack.
Render Order determines if new particles are created in front of (Oldest Last) or behind (Oldest First) the existing particles. For our “steam-stack,” I’ll set this to Oldest Last.
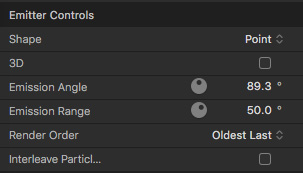
Play with these a bit, then set them to match my settings here. Again, don’t worry if your numbers don’t match exactly.
CELL CONTROLS
Cell controls are where the fun really starts.
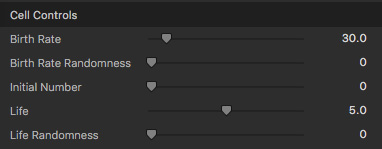
The first five lines control how many particles we are dealing with:
Randomness is a really neat feature. There are six of these controls. These allow us to add a sense of spontaneity, “organic realness,” or randomness to our creations so they seem more “real,” and less computer generated.
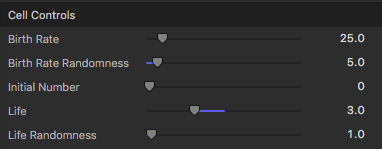
Play with these to see what they do. Then, when you are done, set them to the values illustrated here to stay current with me. Again, there is no magic in these specific numbers.
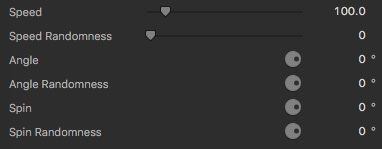
This next section determines what happens to a particle after it is “born.”
Most of the time, I find myself using Spin much more than Angle.
NOTE 1: For Angle and Spin to be visible, you need to choose an initial particle shape that isn’t symmetrical, otherwise, you won’t see the change in movement.
NOTE 2: When I write that “… does not change during the life of a particle,” I just realized that you CAN create change using keyframes. Hmm… I’ll save that for another article as this is just an introduction.
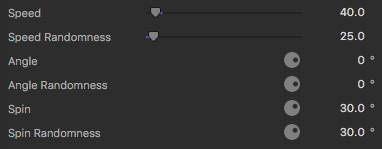
The easiest way to see how these work is to play with them during playback. When you are done, set them to these values.
ADDING FADES

However, steam doesn’t just appear then, poof!, disappear. It slowly fades away. That’s what Opacity Over Life emulates.
NOTE: Birth is on the left and death is on the right. Life is what happens between. Motion is very metaphysical.
The default is that every particle is fully opaque until it dies.
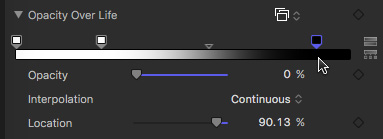
To have a particle slowly fade away, click inside the white bar to set a “change point.” Here, I’ve set two additional points. What this says is that the particle will be born fully opaque and stay opaque until it’s about 25% old, then slowly fade to transparent so that by the time it is 90% old it has disappeared.
You can change the timing of any of these squares by dragging. Change the opacity represented by selecting a square then adjusting the Opacity slider below it. You can change the speed of the transition by dragging the small triangle between two points.

If you want to match what I’m doing, here are my settings. (On the other hand, feel free to tweak wildly. There’s no “right” answer here.)
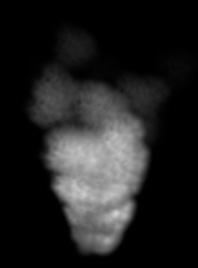
Before we mess with the colors, here’s what the final “steam-stack” looks like. Everything black is transparent, everything gray is translucent.
ADDING COLOR
While adding color doesn’t make sense for smoke, steam or fog, life would not be complete if we didn’t add color somewhere. So, I’ve decided that this is not a smokestack emitting fog. No. Too simple – everyone expects that. Instead, it is a party-colored fog being emitted from a pipe. NO one expects a party pipe.
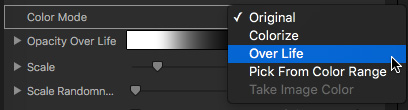
Set the Color Mode to Colorize to create a truly bilious, noxious cloud of evil vapor. Yuck!
Set Color Mode to Over Life and the particles change color as they age. (This Over Life setting is one of my favorites.) Click the pop-up menu to the right of Color Over Life (its covered in this screen shot by the menu) and pick a color combination from the popup menu, or create your own using the Color picker.
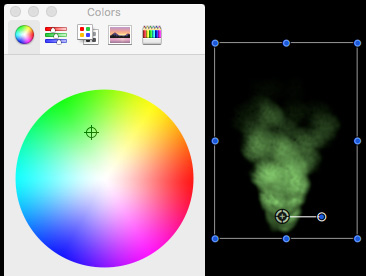
In the color picker, the top bar represents opacity over life, as we’ve just seen.
The bottom bar represents the range of colors a particle will assume over the course of its life. Existing boxes can be dragged, new boxes added by clicking inside the bar, and colors changed by clicking a box and modifying the settings below it.
My best advice here is just drag something and see what happens.
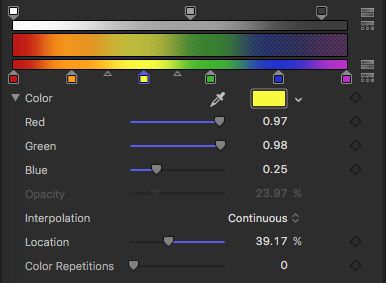
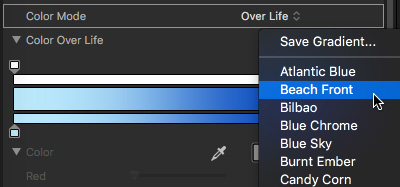
Here are the Rainbow settings from the popup menu. This creates the colors over life for our “party-stack.”
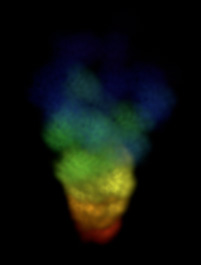
And these are the final results.
EXTRA CREDIT

You can now export this movie to composite into the video of your choice.
Or, create multiple plumes of steam by duplicating this Group into multiple streams, change colors… the possibilities are endless.
Look at the joy working with particles has brought our pipe smoker this holiday season!
Have fun!

2,000 Video Training Titles
Edit smarter with Larry Jordan. Available in our store.
Access over 2,000 on-demand video editing courses. Become a member of our Video Training Library today!
Subscribe to Larry's FREE weekly newsletter and
save 10%
on your first purchase.
2 Responses to Motion 5: Introduction to Particle Effects
That was a fun exercise, Larry. I published it as an FCP Generator along with many of the Emitter and Cell Control parameters so that I could customize it to a scene.
Philip:
Very cool – glad you liked the exercise.
Larry