
![]() The “Ken Burns effect” was made popular by documentary filmmaker Ken Burns who brought stills to life using pans and zooms. Final Cut Pro X took this effect and built it into the software. (At the end of this article, you’ll see an update covering a new feature Apple added in the 10.1 release.)
The “Ken Burns effect” was made popular by documentary filmmaker Ken Burns who brought stills to life using pans and zooms. Final Cut Pro X took this effect and built it into the software. (At the end of this article, you’ll see an update covering a new feature Apple added in the 10.1 release.)
There are actually two ways to create this effect:
The advantage to the automated tools are that they are fast and easy. However, this always uses the entire duration of the clip. The advantage to keyframes is that you can animate a complete clip, or just a portion of the clip. However, keyframes are somewhat harder to use.
This article illustrates both techniques.
CREATE MOTION USING THE “KEN BURNS” EFFECT
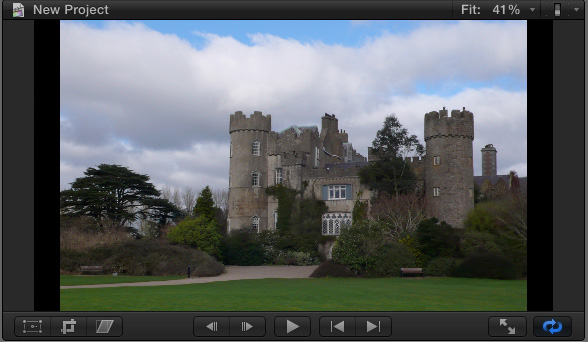
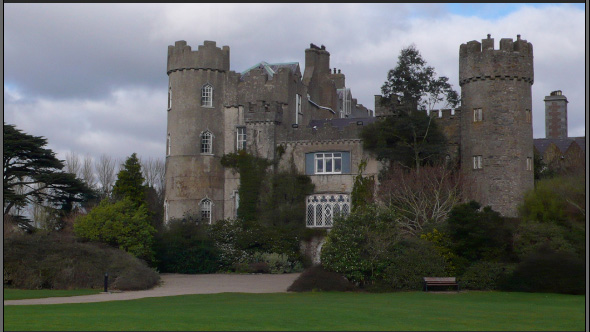
To apply the Ken Burns effect to a still image or video clip, select the clip in the Timeline. (This is a photo I took of Malahide Castle just outside Dublin, Ireland, when I visited recently on a seminar tour.)

Click the Crop icon in the lower left corner of the Viewer….
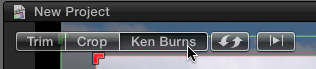
Then, click the Ken Burns effect in the bar at the top.
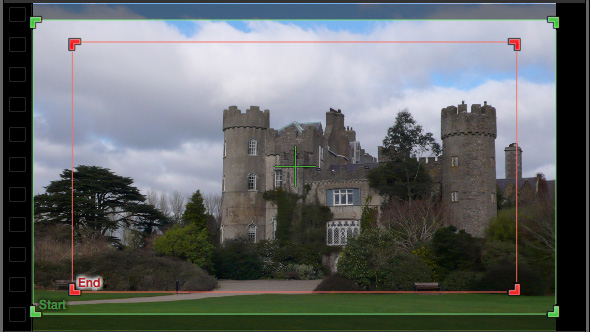
Two rectangles are displayed. The green rectangle shows the image displayed at the start of the clip. The red rectangle shows the image displayed at the end of the clip.
NOTE: The Ken Burns effect always runs the entire duration of a clip. If you want it to only run for a portion of the clip, cut the clip with the razor blade.
Click inside the green rectangle, but NOT the red rectangle, which selects the green rectangle – this sets the starting position. Drag the corners of the green rectangle to size the starting image. In this case, I’m selecting a wide shot in the lower right portion of the frame.
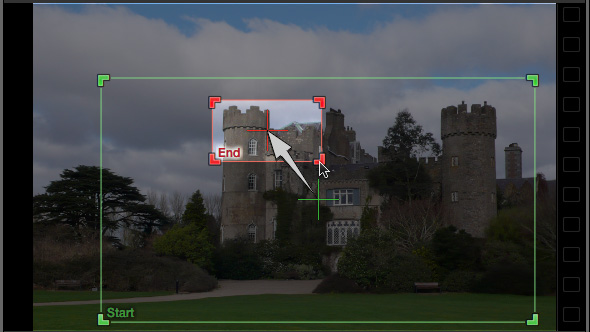
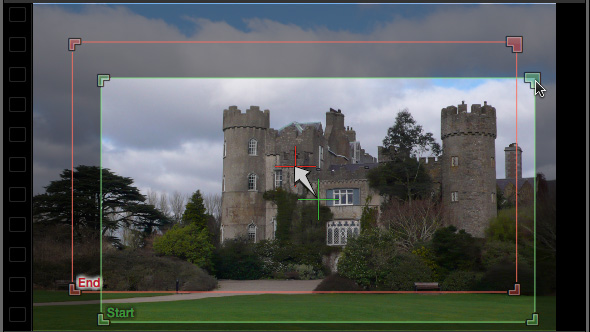
Then, click inside the red rectangle to select it and size and drag it until you get the ending image you want. In this case, I’m zooming into the top window of the turret, to highlight where the fair princess is being held captive by … well, I guess you know that story.
The white arrow shows the direction of the movement.
NOTE: Avoid zooming an image too large in the frame. Since video always deals with bitmapped images, zooming too far simply creates fat pixels — which look ugly. Here’s an article on sizing still images for video.
Press the up arrow key to move to the beginning of the clip and press Play.
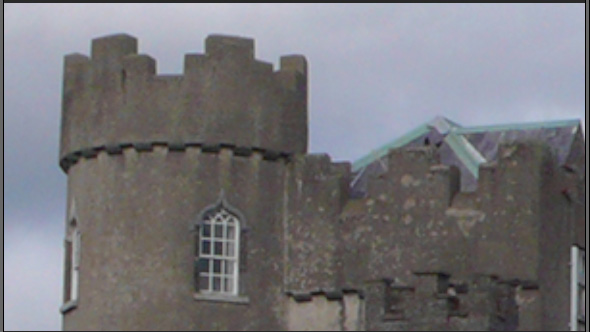
The clip smoothly zooms from the starting to the ending position. (In fact, for the smoothest moves, you’ll need to wait for the clip to render. However, even before rendering is complete, you can get a good idea of what the move will look like by pressing Play.)
That’s it. Fast and easy. And done.
UPDATE
There’s a new option that Apple added with the 10.1 update to Final Cut Pro X: we now have the ability to change the acceleration and deceleration at the beginning and end of the Ken Burns effect.
The default setting used to be that the effect would start and end slowly, but speed up in the middle. Now, when we right-click (Control-click) inside the Viewer on the selected clip, four options appear:
Ease In and Out accelerates at the beginning and decelerates at the end of the effect.
Ease In decelerates at the end of the effect.
Ease Out accelerates at the beginning of the effect.
Linear maintains the same speed throughout the effect.
CREATE MOTION USING KEYFRAMES
The only problem with this approach is that is always uses the entire duration of the clip and, if you want it to change speed or pause in the middle of a move, you can’t. For that level of complexity, you need to use keyframes.
DEFINITION: A keyframe creates a change during playback. Virtually every parameter in FCP X can be keyframed. And you always use keyframes in pairs – a starting and ending keyframe.
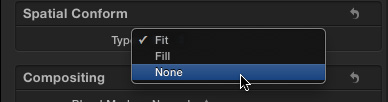
When manually sizing and positioning images, select the clip, go to the Inspector (Command+4), and set Spatial Conform to None. This displays the image at its full resolution, without scaling. (Here’s an article describing Spatial Conform.)
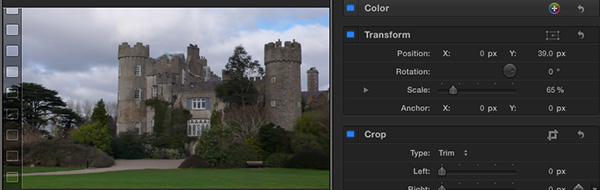
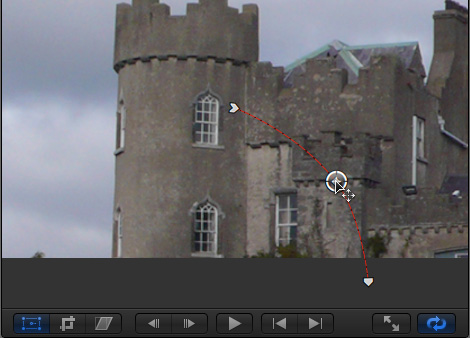
Position your playhead in the clip where you want the move to start and make sure the clip is still selected. Then, adjust the Transform settings in the Inspector until you have the starting position for the image. (In this example, I want the move to start one second in, scaled the image to 65%, and moved the image up 39 pixels.)
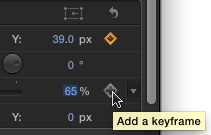
Because we need to adjust scale and position during this move, we will need to set a starting and ending keyframe. Keyframes are set for each parameter you want to change – in our case, that means Scale (size) and Position.
Click the gray diamond with a plus sign to set a key frame for both Position and Scale (two keyframes total).
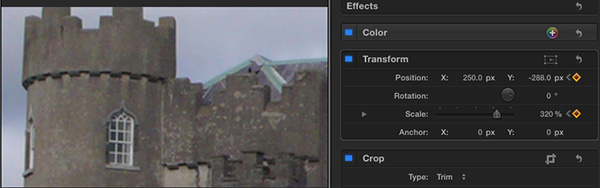
Next, move the playhead where you want the move to stop. Adjust both Scale and Position until you get the final position set. Because you already created keyframes for these settings, Final Cut automatically records ending keyframes.
In other words, you only need to create the starting keyframes. After that, FCP creates all other keyframes for those parameters automatically.
Play your clip and watch as the move starts in the middle of the clip and ends before the end.
Now, things get interesting.
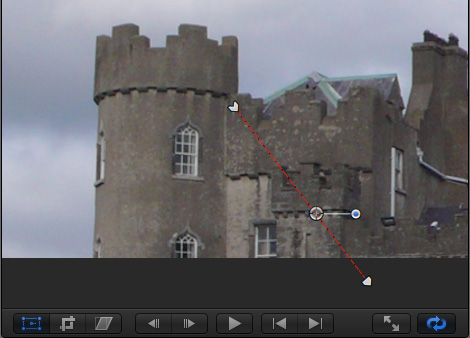
Click the Transform icon in the lower left corner of the Viewer which displays a red Motion Path, showing the movement of your image.
Grab the white ring (which represents the center of your image) and drag it. Notice that the motion path turns into a curve!
Click the new position keyframe you just created and two Beziér curves are displayed.
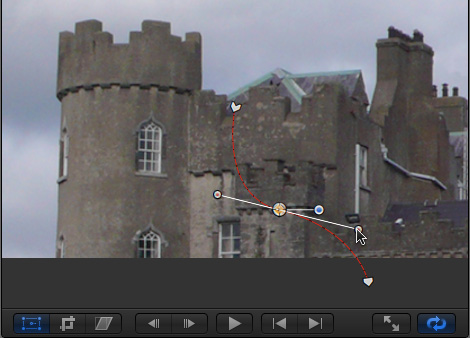
Grab one of the handles and drag it to change the angle of the curve. Make the handle longer to smooth the curve, make the handle shorter to sharpen the curve.
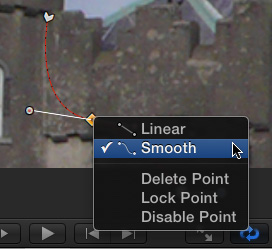
Right-click any keyframe to switch between linear (straight-line) and smooth (curves). You can also use this pop-up menu to delete, lock, or disable keyframes.
SUMMARY
The Ken Burns effect is fast, and makes image alignment simple. However, you have much more flexibility and control by using keyframes.
Now, you have a choice.
NOTE: I’ve created an entire series of video training cover Final Cut Pro X. Take a look here to see what’s available.

2,000 Video Training Titles
Edit smarter with Larry Jordan. Available in our store.
Access over 2,000 on-demand video editing courses. Become a member of our Video Training Library today!
Subscribe to Larry's FREE weekly newsletter and
save 10%
on your first purchase.
25 Responses to FCP X: "Ken Burns" Effect [u]
Newer Comments →-
 David Dixon says:
June 11, 2012 at 6:05 am
-
 Aaron Walker says:
November 23, 2012 at 3:01 pm
-
 Larry Jordan says:
November 23, 2012 at 4:18 pm
-
 Aaron Walker says:
November 24, 2012 at 6:26 pm
-
 Larry Jordan says:
November 24, 2012 at 9:26 pm
-
 David Resce says:
February 17, 2013 at 6:36 pm
-
 Larry Jordan says:
February 17, 2013 at 8:30 pm
-
 Milla says:
February 27, 2013 at 5:30 am
-
 Dave Garth says:
March 24, 2013 at 2:00 pm
-
 Larry Jordan says:
March 24, 2013 at 2:29 pm
-
 Ronald de Lange says:
July 15, 2013 at 6:03 pm
-
 CL says:
April 17, 2013 at 2:08 pm
-
 Larry says:
April 17, 2013 at 10:20 pm
-
 CL says:
April 18, 2013 at 6:13 am
-
 Arnie Blum says:
June 25, 2013 at 4:42 am
-
 Larry Jordan says:
June 25, 2013 at 7:13 am
-
 Arnie Blum says:
June 25, 2013 at 7:54 am
-
 Terry says:
July 6, 2013 at 8:18 am
-
 Arnie Blum says:
July 7, 2013 at 8:28 am
Newer Comments →I find the Alex4D free plugin Smooth Move to be an excellent third way. It allows you to put holds at the beginning and/or end of a Ken Burns-like move, automatically beautifully smoothed. It’s an excellent compromise between the ease of Ken Burns and the power of keyframes. I consider it a must-have plugin.
I really can’t find this answer…. How can I set the “End” frame so that it fits perfectly to the shot; I can attempt dragging the frame around for 4 minutes but sometimes get not the whole frame and sometimes I have some “black” on the edges… THANKS!!!
Aaron:
Hold the Option key down while you drag a corner of the red image. This scales the image from the center of the frame. At which point, it becomes very easy to see when your image fills the frame.
Larry
Hmm.. That doesn’t seem to be having the intended effect. I’ll keep trying. What could I be doing wrong… THANKS for the response though! 🙂
One more thing – can I disable the magnetic effect when I’m cropping images? For instance, I’m placing a “paper” image at 50% opacity behind some text to give it some clarity and it’s wanting to snap to some yellow lines – I’m familiar with this in Pages, and can disable the feature, but haven’t found it here yet.
I JUST moved from iMovie – thanks for the patience 🙂
The yellow lines are called Guides and display the horizontal and vertical centers of the image. You can turn off snapping by typing the letter “N” . This is a toggle, it turns snapping on or off.
Larry
How can I apply the ken burns effect over all the photos quickly then adjust from there? Going through one by one takes a long time
David:
Consolidate all your clips into a Compound clip, then apply the Ken Burns effect to it. This will treat all the images in the Compound clip as a group.
OR… apply the Ken Burns effect to one clip. Select the clip and copy (Edit > Copy) it.
Then, select all the other clips you want to apply the effect and choose Edit > Paste Effects. That Ken Burns effect is now applied to all selected clips.
Larry
Hi Larry,
I’ve a problem concerning the ken burns effect, but am unsure if it is to do with the files, the initial set up or the sharing. I used the effect extensively with layering, for a composition of scanned, cropped images. I shared it at different resolutions, 25 frames/second. The film judders and shakes through each Ken burn’s pan. I resized the images and re-rendered without success.
It may be simply solved – but I can’t locate clear instructions to resolve this problem.
With thanks
Milla
I would like to make two Ken Burns camera moves on the same still image. When I split the still photo clip with the blade, it’s almost impossible to match the end of the first clip to the beginning of the second. Or is there an easy way?
Dave:
Because the Ken Burns effects adds an Ease-in/Ease-Out acceleration to the ends of each move, matching is really tough.
A better idea is to create the move using keyframes, at which point, matching becomes MUCH easier.
Larry
Apply the Ken Burns effect to your still image. Then use the blade to split the clip. Both clips now have the same Ken Burns effect. Make the second clip active and open the Ken Burns effect in the Viewer. With the curved arrows button in the top left corner of the Viewer, switch the start and end rectangles, thus making the red rectangle the green start one. Now the start of the second clip is at exactly the same point as the end of the first clip. You can now use the red rectangle for the end of your new move on the second clip.
I cannot for the life of me get the menu to pop up when I click on the “crop” tool. When I click on it, nothing pops up at all. I’ve tried it with the clip selected in timeline, with a portion of the clip selected using the ‘range selection’ tool, and every other way possible. I’m using FCPX 10.0.8. Did they change something in this version or am I just missing something very obvious?
Where are you clicking? The menu appears in the Inspector, and on the icon in the lower left corner of the Viewer.
Larry
I was clicking on the “crop” icon in the lower left corner of viewer & in the Inspector. I figured out by accident what works, and it’s strange — I have to have the skimmer playing on the clip in Timeline, and click the “crop” icon in lower left corner of viewer. Then the menu of options shows up in the viewer – including the “ken burns effect.” Strange, but it’s the only way I can get that to pop up.
Hi Larry. So if using key frames, there’s no ease in/out function like fcp7?
Correct, keyframes in FCP X behave like keyframes in FCP 7.
Larry
Yep. Thanks Larry.
Hi Larry, Always enjoy your web offerings. They are as generous as they are informative. I am trying to apply rotation and Ken Burns effect to a photo that I want to use in a clip I am working on in FCP X. I am starting with a small piece of the photo, rotating, and pulling back in the view, but when I rotate I would like the rest of the photo to fill in the screen so there are not any abrupt edges to the rotating image. I thought I had read a comment by you somewhere else as to how to do that, but I can’t find it anywhere! Is there a way to use the rest of the image to fill the screen view while rotating it? Thanks. Terry
Great Larry.
Is there an “Ease in/Out after you apply the key frames and final moves? As you know FCP7 has it as a drop down.