 [ There are more than twenty significant new features in the 10.0.6 update to Final Cut Pro X. This article looks at one of them. Check out our latest training covering the Final Cut Pro X 10.0.6 update here ]
Chapter markers may not seem like a big thing, but Apple brought joy to a lot of hearts when it added them back to Final Cut with this release.
A chapter marker is a special kind of marker that is used to help viewers quickly navigate within a lengthy project. Chapter markers travel with the exported file and can be viewed when the movie is compressed for a DVD, or displayed to the web, or played in QuickTime.
Setting them in Final Cut Pro X is easy – as long as you have version 10.0.6 or later. Here’s how:
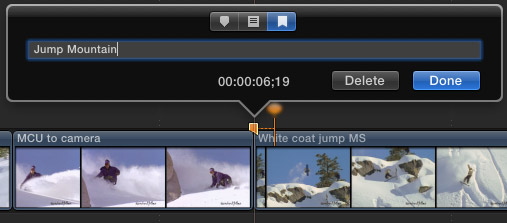
Open a project into the Timeline and put the skimmer where you want to place the Chapter marker. (If skimming is turned off, the position of the playhead is used instead.)
Type M, then type M a second time to open the Edit Marker dialog box.
By default, Chapter markers are named “Chapter” followed by a number. However, I generally rename my markers to indicate the subject of that particular section of the video. In this example, I’m renaming the marker to “Jump Mountain”.
Renaming a marker is not required, but I find it helpful, especially for DVDs

There are three types of markers:
NOTE: Only Chapter Markers export with the file. Click the far right marker icon at the top to set a chapter marker.
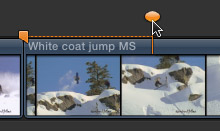
Chapter markers are indicated with the color orange and two icons: the marker and a poster frame pin. By default, the poster frame, that is, the image that’s associated with the marker, defaults to the frame the marker is on. However, you can change the marker’s poster frame by dragging the pin. This allows you to select a more representative poster frame for the marker.
Not all applications support poster frames, for instance, DVDs do not. However, for QuickTime movies, this gives you a greater range for selecting exactly the right image for your marker.
NOTE: Only Chapter Markers have pins that allow you to select poster frames.
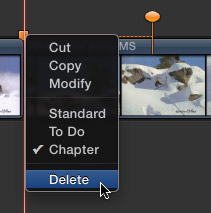
Once a marker is created, you can change it by right-clicking the marker and selecting the marker type you want to use. To delete a marker, select Delete.
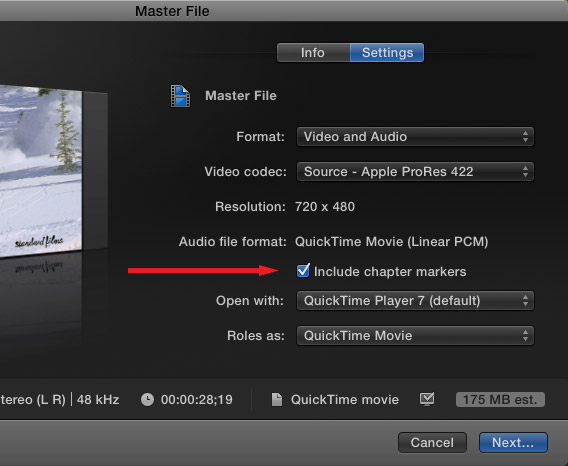
When you export your project, be sure the Include chapter markers checkbox is checked. In this example, exporting a master file, this is checked by default.

In QuickTime 7, you can see a list of all markers by clicking the marker name in the lower right corner of the window, next to the end of the Timeline.

In QuickTime Player X, click the Four Squares icon…
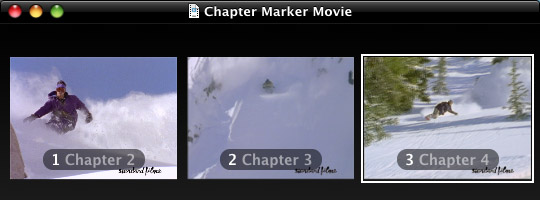
… to display a list of all markers associated with that movie.
The nice thing about chapter markers is that they will travel with a file even after it’s compressed. I use these markers all the time for DVDs or my H.264 training movies that are available for download or streaming.
It is REALLY nice to see these return to Final Cut Pro.
2,000 Video Training Titles
Edit smarter with Larry Jordan. Available in our store.
Access over 2,000 on-demand video editing courses. Become a member of our Video Training Library today!
Subscribe to Larry's FREE weekly newsletter and
save 10%
on your first purchase.
30 Responses to FCP X: Create Chapter Markers
← Older Comments-
 Ulli Jossner says:
March 11, 2017 at 7:55 am
-
 Larry says:
March 11, 2017 at 8:42 am
-
 Mary B says:
November 16, 2019 at 4:28 pm
-
 Larry says:
November 16, 2019 at 4:38 pm
-
 George Bumiller says:
February 26, 2021 at 5:24 pm
-
 Larry says:
February 26, 2021 at 6:16 pm
-
 Cory Langley says:
April 27, 2023 at 2:48 am
-
 Larry Jordan says:
April 27, 2023 at 5:01 am
-
 N Lewis says:
February 2, 2025 at 11:12 am
-
 Larry says:
February 2, 2025 at 4:50 pm
← Older CommentsSorry to ask this here, but I’m kind of desperate. Can you delete chapter markers in QT. I’ve replaced some parts in a QT film and QT created chapter markers without me noticing. Deleting them on a QT level would save me hours. Otherwise I’d have to export a 90′ film again.
Thanx in advance
Ulli
Ulli:
You can delete entire marker tracks in a movie using QuickTime 7 Pro. However, you can’t rename or delete individual markers.
However, you MAY be able to do so using MusicBrainz Picard. Check out this website to see if it can help you:
https://picard.musicbrainz.org
Larry
Is there a way that Chapter Markers can be made visible on a youtube clip
Mary:
No. But here’s the workaround:
http://www.onlinevideo.net/2013/10/create-chapter-points-…
Larry
Larry,
The workaround for chapter markers on youtube doesn’t seem to work for me…possibly it’s been deleted or changed.
Any current workaround?
George:
None that I know of, if these don’t work. Perhaps another reader will have a suggestion.
Larry
after placing all markers, can you batch process all of them into the orange ‘chapter marker’ or must you do it one by one?
thanx Cory
Cory:
You can’t do this natively in Final Cut.
You could export an XML file and change the marker types within the XML file, then reimport it.
I did a quick Google search but didn’t find any specific marker conversion tools.
Larry
You should make an additional set of instructions on chapter marker posters because I struggled with it for over a week until finally figuring it out. Here are the key points: 1) the orange circles in FCP to position chapter poster marks can not span a gap in a layer on the FCP timeline. FCP will let you position it there but will then spontaneously reset the position to be at the end of the clip in that layer. The workaround is that chapter marks and the associated chapter poster mark can be in any layer in the timeline, even one that is V(voided), and they will still work fine and stick as positioned as long as there are no gaps in footage in that layer. 2) If one exports a file using FCP, the chapter mark poster images will not be exported. Instead one must export the file using File: Share to Compressor to also export the chapter marks along with the chapter poster frame images set by the orange dots in the FCP timeline. 3) In compressor, and not in FCP, one also has the option to use any arbritrary image as the chapter mark poster image, by selecting the chapter mark and then importing the image with the button “from File” in the chapter mark poster window that appears in Compressor. Figuring this out took me about a week of frustration and struggles and hopefully it will be avoided for others if you include and/or amend your very helpful instructions on chapter marks to include these pointers.
These are excellent notes! Thanks for adding them to this article.
Larry