 Recently, I got an email from a reader asking how to change Project Properties in Final Cut Pro X. It isn’t hard, but there are a couple of hidden steps.
Most of the time, when you create a project, the settings are fine; especially when you let your Project auto-configure itself based upon the first clip you edit into it.
However, every so often, you edit the wrong type clip in first and the Project configures incorrectly, or you want to change the image size, or the render format. Here’s how.
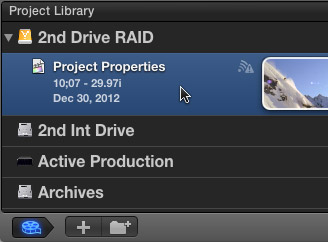
Select the Project you want to change in the Project Library.
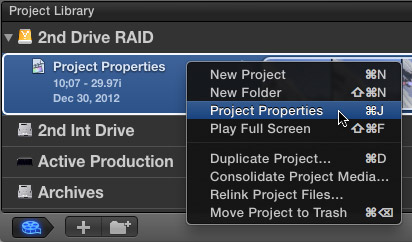
Then, either right-click the name of the project, type Command+J, or choose File > Project Properties.
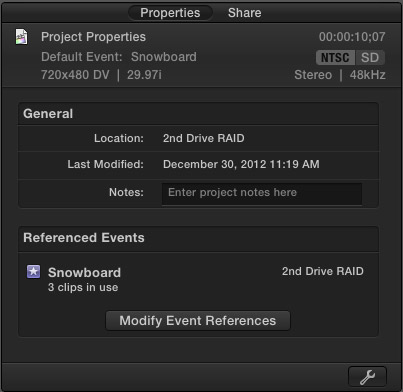
This opens the Properties tab in the Inspector.
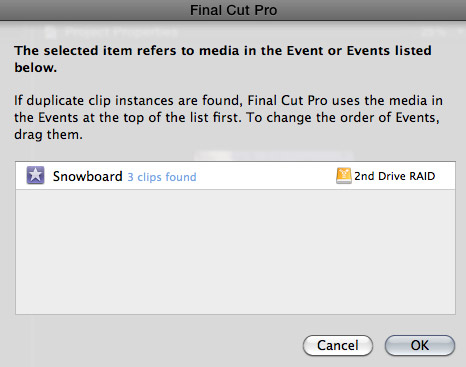
Clicking the Modify Event References button allows you view which Events are storing the media used in your Project. If you are using multiple Events, you can change their priority by dragging them up or down.
NOTE: Personally, I’ve never used this feature. However, it is nice to know it is here.

Click the Wrench icon in the lower right corner to open the Project Properties panel.
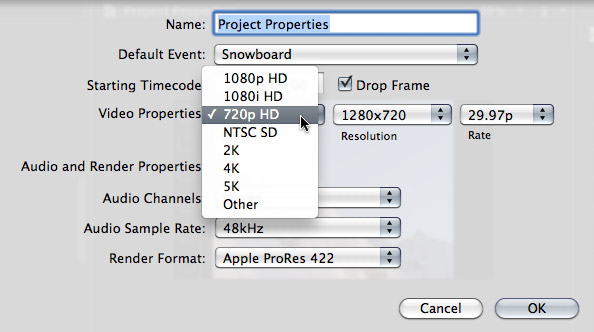
Here, you can change many of the settings of your project; including starting timecode and image size. However, once you have media edited into your Project, you are not able to change frame rate.
If you need to change the frame rate, the easiest thing to do is create a new Project, then copy the clips from the old Project and paste them into the new one.
NOTE: The best time to change project properties is when there are no clips edited into the sequence. When a sequence is empty, any property can be changed.
When you are happy with your revised settings, click OK.
Done.
2,000 Video Training Titles
Edit smarter with Larry Jordan. Available in our store.
Access over 2,000 on-demand video editing courses. Become a member of our Video Training Library today!
Subscribe to Larry's FREE weekly newsletter and
save 10%
on your first purchase.
51 Responses to FCP X: Change Project Settings
← Older Comments Newer Comments →-
 Max Federman says:
November 27, 2013 at 12:31 pm
-
 Larry Jordan says:
November 27, 2013 at 10:18 pm
-
 Ricardo Rico says:
January 29, 2014 at 1:15 pm
-
 Richard says:
December 20, 2013 at 11:47 pm
-
 Larry Jordan says:
December 21, 2013 at 12:44 am
-
 Chris says:
February 25, 2014 at 5:14 am
-
 Larry Jordan says:
February 25, 2014 at 3:16 pm
-
 Chris says:
February 25, 2014 at 5:01 pm
-
 Ryan says:
July 19, 2014 at 7:59 am
-
 LarryJ says:
July 19, 2014 at 1:24 pm
-
 Ryan says:
July 19, 2014 at 9:54 pm
-
 Ryan says:
July 19, 2014 at 10:27 pm
-
 LarryJ says:
July 20, 2014 at 10:36 am
-
 Suzi P says:
February 15, 2016 at 8:58 am
-
 Larry says:
February 15, 2016 at 10:10 am
-
 Suzi Piker says:
February 15, 2016 at 5:25 pm
-
 Larry says:
February 15, 2016 at 6:29 pm
-
 Suzi Piker says:
February 16, 2016 at 8:32 am
-
 angelo Bosco says:
November 14, 2016 at 10:12 am
-
 Manan fredriksson says:
March 22, 2017 at 2:16 am
-
 Kathy says:
May 18, 2018 at 8:12 am
-
 Larry says:
May 18, 2018 at 8:19 am
-
 Kathy says:
May 18, 2018 at 8:24 am
-
 Larry says:
May 18, 2018 at 8:26 am
-
 Kathy says:
May 18, 2018 at 8:44 am
← Older Comments Newer Comments →Larry– please please help with this workflow question…
Often in FCP 7 I use a method of scaling video footage where I set the sequence to 720p and then drag in 1080p clips of the same frame rate. When dragged in, the 1080p clips read 66.7% in the Scale settings. This allows for various re-framing to take place in the sequence. As long as 100% is not exceeded, the quality comes out great.
Now in FCPx, I am trying to use this same technique and found your helpful post here explaining how to change the project settings. What’s troubling is that when I insert a 1080 clip into the 720 sequence, the 1080 clip reads 100% in the Scale rather than 66.7%. In this case I am trying to reframe a rudimentary 8mm film transfer. I am loving the time saving background tasks and direct to Blu-Ray function but until I get this size issue worked out I will have to work in another program.
Very appreciative of any help– thanks Larry– great tutorials by the way; your DVDSP tutorial saved me days of my life a handful of years ago!
Easy – but different than FCP 7.
Select the clip you want to correctly scale in the Timeline of FCP X.
Open the Inspector and scroll down to Spatial Conform. Change it from Fit to None.
Done.
Larry
Larry, you’ve done it again! This is exactly the answer I was looking for as well! Just came over to FCPX and purchased your complete training. If this was mentioned in there I might have missed it.
Point is that I used this same method (using a 1080 clip in 720 timeline) to be able to make frame changes (such as shooting an interview with only one camera) and I’ve been banging my head against a wall trying to figure it out.
So long story short… THANK YOU LARRY for all that you do for Final Cut users!
Ricardo
Dear Larry,
I often find myself on your site when searching for solutions to FCPX issues. You’ve helped me so many times I felt compelled to let you know and say thanks. That doesn’t really do the subject justice but I’ve only got words and this box to convey the appreciation. Thank you for the time you generously put into this public site. I am happy that you reap what you sow and you will get compensated somehow and in some way.
Richard:
Thanks for the very kind words – they are much appreciated!
I enjoy what I do — especially when it has a chance to help someone else.
Thanks,
Larry
Hi Larry,
I have a project in FCP 7 that I mistakenly set at 720 in the sequence settings. I’m told I can’t copy and paste the clips into a new 1080 sequence and have those clips be in 1080, but would have to re-edit the whole thing (it’s 25 minutes long). Is that correct?
Thanks!
Chris
Chris:
Not correct.
Create a new project. Edit ONE clip that has the correct frame size and frame rate to lock the sequence.
Copy and paste clips from the old to the new project.
Delete the placeholder clip.
Done.
Larry
Great, thanks!
Hi Larry!
First of all, thank you for doing what you do! You are truly an editing genius! I’ve encountered one problem though that is driving me crazy… I’ve been editing a film and realized that this whole time it’s been NTSC SD/30fps, but I wanted to change everything to 720p/60fps. I used the above steps to copy my media over to the settings I wanted. However, my projects have been getting tweaked by Final Cut and I’m having to go back in and move everything back to the way it was! Is there any way to not have to do this? I’m surprised that this software can’t seem to copy everything EXACTLY the way it was.
Ryan:
If FCP X copies everything “EXACTLY” you’d be creating a new NTSC project.
In your new project, you need to change scaling because the images are different sizes, and, if you set preferences to Pixels as your measurement system, then all your keyframes are off because the images are different sizes between SD and HD.
However, any settings that don’t involve geometry – blurs, transitions, and color grades, for example – copy and paste between different projects with no problems.
Larry
Thank you for the swift response good sir! I learned the hard way on this one. From now on, I’ll set frame rates beforehand.
So you recommend changing Pixels to Percentages? And by scaling, are you referring to Spatial Conform?
Personally, I prefer pixels – however, others may prefer Percentages. I don’t have a recommendation.
And, by scaling I am referring to the setting in the Transform section of the Inspector.
Larry
Hi Larry,
I know this is an old thread but I’m hoping for your wisdom. I have a project that is comprised of 720 59fps (interviews and broll) and some 1080i (30fps broll).
My goal is to setup, edit and export this large project as best as possible from the onset.
I have two questions:
1) regarding size: should I edit on on a 720 and convert the 1080 down?
2) regarding frame rate: Knowing that my interview tape is 60fps … Can I still achieve optimal playback when it coverts on my timeline to 24 fps? Should I use another frame?
rate?
Everything was optimized when I was imported.
Best,
Suzi
Suzi:
The KEY!! thing is to edit your project based upon the format you need to deliver. If you are delivering 1080, edit 1080. If you are delivering 720, edit 720. Also, avoid changing the frame rate unless you have to. Match everything to your final deliverable format. If you are going to the web, there is NO!! benefit to changing the frame rate.
Larry
Larry,
Oh how I want the key 🙂 My final delivery format is flexible in the sense that I want the best possible product to be available via Vimeo. What settings might yield the best results knowing that I have to choose a size AND rate and then pull this unmatched footage in? Will my key interviews shot at 59.94 suffer at 24fps? What are the downsides of going with 720? Thanks so many times in advance.
Suzi:
Vimeo is VERY flexible and strongly prefers progressive instead of interlaced video.
Given what you’ve shot, I’d recommend editing 720p 59.94 and scale the 1080 footage into it. You’ll get the best quality for Vimeo that way.
larry
Thanks, Larry — Since I have some 29.97 footage — is there a downside of converting the 59.94 to 29.97?
Thanks so much for this- really helped
Hey Larry
I’ve just edited a project in 1080p which is now going to be shown in a cinema. They’ve requested the file be 2k/DCP which it obviously wasn’t shot in. Is there any work around?
Many thanks
Manan
I’ve usually shot interlaced but am noticing that when it’s compressed to 264 (unfortunate necessity) the lines are very apparent. I can shoot progressive on my Sony. Which is the better of the two to use? The pieces are for the web at the moment but client may ultimately want them on television. Thanks.
Kathy:
Always, always, ALWAYS!! shoot progressive. Always. It is easy to go from progressive to interlaced. It is life-altering to go from interlaced to progressive; worse, the images look terrible.
Larry
Thanks for your help. 29.97p?
Kathy:
Generally, you should shoot the frame rate you need to deliver. Changing frame rates after the fact is equally not fun.
Larry
Thanks! From now on, Progressive!