
![]() Final Cut Pro X provides a variety of ways to set audio levels: for an entire clip, a group of clips, or a range within a clip. You can also adjust audio levels using keyframes. This article looks at all these methods.
Final Cut Pro X provides a variety of ways to set audio levels: for an entire clip, a group of clips, or a range within a clip. You can also adjust audio levels using keyframes. This article looks at all these methods.
BIG NOTE: This article talks about HOW to set audio levels. It does not talk about WHERE to set levels. That is a much bigger debate because it all depends upon where your project is going to be viewed. The web has one “standard,” broadcast TV has another, theatrical films use something totally different.
From personal experience, I can tell you that the fastest way to get an audio argument started is to discuss where to set levels. Here’s an article I wrote a while back that can help explain this; the screen shots are from FCP 7, but the levels and definitions are still appropriate for FCP X.
GET READY

To display levels in the Timeline, click the Switch in the lower right corner and click any of the four icons starting from the left. (The last two display video only, and a reduced view that does not display either images or waveforms.)
NOTE: This may be an obvious first step, but, recently, I was demoing audio editing and could not figure out why my waveforms were not displaying. Until I, um, clicked the correct icon.

The Toolbar contains a small audio meter display. To reveal the larger audio meters, click the small meter display immediately to the right of the timecode display.

Depending upon your Project settings, you will either see stereo meters (left) or surround meters (right).
NOTE: To change project settings, select File > Project Settings, then, click the small wrench icon in the lower right of the inspector.
In the Project Settings window, change the Audio Channels to Surround. (Stereo is the default setting.)
HOW AUDIO LEVELS ARE MEASURED
Audio levels are measured in dB (deciBels). 1 dB is generally defined as the amount of volume change that can be perceived by an individual with normal human hearing. In other words, you won’t be able to hear the difference between a clip playing at 6.0 dB compared to a second clips playing at 6.2 dB. (This serves as a good reminder that just because you can measure it, does not mean you can hear it.)
Just off the top of my head, I can think of five different ways that audio levels are measured:
Final Cut Pro X measures audio as peaks, with audio levels displayed using dBFS (deciBels Full Scale). This causes a great deal of confusion for audio engineers who are used to measuring average volumes.
When we change audio levels within a clip, we are making a “Relative” change. This is a level change relative to the level at which the clip was recorded. Generally, dialog is recorded a bit softer on set so that actors can raise their voices without worrying that the audio will distort in the recording.
Music, on the other hand, is mastered as close to 0 dB as possible to take advantage of the full dynamic range (distance between the softest and loudest passages of music) that digital recording provides.
So, we most often raise dialog levels, and lower music clip levels. These changes are relative to the original recording volume.
The audio meters, though, display audio at an absolute level. This is precise, measure volume of the total mix. When it comes to audio LEVELS, never trust your ears. Always trust the meters. When it comes to the SOUND of your audio, always trust your ears.
NOTE: Audio is additive; the more audio clips that are playing at the same time, the louder the mixed audio level will be. Video is not additive; if you have four images on screen at the same time, the image is not four times brighter than if you had only one image on the screen.
CHANGE LEVELS IN THE TIMELINE

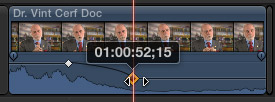
An easy way to set audio levels is to drag the black horizontal line located near the center of a clip up (to make the audio louder) or down (to make it softer).

As we raise, or lower, the black line, the waveforms in the clip change to reflect the changes in the audio for that level.
CHANGING LEVELS USING KEYFRAMES
I was really afraid of keyframes for a long while until I realized that a keyframe is “a point of change during playback.” If nothing changes during playback, then you don’t need to use keyframes. And we always work with keyframes in pairs; a starting position and an ending position.

To create a keyframe, Option+click directly on the black volume line. To change audio levels, drag the keyframe up or down.
To change the position of a keyframe, drag it left or right.
To remove a keyframe, click it so it is selected (gold outline) and press the Delete key.
CHANGING LEVELS USING RANGES
You can also use the Range tool (R) to select a range within a clip.

Then, inside the selected range, drag the black line up, or down. This changes the audio level of the entire selected range all at once.

What FCP X does is put a pair of keyframes at the beginning and end of the range. (At a recent webinar, Jari Innanen pointed out that using ranges a great technique to speed dialog editing.)
NOTE: Adjusting levels using ranges only applies to a single clip, you can’t adjust levels across multiple clips using a single range. (See the Secret Tip, below.)
INSPECTOR CONTROLS
In the Timeline, we can adjust levels for a single clip. In the Inspector, we can adjust levels for multiple selected clips.

For example, select a group of clips in the Timeline. Then, in the Inspector, change the Volume slider and the levels of all selected clips will be adjusted.
NOTE: This technique works for Pan as well.

You can also set audio keyframes for volume, or pan, in the Inspector by clicking the small downward-pointing triangle to the right of the settings section. However, while this is a great way to set pan, I generally prefer to set keyframes for audio levels in the Timeline.

To reset a clip back to its default settings, select the clip in the Timeline, then click the curved Reset arrow in the top right corner of the Volume and Pan settings in the Inspector.
Resetting deletes all keyframes, resets the volume level back to the level at which the clip was recorded, and resets pan back to its default setting.
NOTE: You can reset a group of clips, which also deletes all the keyframes they contain, using this same technique. Select all the clips you want to reset, then click the Volume reset arrow in the Inspector; or the Effects Reset arrow at the top of the Inspector to reset all Effects back to their defaults.
MENU AND KEYBOARD SHORTCUTS
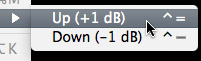
You can also set clip levels using Modify > Volume. Choose Up or Down to move the levels in the selected clips up or down in 1 dB increments. The keyboard shortcuts for these two commands are: Control+= (equals) and Control+- (dash).
COOL SECRET TIP
These two keyboard shortcuts give us a very cool technique that we can’t do any other way: adjust a selected range across multiple clips. Select a range that spans more than one clip. Type one of the two keyboard shortcuts mentioned above (or go to the Modify > Volume menu) to adjust the levels in all clips selected by that range.
This technique can be used for more than ranges, you can also use this for selected individual clips, or a group of selected clips.
Cool.

2,000 Video Training Titles
Edit smarter with Larry Jordan. Available in our store.
Access over 2,000 on-demand video editing courses. Become a member of our Video Training Library today!
Subscribe to Larry's FREE weekly newsletter and
save 10%
on your first purchase.


26 Responses to FCP X: Adjusting Audio Levels
← Older Comments-
 Mike Jung says:
January 22, 2023 at 5:42 am
-
 Larry Jordan says:
January 22, 2023 at 7:19 am
-
 Mike Jung says:
January 22, 2023 at 8:10 am
-
 DON SPENCE says:
June 19, 2023 at 11:30 am
-
 Larry says:
June 19, 2023 at 5:10 pm
← Older CommentsI edit a no-budget documentary in dual mono (interviewer’s and interviewee’s voices). I set the project property to output in stereo. I let the output gain meter in the compressor hover around 0dB with limiter on. But the stereo audio meters hover around -6 dB. I don’t understand the difference. Where can I find more information about applied audio theory. Now I am hesitating in doing the mix in FCPX. To use ProTools is too expensive for no-budget. Before I worked with a sound designer who made the mix, now I must do the mix myself. Which, say, economical workflow would you suggest to me? I cover the whole filmmaking process from concept to camera and to final output and audio is hardest, I need more training.
Mike:
I understand your concern. First, set the output gain to -3 dB, rather than 0. Virtually all social media services recommend a slightly lower audio peak (equating to about -15 dB in average, rather than peak levels.)
Second, I’ve see this same behavior in my own FCP mixes. For some reason, and I’m not sure why, FCP limits the gain per channel to around -6 dB for stereo mixes. The good news is that if your compressor output level is set to -3 dB, and FCP meters show around -6 dB, you’ll end up with a mix that sounds good and loud, is approve for all social media outlets and the client will be happy.
I am not really sure why this level change happens, but I’ve never had any problems with the results.
Larry
Thank you very much, Larry for your super fast help.
WHERE DO YOU SET OUTPUT LEVELS, LIMITER ETC.?
THANKS
Don:
I recommend you set the Output Level for the Limiter to -3dB. This equates to -14 LKFS, which is the preferred audio level for YouTube and other social media.
Larry